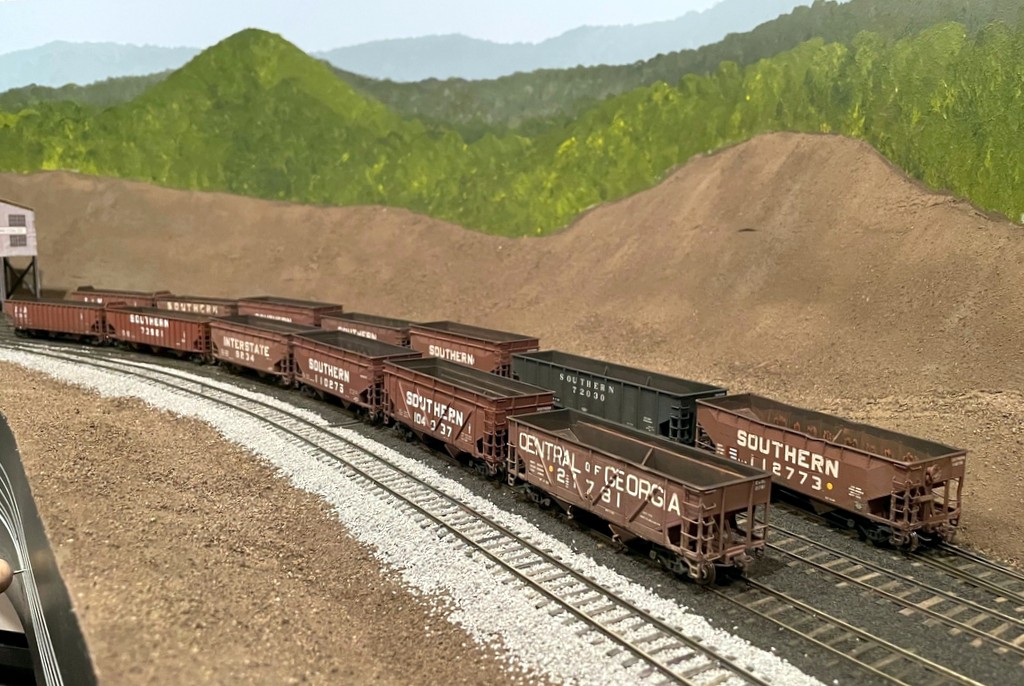
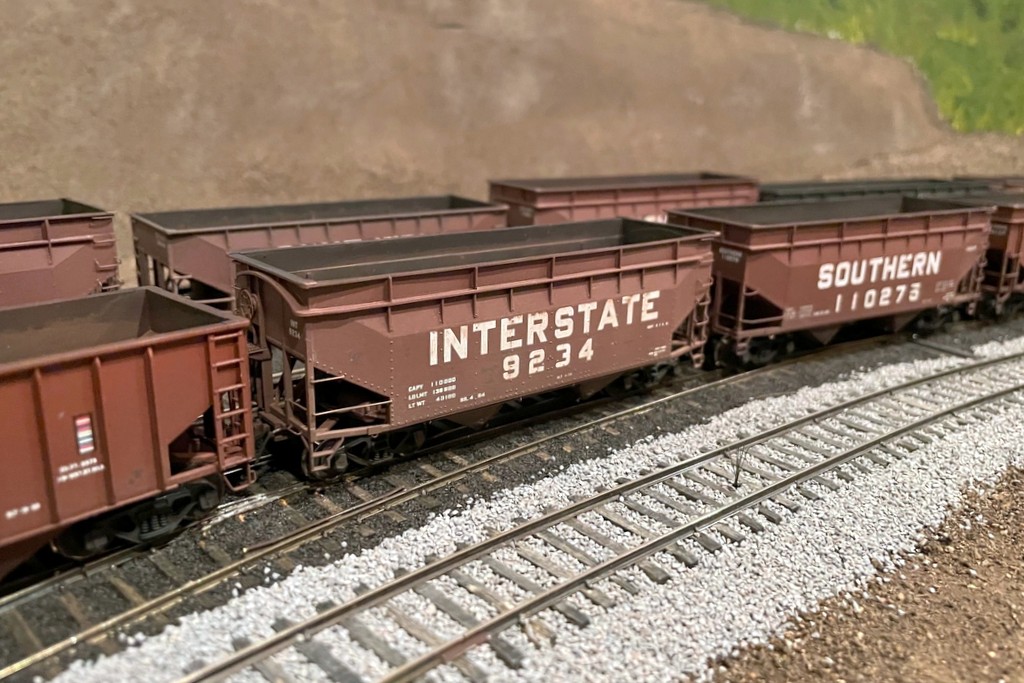
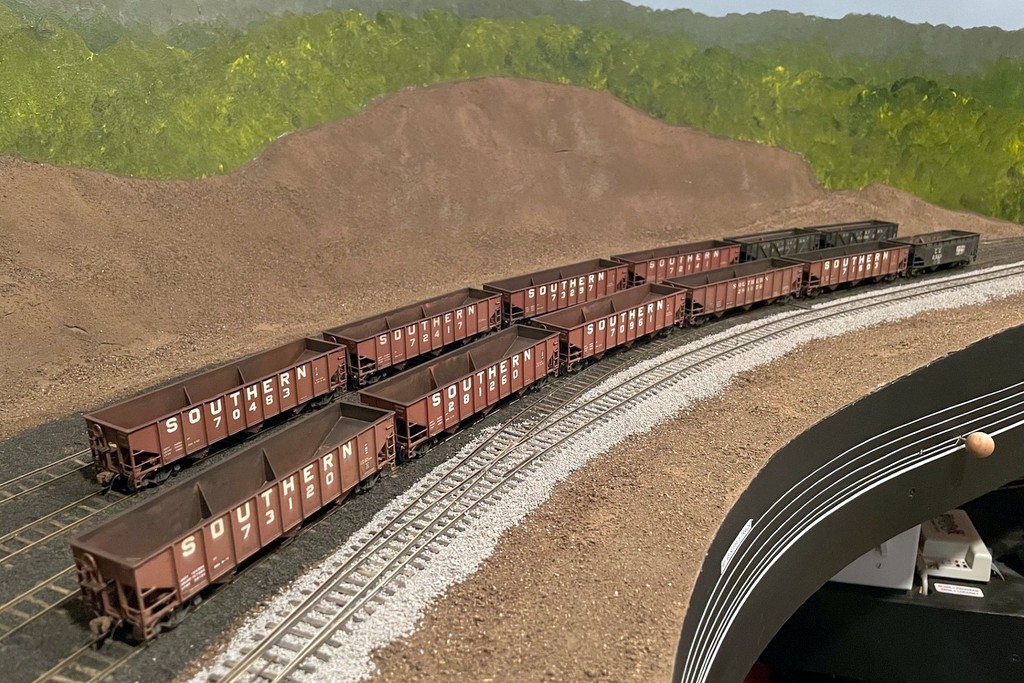
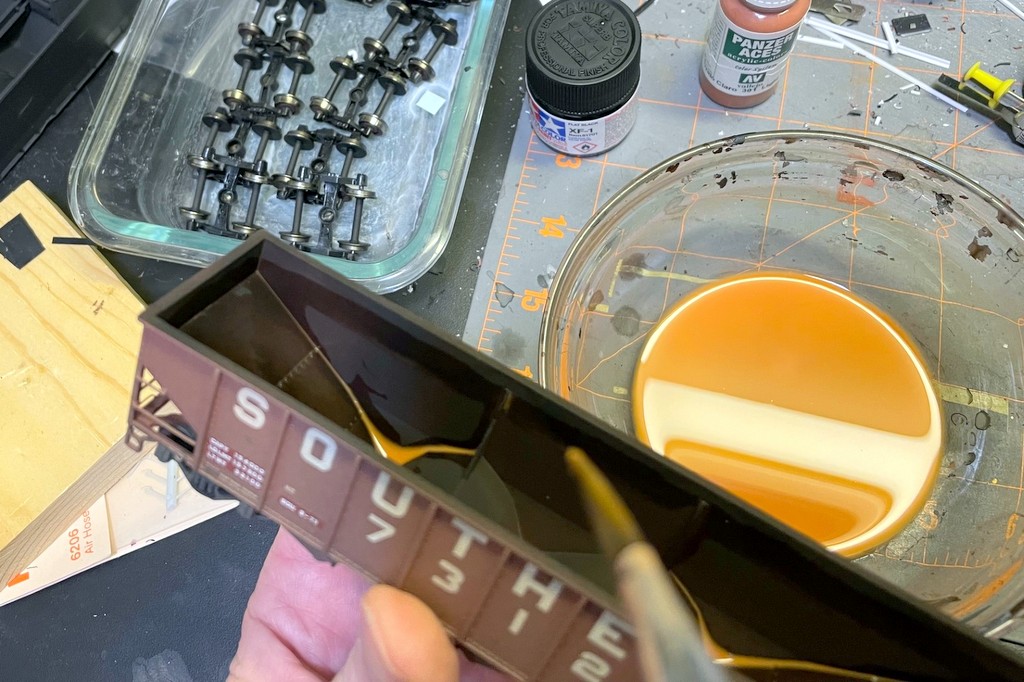
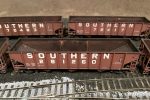
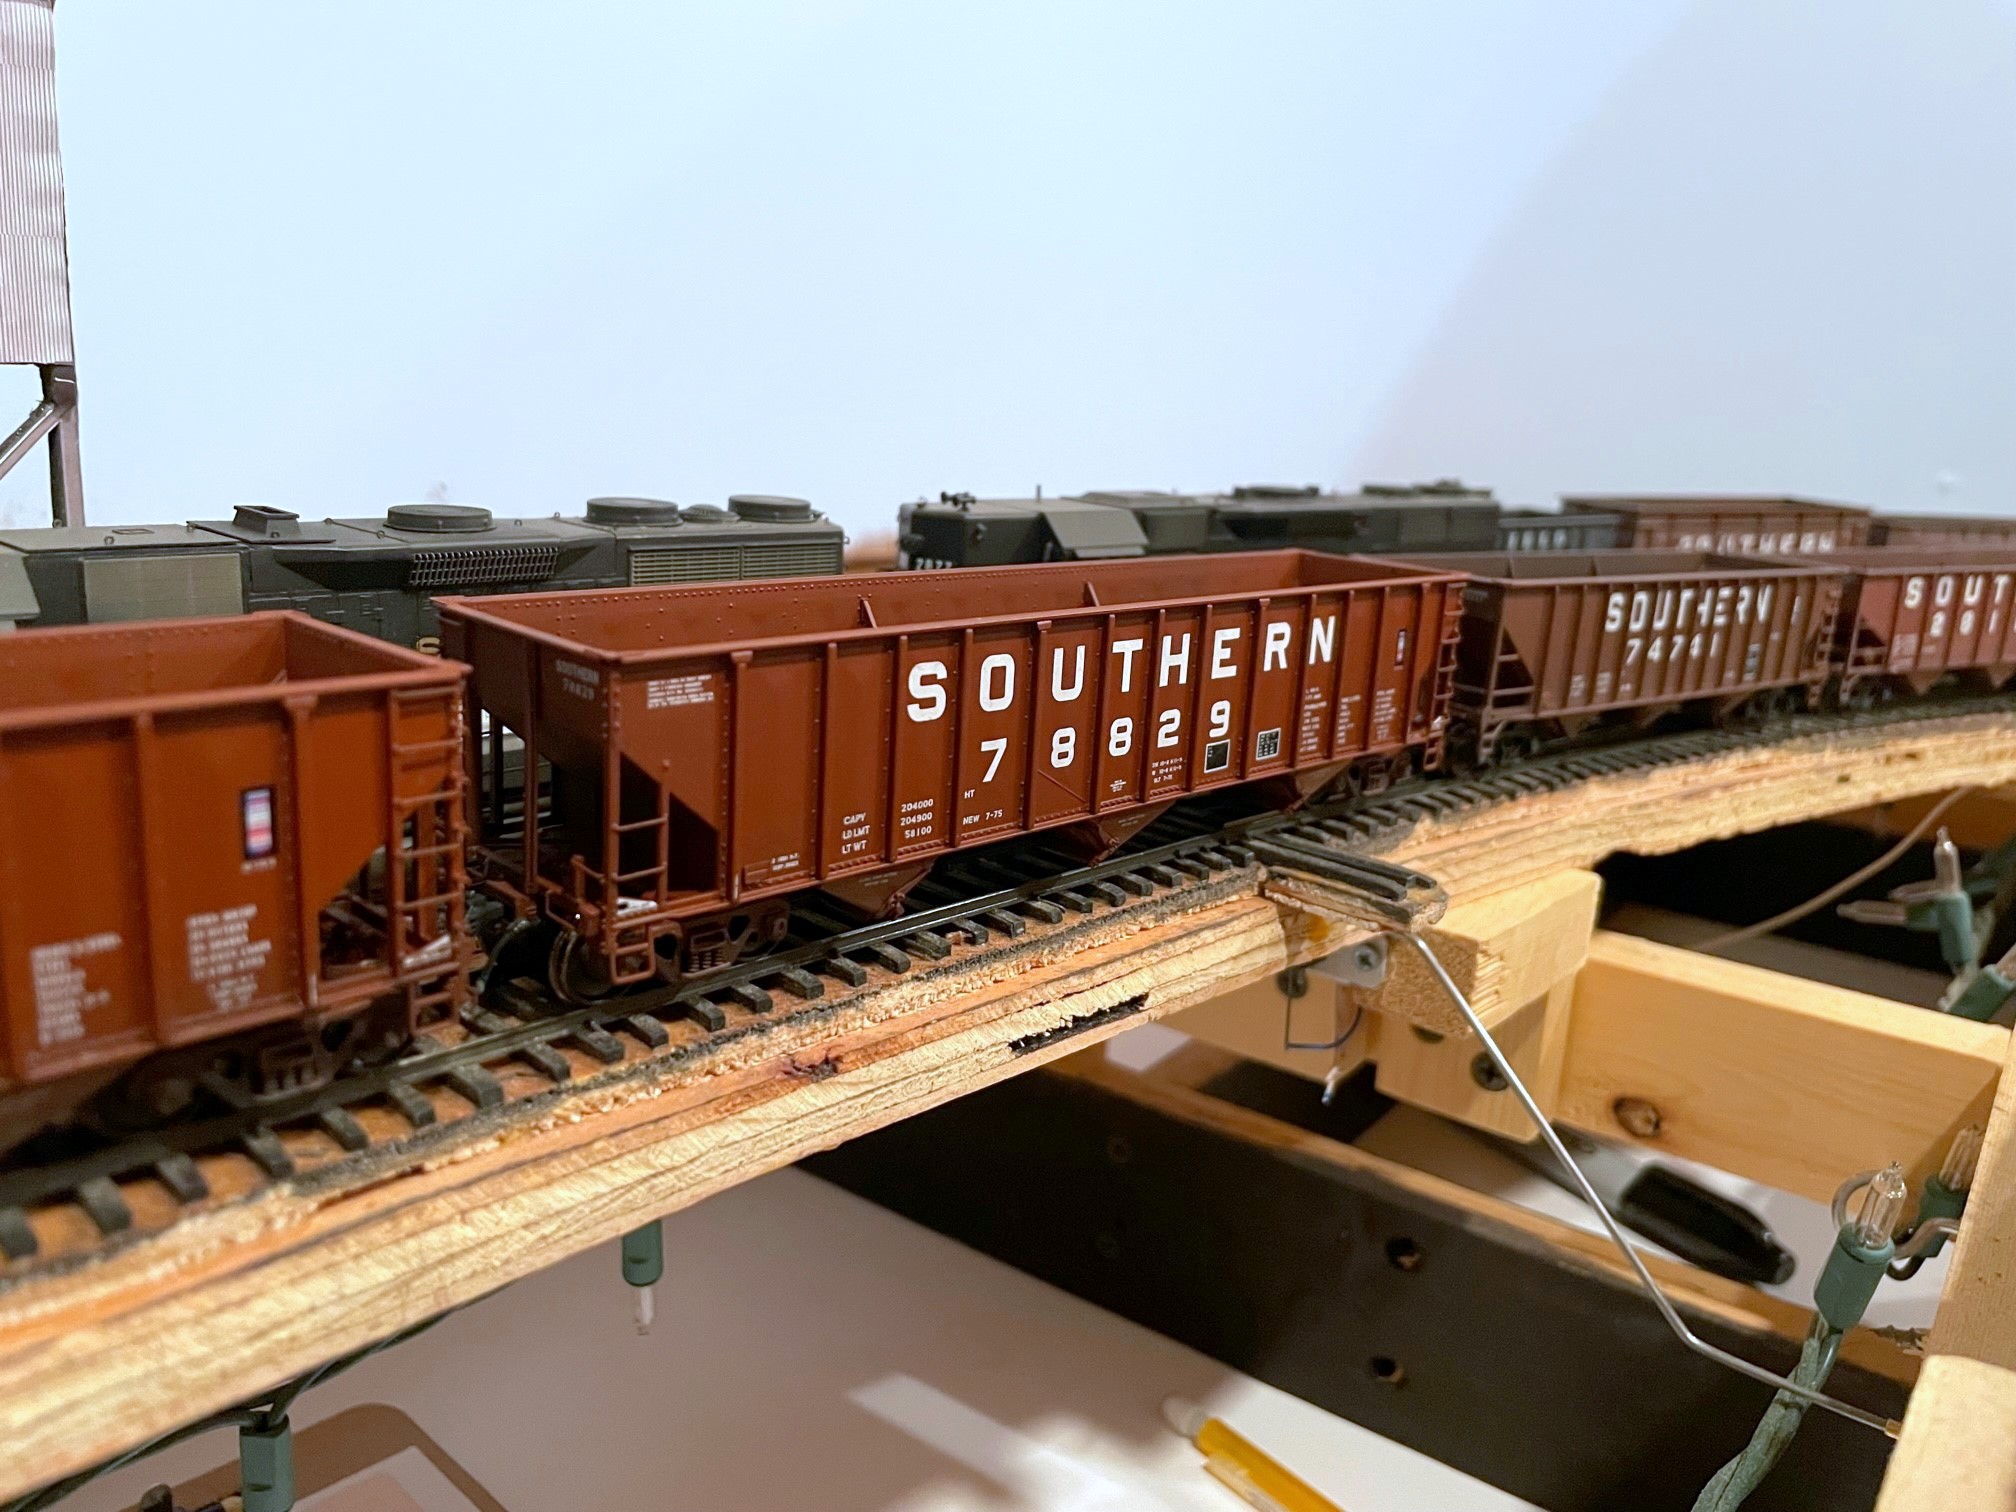
I’ve been on a hopper kick lately, so following close on the heels of the hopper class of January ’24 are these 13 cars comprising the hopper class of March ’24. They were actually built at the same time as the previous hoppers, but these were all custom paint jobs, so it took a while longer to paint and decal them. Among this class are several unique cars including two exact cars I’ve wanted to model since I first saw a picture of them. The first is Central of Georgia war-emergency rebuilt hopper 21781–there’s a photo of this car on railpictures.net at in a line of “yellow ball” hoppers Appalachia in 1978. The other car is Interstate 9234, a hand-me-down offset hopper of unknown origin with arched ends and an 18″ height extension to increase its capacity.
I’ve wanted to build a model of this car ever since I saw it in Ed Wolfe’s first Interstate Railroad book. The Altas offset hopper makes it easy
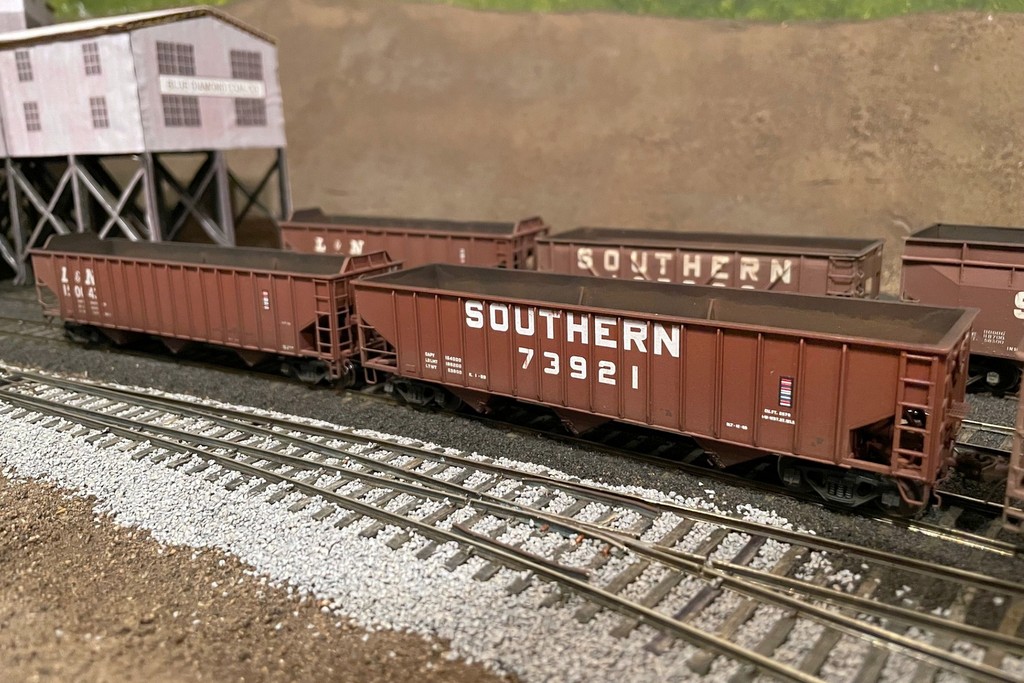
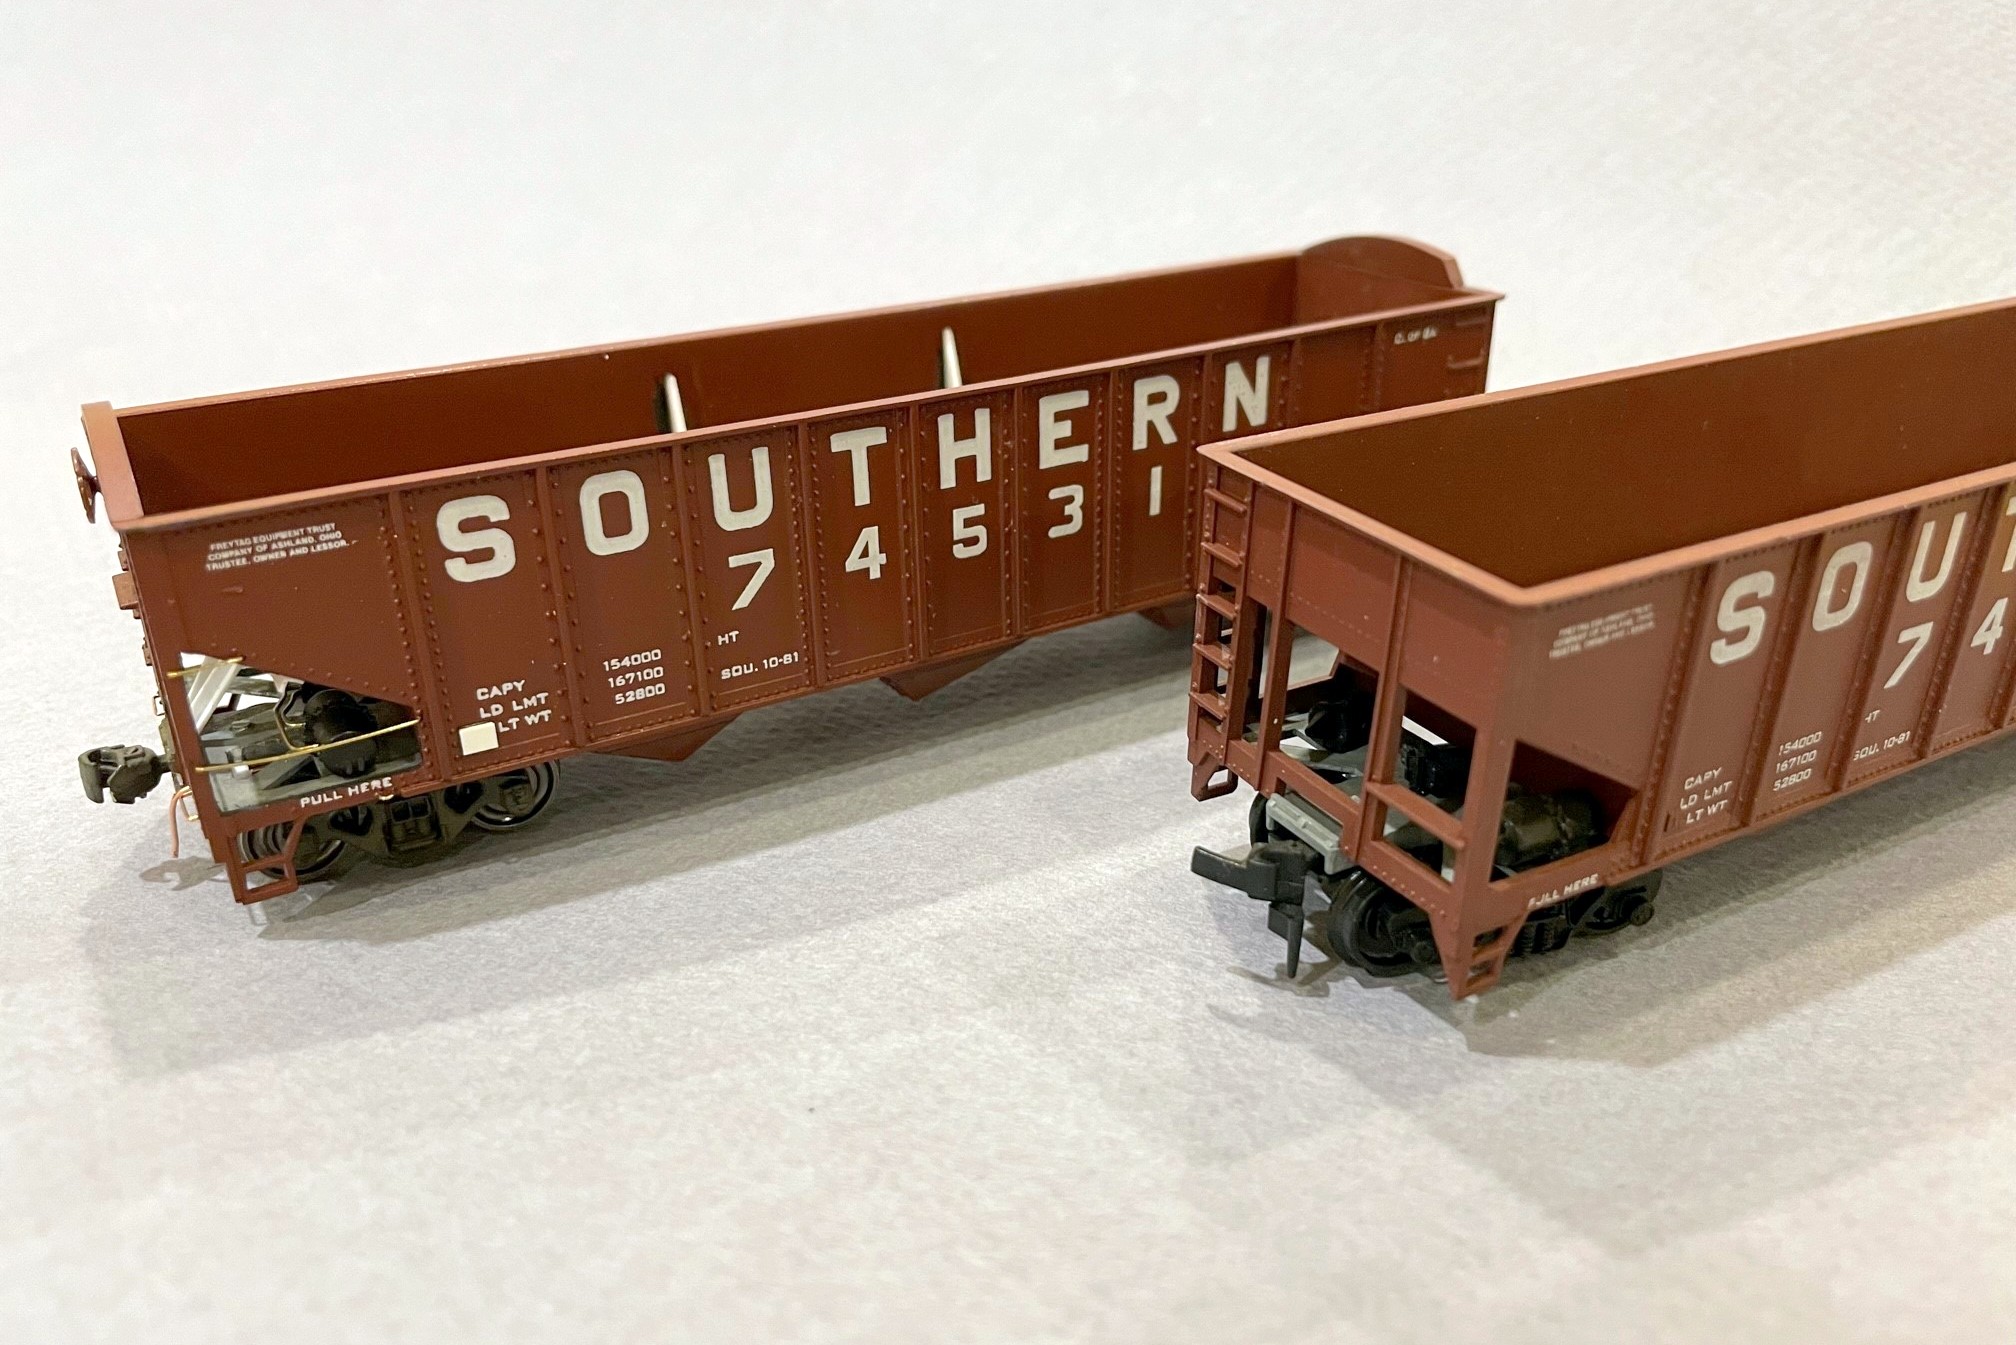
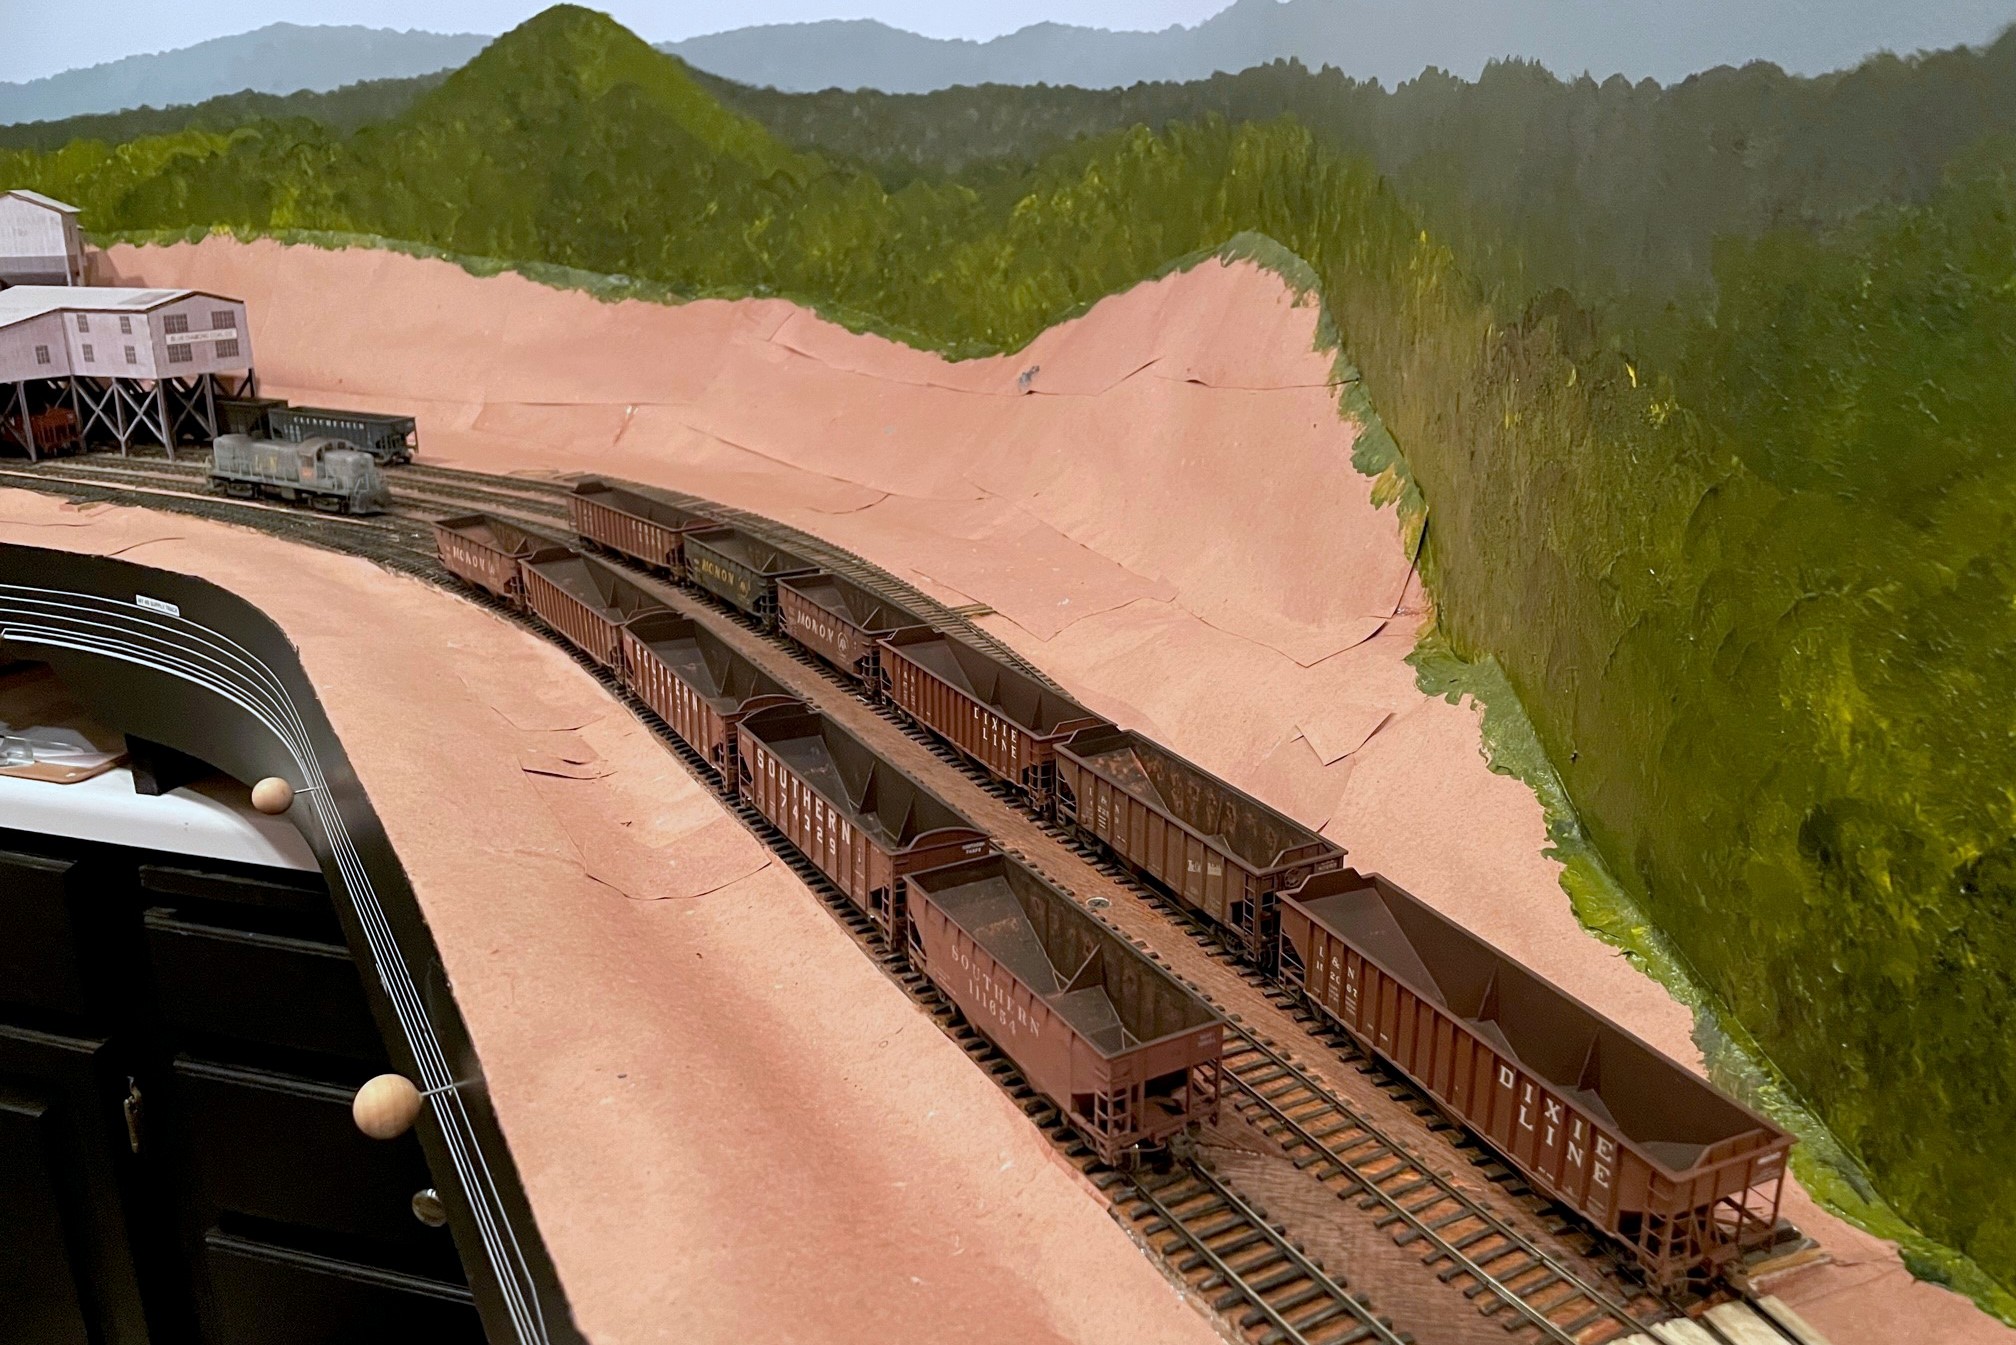
Most of the cars in this class represent old 50-ton cars relegated to “yellow ball” captive service between local mines and the huge coal transloader at Appalachia, VA where the St Charles Branch joined the Southern mainline. A few cars are regular offsets and war-emergency rebuilds including offset 112773 which spent a lot of time against a 100W lightbulb getting “beat up” to look the part! In addition to the Interstate car, there are four other cars with scratchbuilt height extensions including three offsets and a war-emergency rebuild, representing cars which received their height extensions in the mid-to-late ’70s.
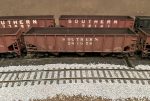
Athearn 34′ offset hopper with an 18″ extension made from sheet and T-shape styrene
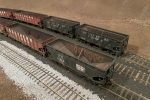
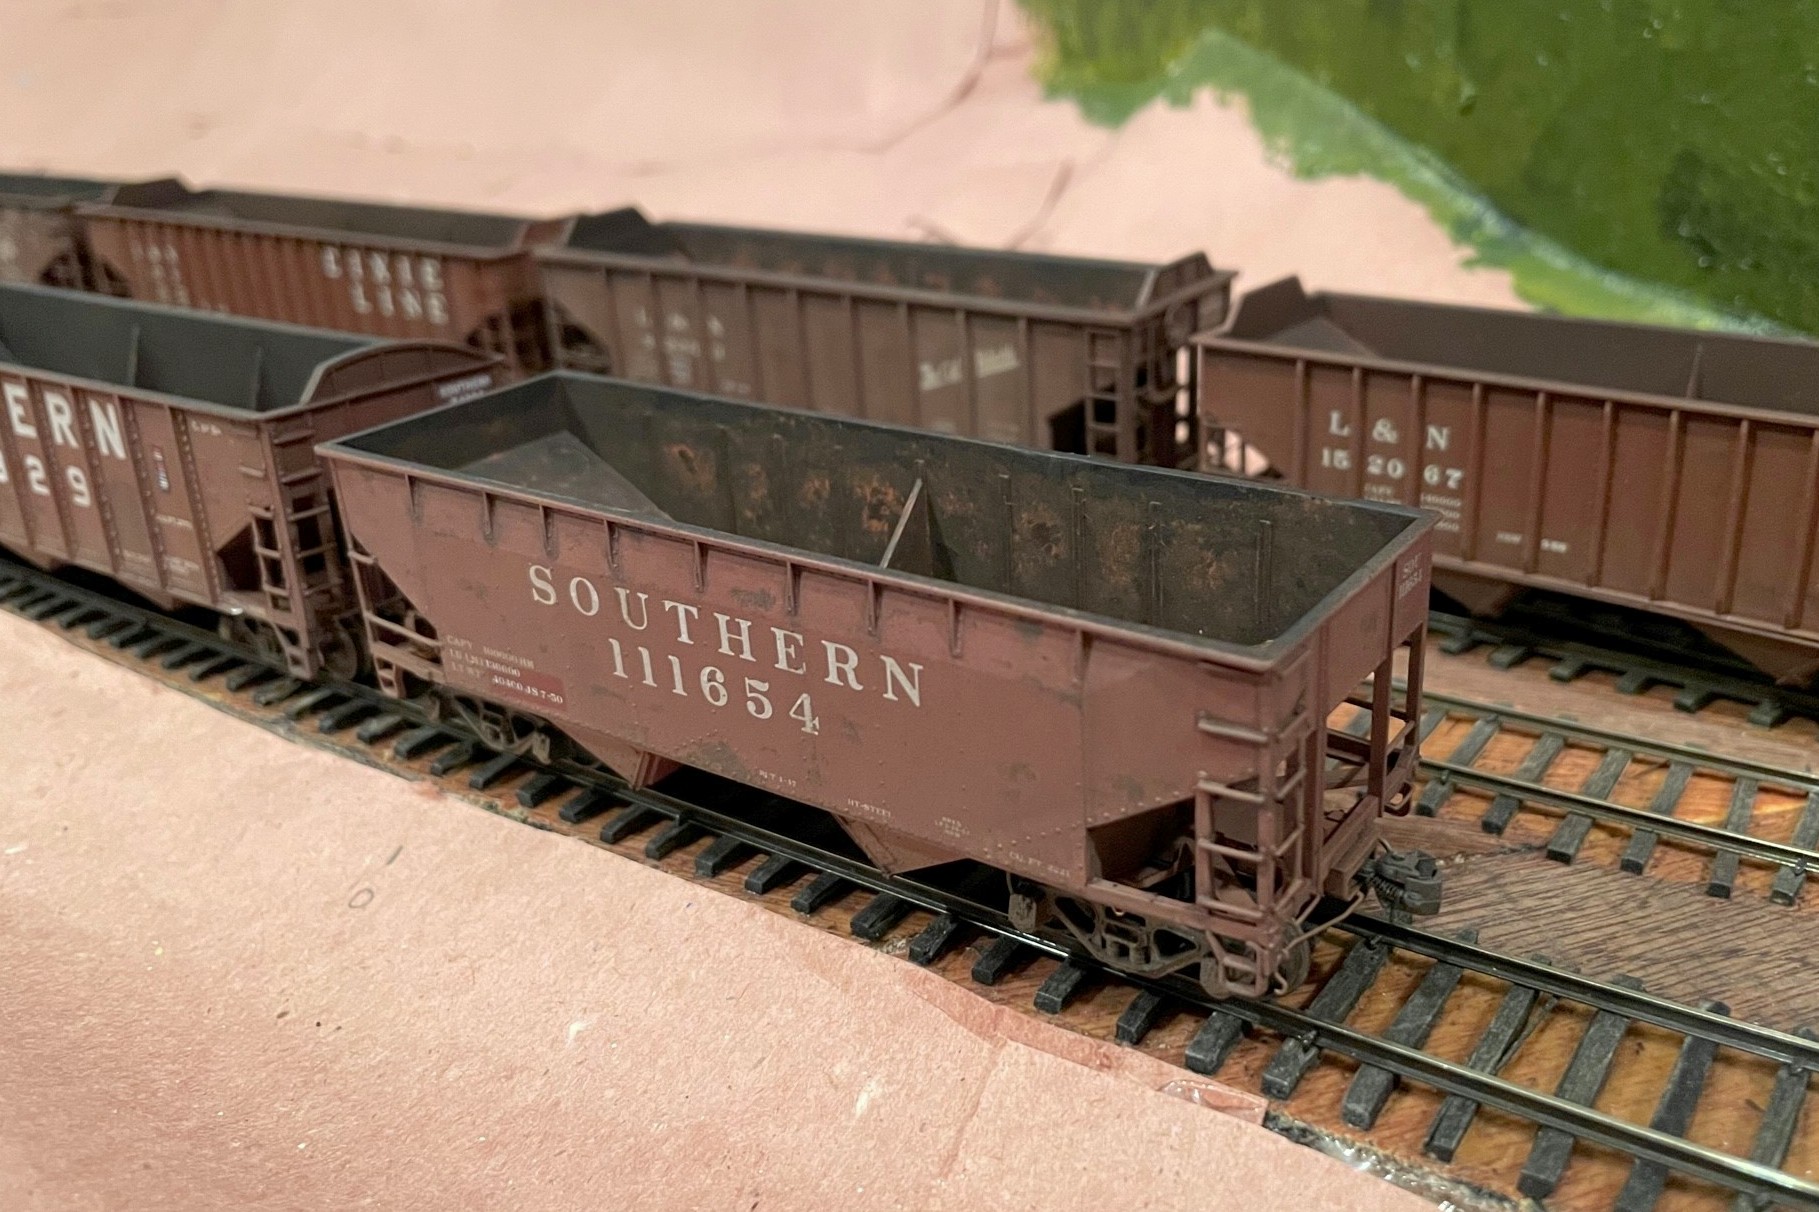
The class includes a couple unique Southern 70T cars as well. The first is a “standard” hopper from the large 70300-73749 class in its original black paint scheme. The first 3,000 or so cars were delivered in black and made it into the mid-’60s before being repainted. Another hopper, 73921, is a Pullman Standard PS3 70T hopper clone that’s been repainted in the more modern Southern scheme from its Railroad Roman scheme. This car, along with the L&N PS3 70T hopper in this set, were kitbashed from Atlas 70T 9-panel hoppers, one by me and one by Patrick Tillery. These were built before the Tangent model was released and have been sitting on the shelf for years–I’m happy to finally have them on the layout! Rounding out the class is an L&N PS3 50T hopper from an old Train Miniatures / Walthers kit representing a repainted car from the late ’60s.
A Southern PS3 clone and L&N PS3, both kitbashed from Atlas 9-panel 70T hoppers
The red cars were painted with either Tamiya NATO brown or a mix of Tamiya NATO brown and flat red–this mix will probably be my standard in the future, and I intend to vary the mixture to get variety in future cars. Never in my life have I done this many decals in one stretch. All told, there are more than 600 individual decals on these cars! Most of them are from K4 decals with a few Mask Island sets. The L&N hoppers are from a Great Decals set and a Curt Fortenberry set I got many years ago. Some Microscale small lettering and ACI labels rounded things out. Most received pretty heavy weathering since most represent non-interchange cars in their last years of service. I’m happy with how these cars turned out, and I’m happy I’ve got 9 more “yellow ball” hoppers to augment the fleet that’s been needing some help for a while.
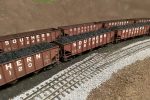
All 12 hoppers from the “class of Jan 24” including 9 Atlas 70T, 1 Atlas 50T offset, and 2 Proto 50T war emergency rebuilds
I’m proud to introduce you to the hopper class of January 2024. This class is comprised wholly of “run of the mill” hoppers for the layout rather than any super-detailing projects. Most are Atlas hoppers including 9 70T 9-panel hoppers and a single 50T offset. Rounding out the class are two Proto 2000 war emergency rebuilds. All hoppers are factory painted, but most have been renumbered, and some have had their round “O” replaced with the rectangular one more appropriate for my era. Renumbering/relettering consisted of carefully scraping off the unwanted digits with an X-Acto chisel blade and adding new decals. I used a tiny paintbrush on the ends to paint in something close enough to the right number to not stand out from a distance.
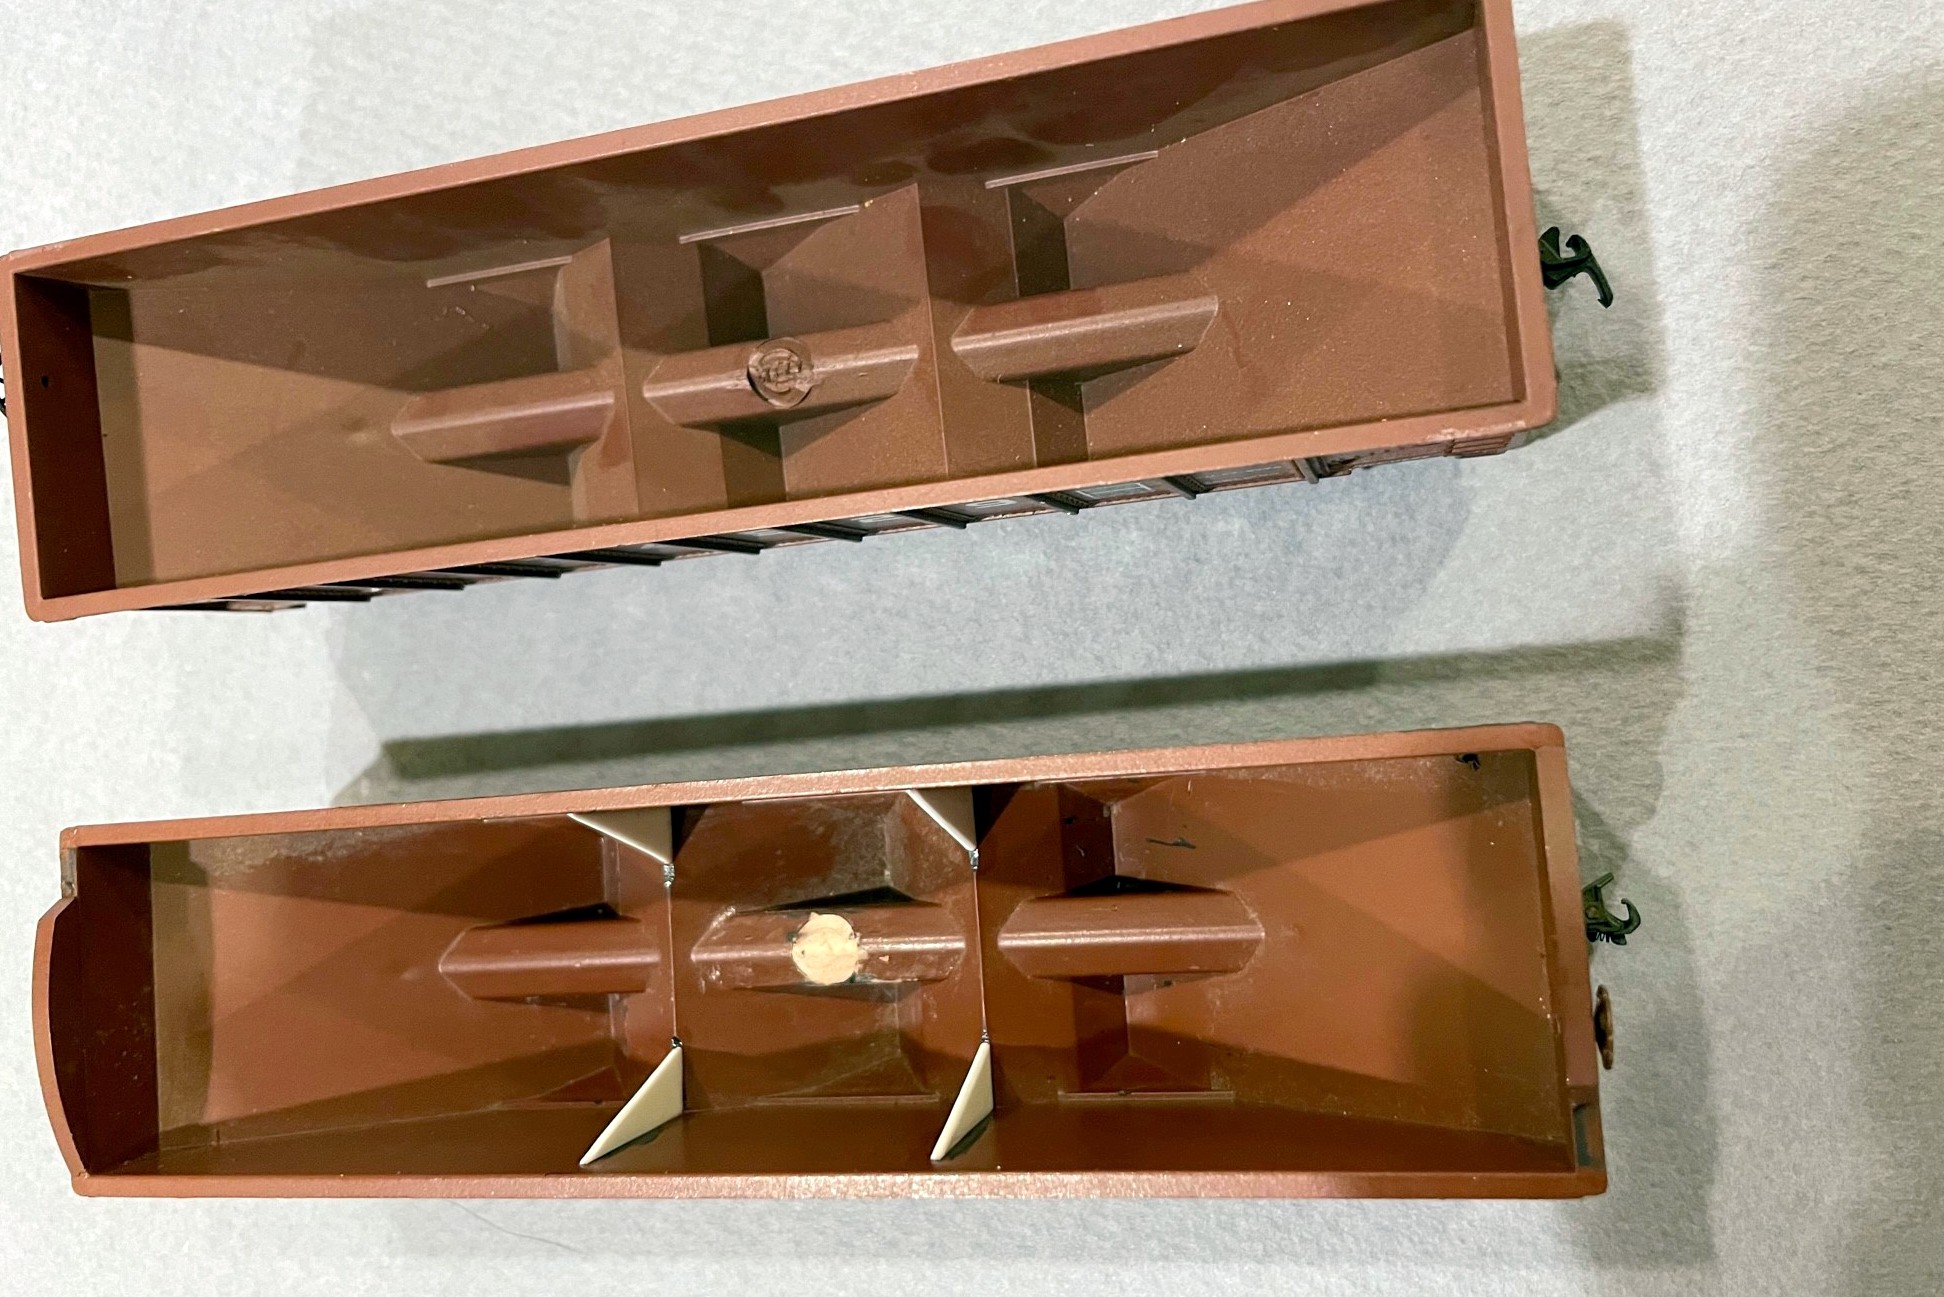
The underside of an Atlas hopper shows the additional details including door bars, train line, grabs, brake platform, and coupler cut bar
The Atlas cars all went through a series of “upgrades” including shaving the backs of the grabs to make them more round and closer to prototypical thickness–this is far easier than replacing all the grabs with wire, and from 12″ away, you really don’t notice that a few of the grabs are still molded onto the body. I did replace all the grabs adjacent to the coupler with wire grabs, and I added homemade coupler cut bars from .012″ brass wire and train lines out of copper from old Cat 5 ethernet cables. Each car also got tack boards made from strip styrene. Since I first posted about the “layout standard hopper” four years ago, I’ve added a couple more details including an etched metal brake platform cut from a sheet of roof-walk material and the bars across adjoining doors, made from styrene channel. The Central of Georgia car also got some slope sheet braces made from styrene L shape. I touched up the metal and bare plastic with some black and Vallejo “hull red”–not an exact match, but close enough once the weathering goes on. I used a silver Sharpie to add a little detail to the elbow and ends of the train lines.
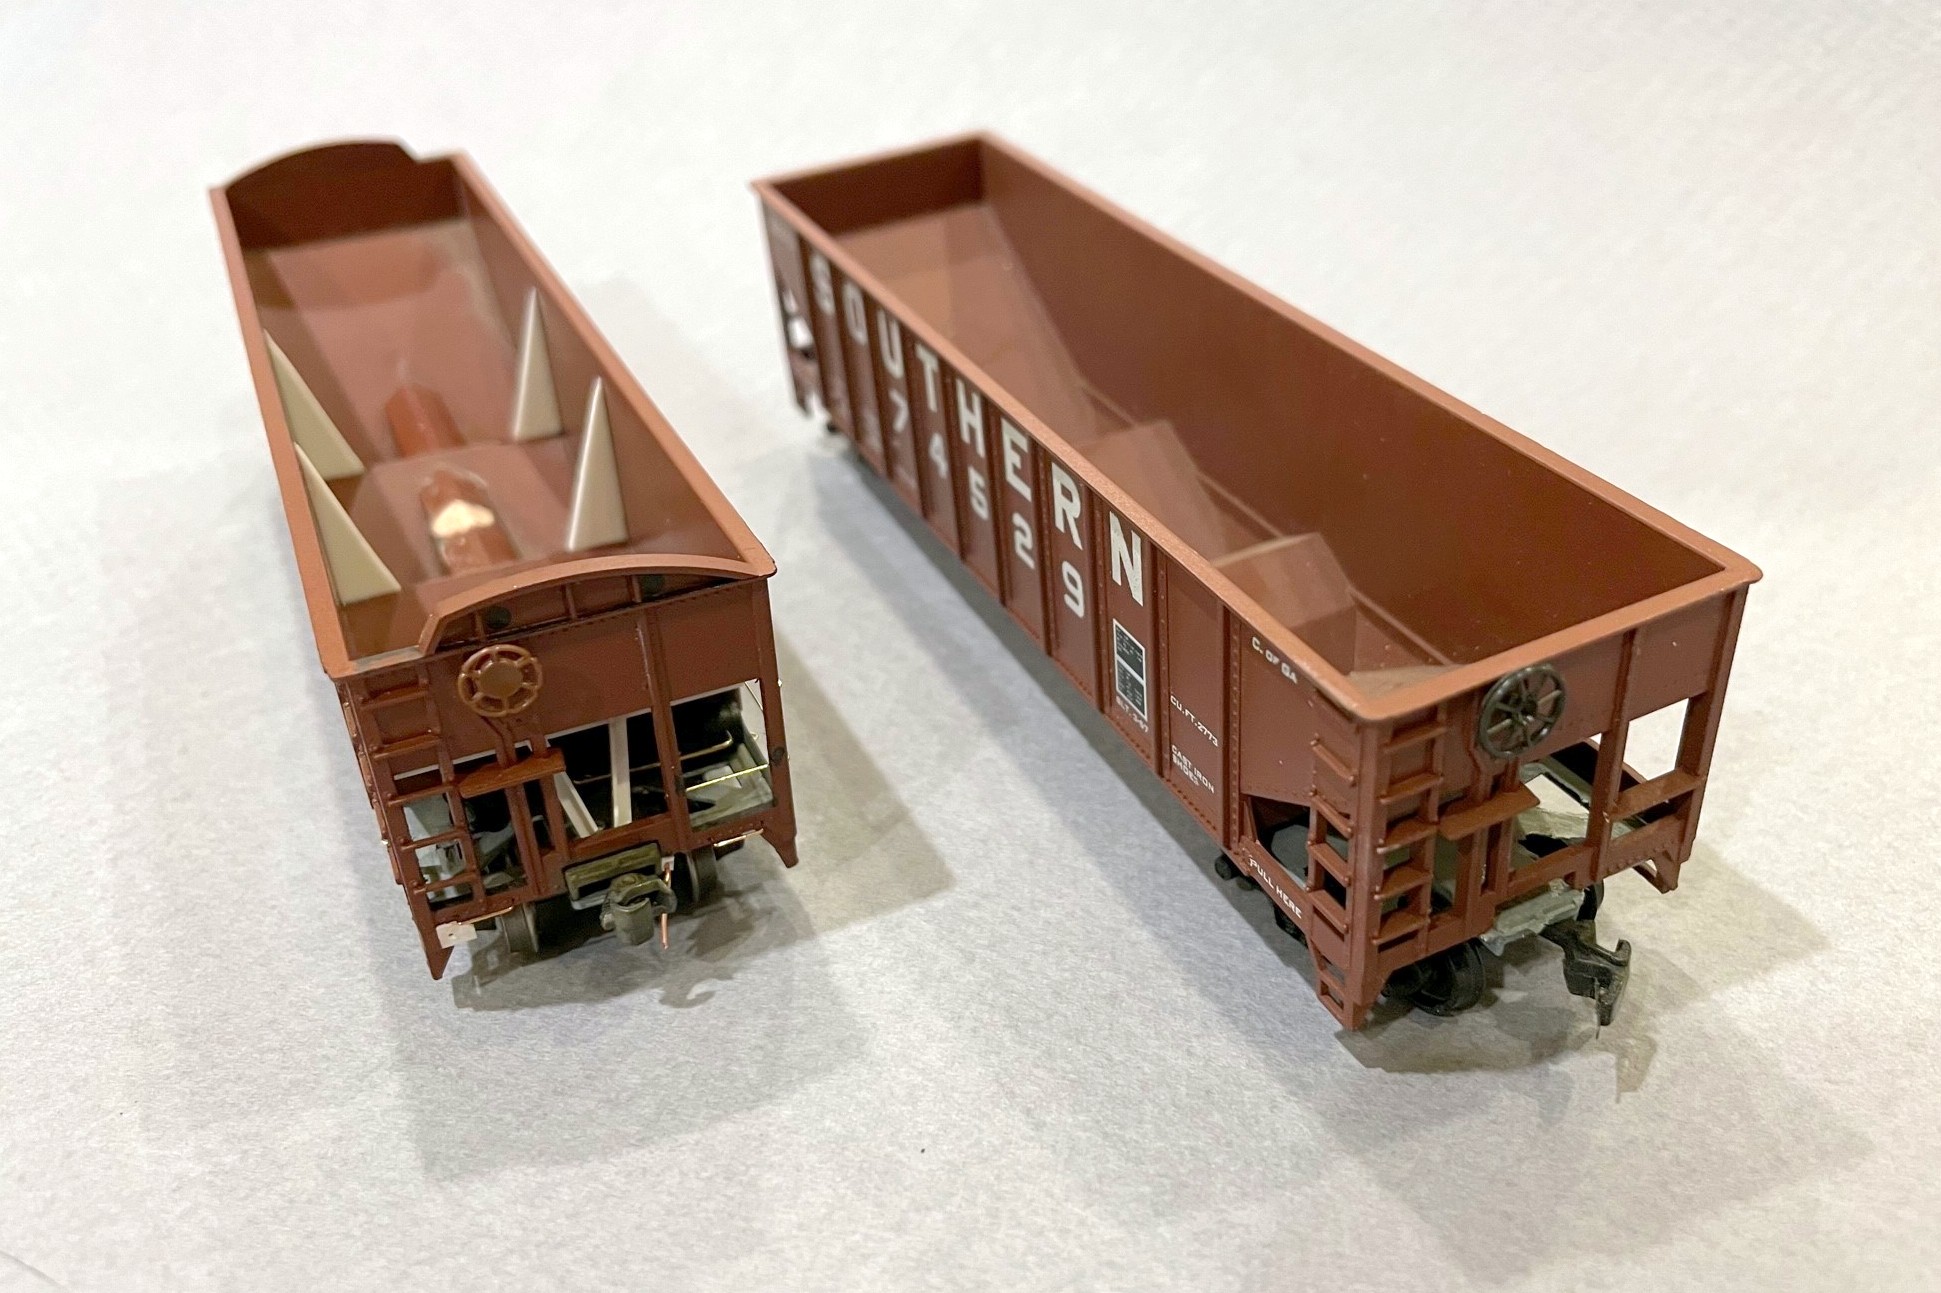
The interior rust is a couple layers of rust-colored wash
I had a lot of fun weathering these. Each first got a coat of matte lacquer spray to help blend in the decals and to give the cars a nice finish for the weathering to stick to. Next, I dry brushed some black, light rust, and dark rust onto the sides of the older black cars to simulate fading paint, scrapes, and rust patches. Some of the red cars also got a few nicks of dark rust. I masked off the capacity data and shop dates of a couple of the cars to keep it new looking like a patch job. I airbrushed all the cars with a light coat of dark tan on the sides and underframe and some flat black inside the hopper. I sprayed the black thinly letting the red still show through a bit. The undersides got a little black as well to add to the grime. Next I gave each a wash or two of flat black to bring out some of the detail and add some grunge. The last step was the hopper interior rust. I made a wash of light rust color, painted a “water line” just below the top chord where the coal would reach, and filled in everything below with the wash. I sopped up any excess with a paper towel. Each car got 2-4 coats leaving some more rusty than others. A few of the older cars (like the black ones) got some extra dabbing of light rust on the insides and a little dry brushed dark rust for some variety.
The CofGa hopper got the most weathering of the bunch
Overall I’m happy with how these turned out, and I like this technique for weathering the inside of older hoppers. While newer hoppers tend to have lighter rust or even bare shiny metal, an older steel hopper tends to settle into a mottled dark rust color which I think the repeated light rust washes over flat black airbrushing accomplish pretty simply and convincingly.
Here’s an Atlas hopper before touch-up painting and weathering showing the additional details and “grab shaving”
The hoppers all got medium weathering and old rusty interiors suitable for their represented age
70T hoper 281260, assigned to the CNO&TP, shows off its dark rusty interior
The only 70T hopper in older roman lettering is 281056–renumbered to fit into a CNO&TP series of these cars
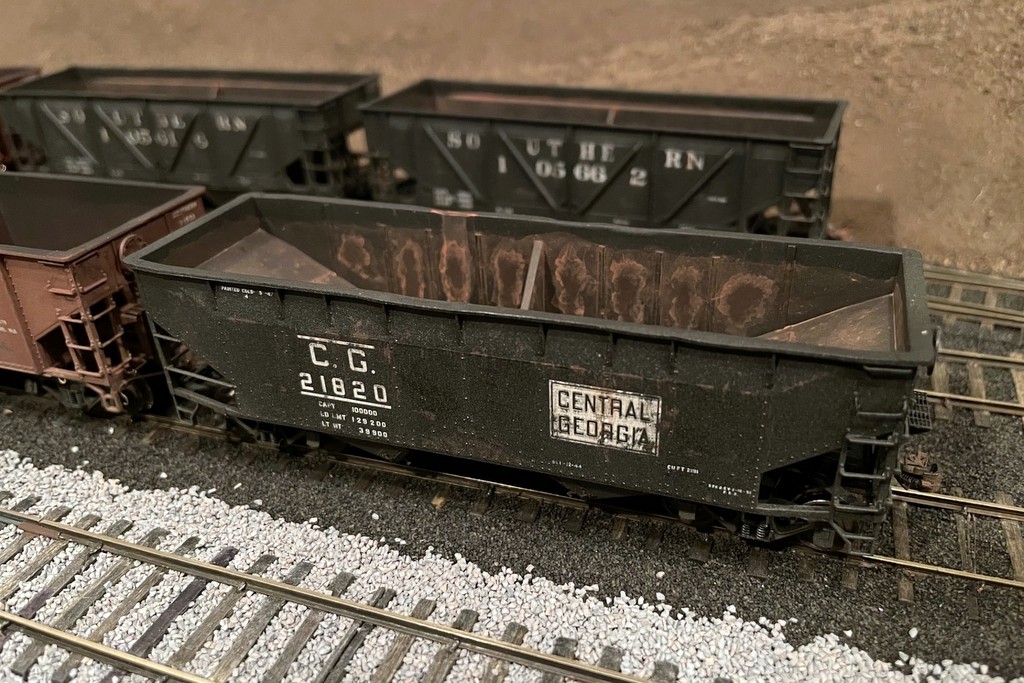
The “oldest” hoppers in the group are a pair of war emergency rebuilds still in original black and a “heritage hopper” Central of Georgia hopper in original colors
A few of the cars with some coal loads showing the heaps straight from the tipple
Side-by-side of an MDC car (left) and Atlas car (right) showing the slight length difference
In the last post, I mentioned some of the work that went into creating an ex-Central of Georgia 70T rib-side hopper from an old MDC Roundhouse kit. Atlas makes a much more crisp and better operating out-of-the-box car in its Trainman 9-panel, 70T hopper that is a good stand-in for this car, but it’s about 2 scale feet too long. The Atlas kit, however, is a great model for the Southern’s mainstay fleet of 70T hoppers in the 70300-73749 and 281000-281299 series which far outnumbered the ex-CofGa cars in the 74100-74584 series–all you have to do is remove the heap shields and renumber them. The MDC Roundhouse kit can be picked up in Southern paint pretty cheaply. It’s a far WORSE model both dimensionally and detail-wise to match the Southern’s main fleet of 70T cars, but its overall dimensions are closer to the ex-CofGa cars. However, it requires a ton of work to make the car presentable in a string of more recently produced and more detailed cars. So, is it worth the work? Spoiler alert: it’s not worth it unless you’re just a crazy hopper person like me who notices the subtle length difference between these different series of cars in a long string of hoppers.
Ok, if you’re still reading, here’s a little more on what it takes to model one of the ex-CofGa cars using an MDC Roundhouse kit or one of the slightly improved Athearn versions. First, what’s wrong with the model out of the box? These molds are at least 40 years old, so the detail is sub-par–the rivets are clunky, the grabs are thickly molded, the brake platform and brake wheel housing is grossly under-modeled, the brake wheel is horrendous, and it’s just missing some details like the long grabs on the left ends of the car and bracing inside the car. Also, the bottom sills and corner posts are super thick at the ends. The interiors have an ugly scar right in the middle where the injection molding was done. The most egregious issue is also the most likely to escape notice (so I didn’t bother fixing it): the middle hopper bay is reversed with respect to the brake end. The lettering is not up to today’s standards but acceptable for a car that will be weathered, but there is no lettering on the ends of the MDC cars. The car also comes with arched heap shields that can be added, but they’re a little too short to look right, something that I initially ignored but eventually remedied by replacing them with parts off an Atlas car. It’s also missing details that were on the CofGa cars like slope sheet bracing on the ends.
Detail differences between the original model (right) and the modified model–note the difference in the side sill width
I remedied most of these issues with an X-Acto blade. I started by removing the angles between the bottom sills and the side panels. Next I worked on the side/bottom sills and carved away excess material from the top and bottom with a No 11 X-Acto blade (leaving essentially just enough for the “PULL HERE” lettering). This was done to both the ends of the sides and the ends. I also removed the excess material from the left-side corner posts with a blade (I left the ladder side alone) and cleaned up the excess plastic in the steps. I narrowed down the ladder grabs with the X-Acto blade using repeated small cuts on the back side and alternating between top and bottom until the grabs were essentially round-ish instead of rectangular. I also used a chisel blade to remove the awkward rib down the center of the underside of the slope sheets. Finally, I removed the molded-on grabs from the lower ends adjacent to the couplers.
Details added include tack boards, grab wires, tow rings, cut bars, and train line
Next came the added styrene bits. I added some flat bits for the tack boards and the panels where the coupler cut bar would attach. Some large triangles (using the Atlas cars as a model) became the interior bracing. The most complex part was the slope-sheet bracing under the ends. I made these from three pieces of L-girder styrene and just dimensioned and cut them to resemble photos. I also replaced the brake wheels with more detailed Miner wheels from the parts bin (one Kadee and another whose origin is lost). I added wire grabs adjacent to the couplers, and added custom-bent long grabs on the left ends made from .012″ brass wire and tow loops made by bending .012″ brass wire around a thumbtack (I bend them into a “J” shape and just drill one hole). I bent coupler cut bars and eye bolts from .012″ brass wire using a little jig I made. I also added a couple pieces of brake-gear piping between the reservoir and triple valve bent from .020″ brass wire. The train line is a piece of copper wire from an old ethernet cable sandwiched between two pieces of L-shaped styrene. The final details included Kadee No 5 couplers, Intermountain metal 33″ semi-scale wheels (faces, backs and axles painted black), and arched heap shields salvaged from Atlas models (the in-progress photos here show the MDC arches which I replaced before weathering). Some careful carving and putty fixed the ugly scar on the center sill inside the car.
Detail differences on the ends
I wanted to renumber the cars and detail them for the early ’70s, so I removed a couple of the numbers and the black-and-white lube stencils the best I could by scraping them off with the back of an X-Acto chisel blade. I custom-mixed some paint to match the body and covered all the new details and scraped sides. I added the new numbers, ACI labels, and end reporting marks using a combination of Microscale, Herald King, and K4 decals. Now they were ready for weathering!
Interior detail including braces and covering up the injection mold scar
For weathering, I started with some drybrushing of dark rust spots in a few places on the sides. Next I airbrushed them moderately using a combination of flat black and dark tan airbrushing and washes. Since these are old cars that have been repainted, I went a little heavier than usual with the black on the interiors. I hit them with a wash of flat black paint and water, letting it sit for a minute and then wiping it off vertically to produce some rain streaking and shadows on the details. I used a wash of light orange rust and water on the interior and then added some drybrushed rust spots inside.
String of Atlas and MDC cars mixed in–the differences are subtle but noticeable
In all, these cars took probably 4x as long to detail and make layout-worthy as the Atlas Trainman cars. Now that they’re complete, I do like seeing the more stocky look of these CofGa cars mixed into a long string of Southern-heritage 70T cars. So much so that I’ll probably eventually go back and take all the heap shields off my Atlas cars and renumber them into non-CofGa series. Thankfully I’ve only completed 3 of these Atlas models, so it’s not a huge sacrifice. So, if you’re a hopper nut like me and nerd out on seeing the subtle differences between car series, then knock yourself out on a project like this! If you’re not a hopper nut, I recommend sticking to the Atlas models and saving yourself a lot of trouble.
The hopper class of April 23 consists of 11 hoppers, mainly L&N and heritage cars
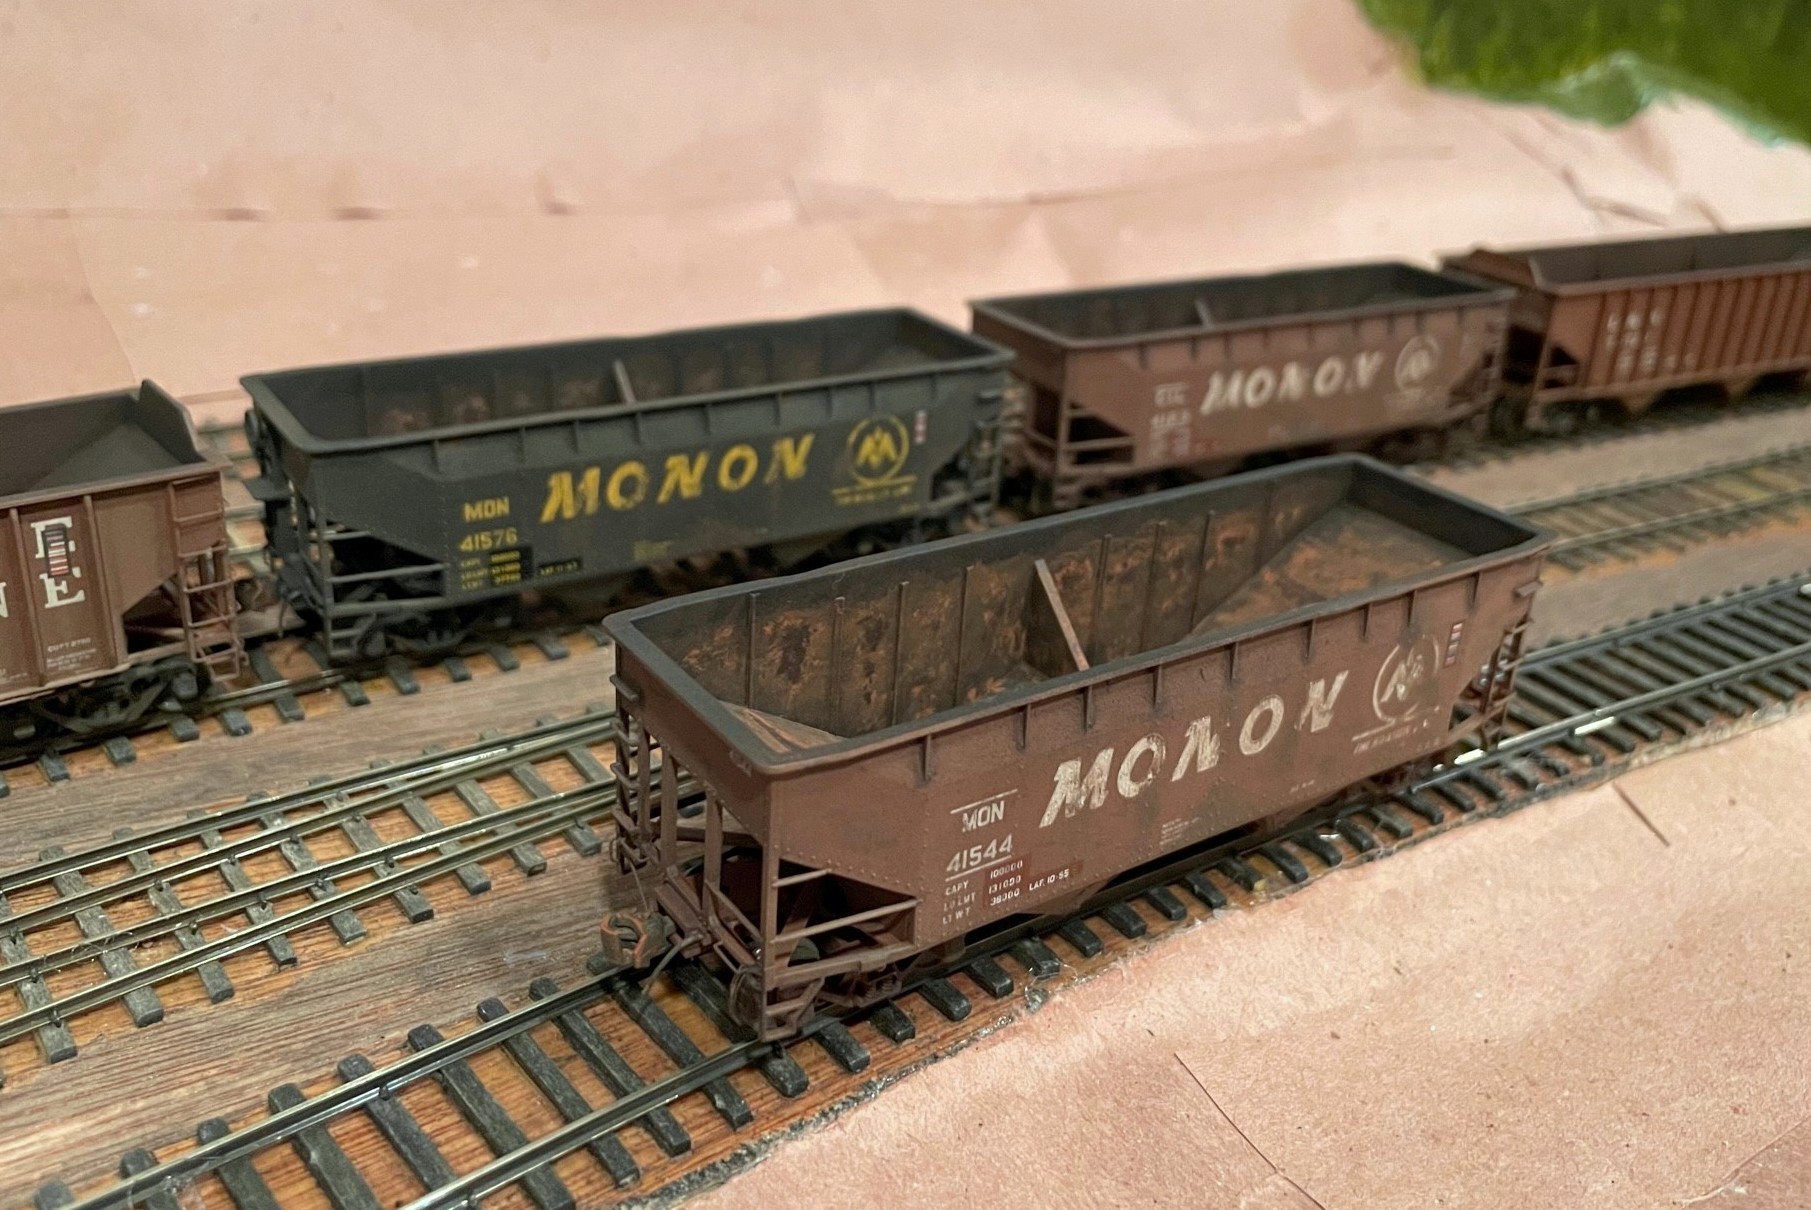
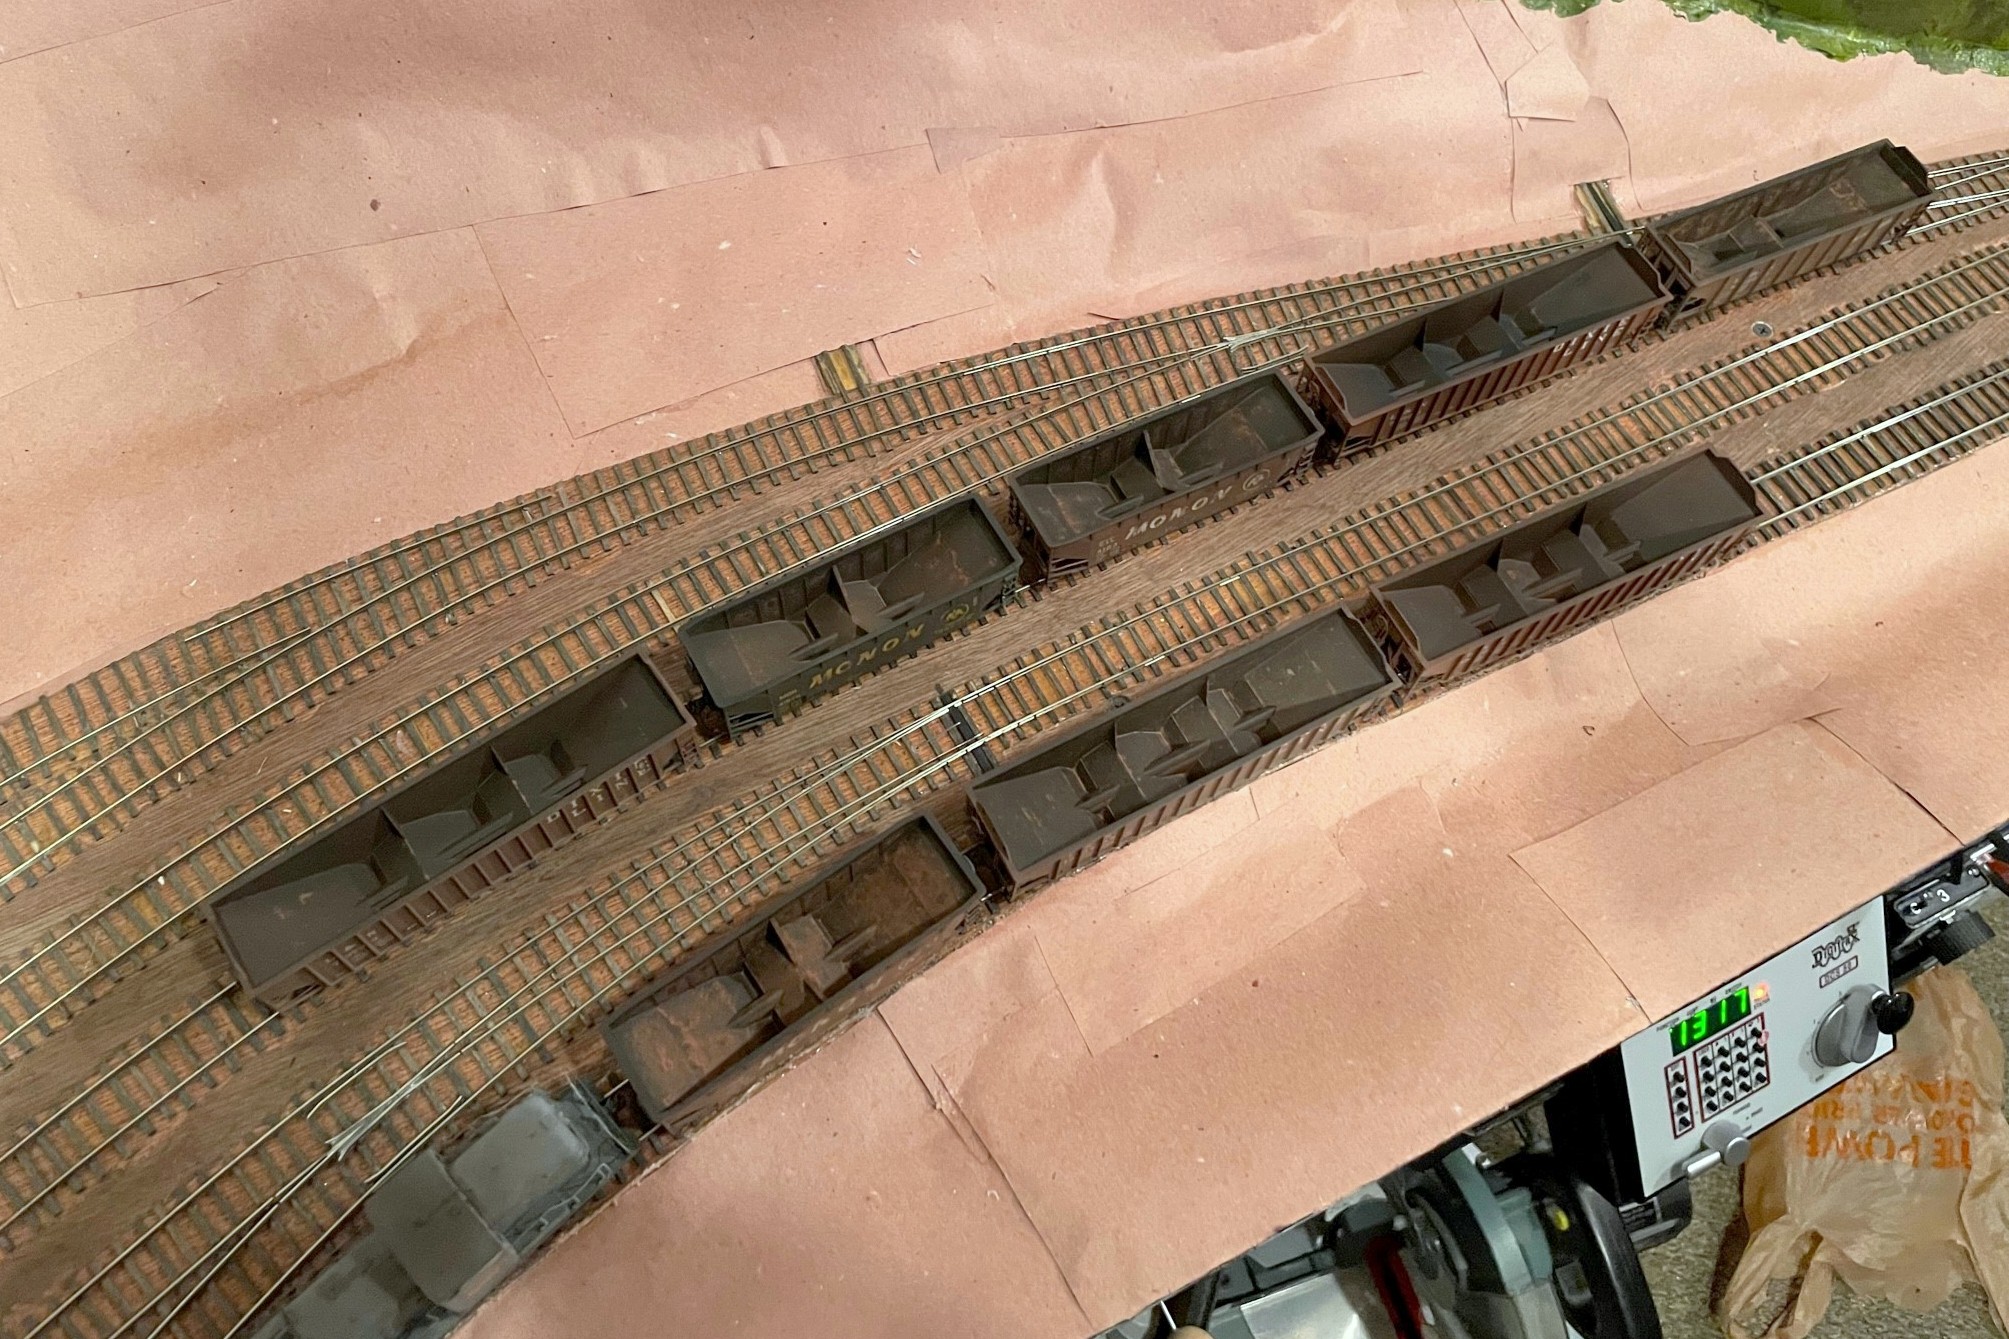
It’s time to introduce another “class” of hoppers graduating from the workbench to the layout. Looking back I see the last class of hoppers graduated in April of ’22, so I guess I’m averaging about a dozen hoppers a year… got a ways to go! This class was fun because most of the cars are for the L&N trains on the layout. Previous to this, most of my L&N cars were of mid-’70s paint and markings, so I focused on some cars to represent the mid-’60s to early ’70s including four PS3 70T cars, a PS3 50T car, and three ex-Monon two-bays (ok, I don’t need 3 Monon hoppers, but they came as a set, and I got them for cheap so…). The three remaining cars represent Southern prototypes including two ex-Central of Georgia 70T cars and an old 50T offset in red with Roman lettering.
This Tangent PS3 2750 hopper received a new number, corner tow loops and roller bearing trucks to represent a later series of cars
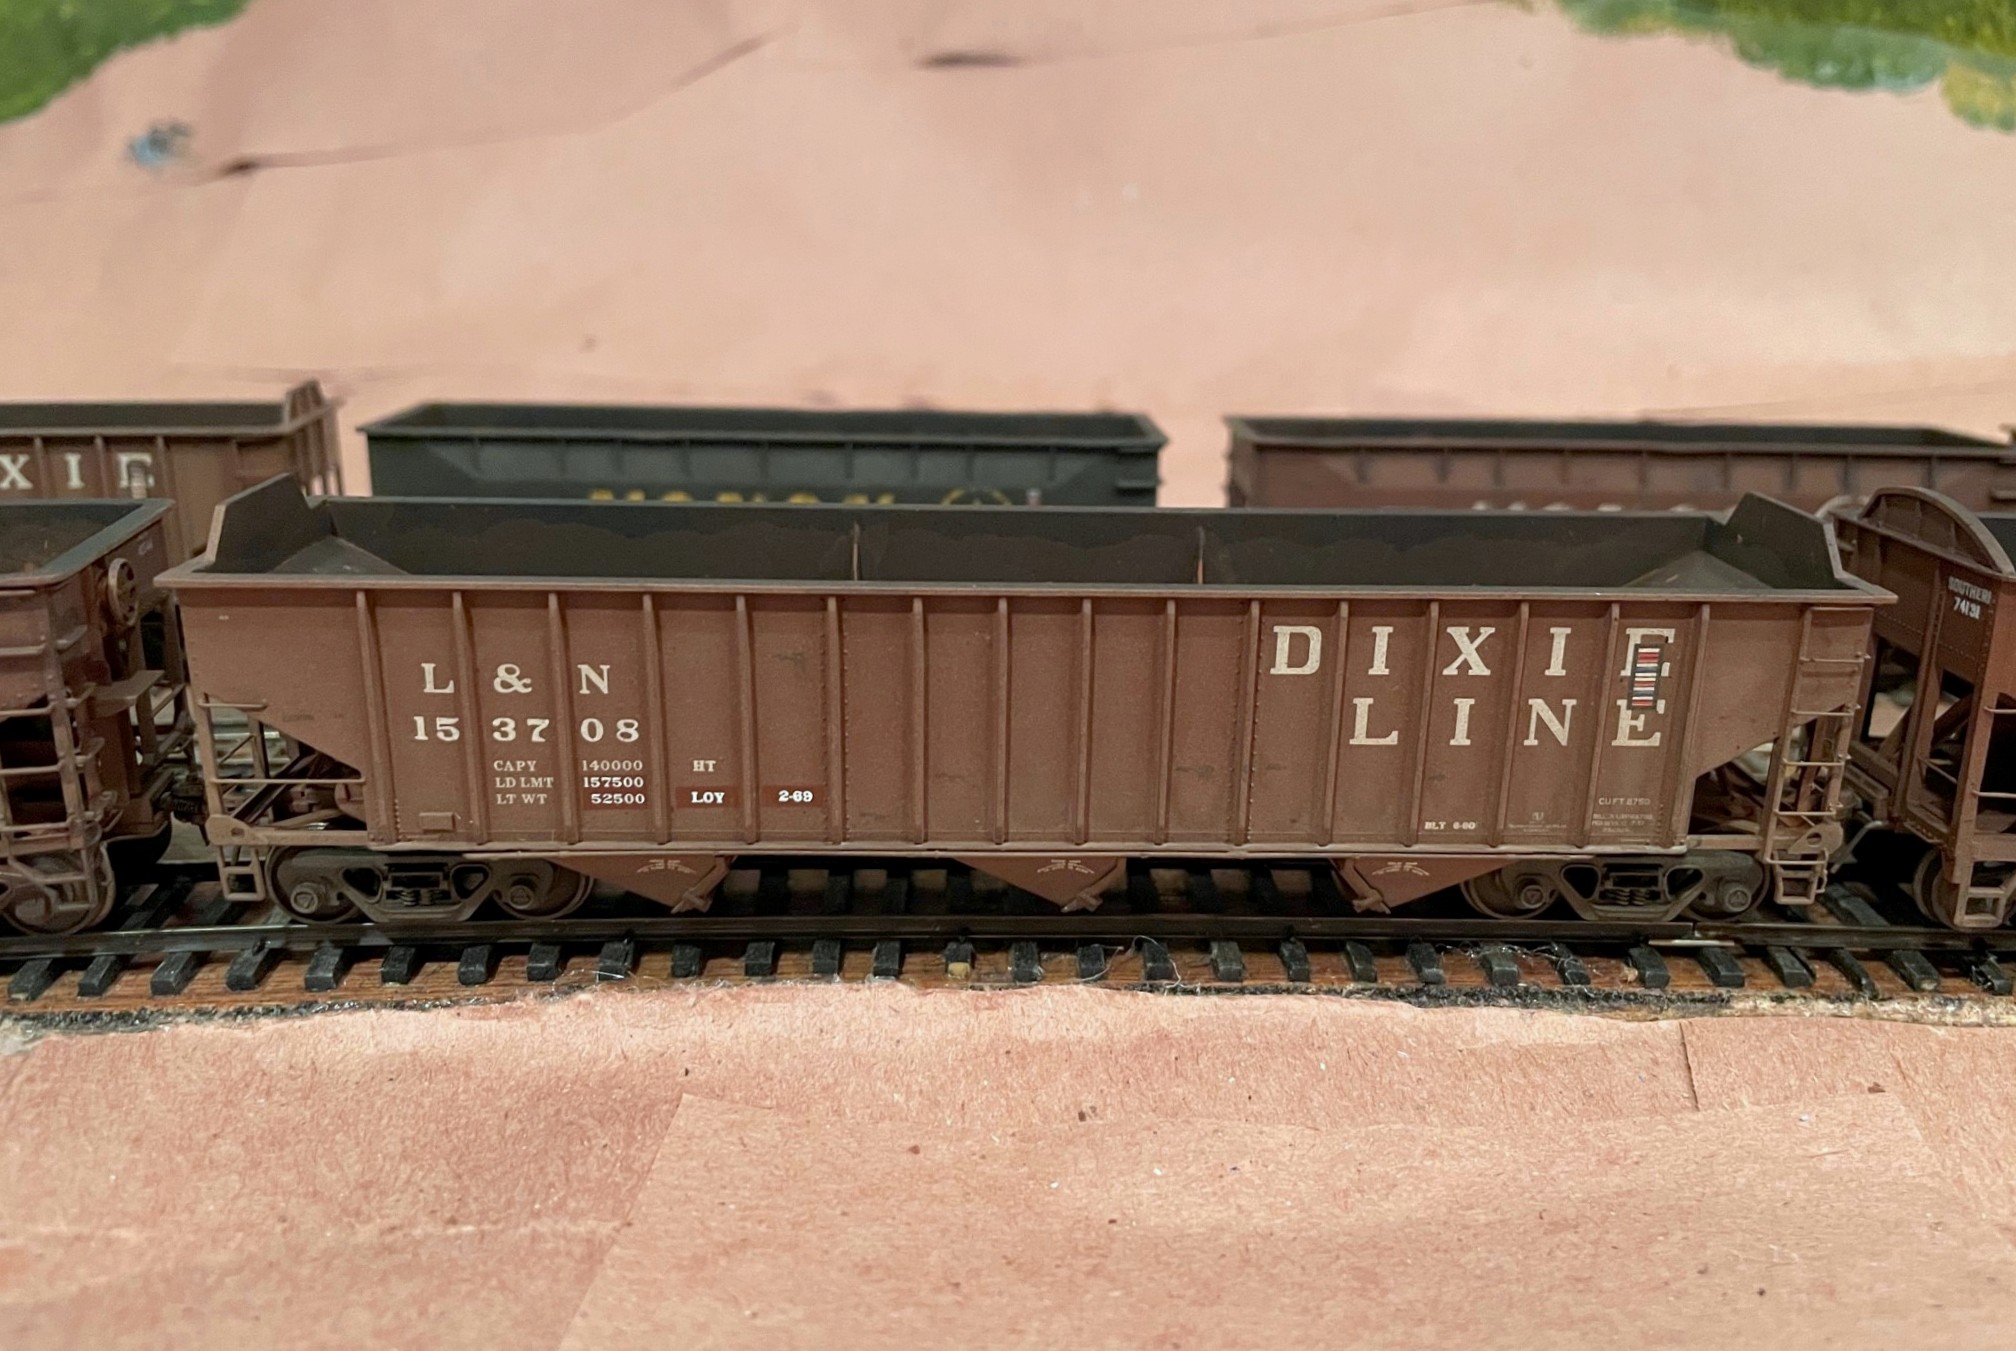
The easiest cars of the bunch were the 70T PS3s which are all factory-painted Tangent cars with excellent detail. The four cars all came lettered in the 73000 series, and after looking through pictures, I decided they’d also be good to represent the 150000 and 153000 class cars that were also delivered in the “DIXIE LINE” paint scheme. For hopper 152067, it was as simple as changing the number and build dates. I scraped off the old lettering using an X-Acto chisel blade–it leaves a little shiny spot, but this is easy to disguise with weathering. Hopper 153708 was a little more involved because this class came with the later style tow loops at the lower corners of the car and roller bearing trucks. I snipped off the modeled loops, cut new corner tow loops from .015″ styrene, glued them on and painted them. A set of Bowser roller bearing trucks and metal wheels fit well and kept the car at the proper height.
This L&N PS3 is a factory painted Walthers Trainline kit that’s received new ladders and other details
The 50T PS3 is a factory-painted Walthers Trainline kit which is an updated version of a VERY old model kit that’s been around since probably the 60s and has pretty clunky detail. I remedied the worst of the detail issues by cutting off the ladders and replacing them with DA ladders and added new scratchbuilt heap shields. A new Kadee brake wheel and some new wire details like brake gear piping, grabs, cut bars and train line hose finished the detailing.
These three hoppers came in a single box from Atlas–they’ve had their details enhanced and have been extensively weathered but are otherwise stock
The Monon 50T hoppers are pretty much stock, factory painted Atlas hoppers. I used my favorite “grab narrowing” trick where I carefully cut away the back of the ladder grab irons with a sharp No 11 X-Acto blade. This makes the detail look much finer from any distance and is easier and quicker, in my opinion, than completely replacing the grabs with wire. I did add some wire grabs on the lower ends along with some cut levers and train line hoses.
Southern 50T hopper in Roman scheme weathered as if it’s seen a few miles
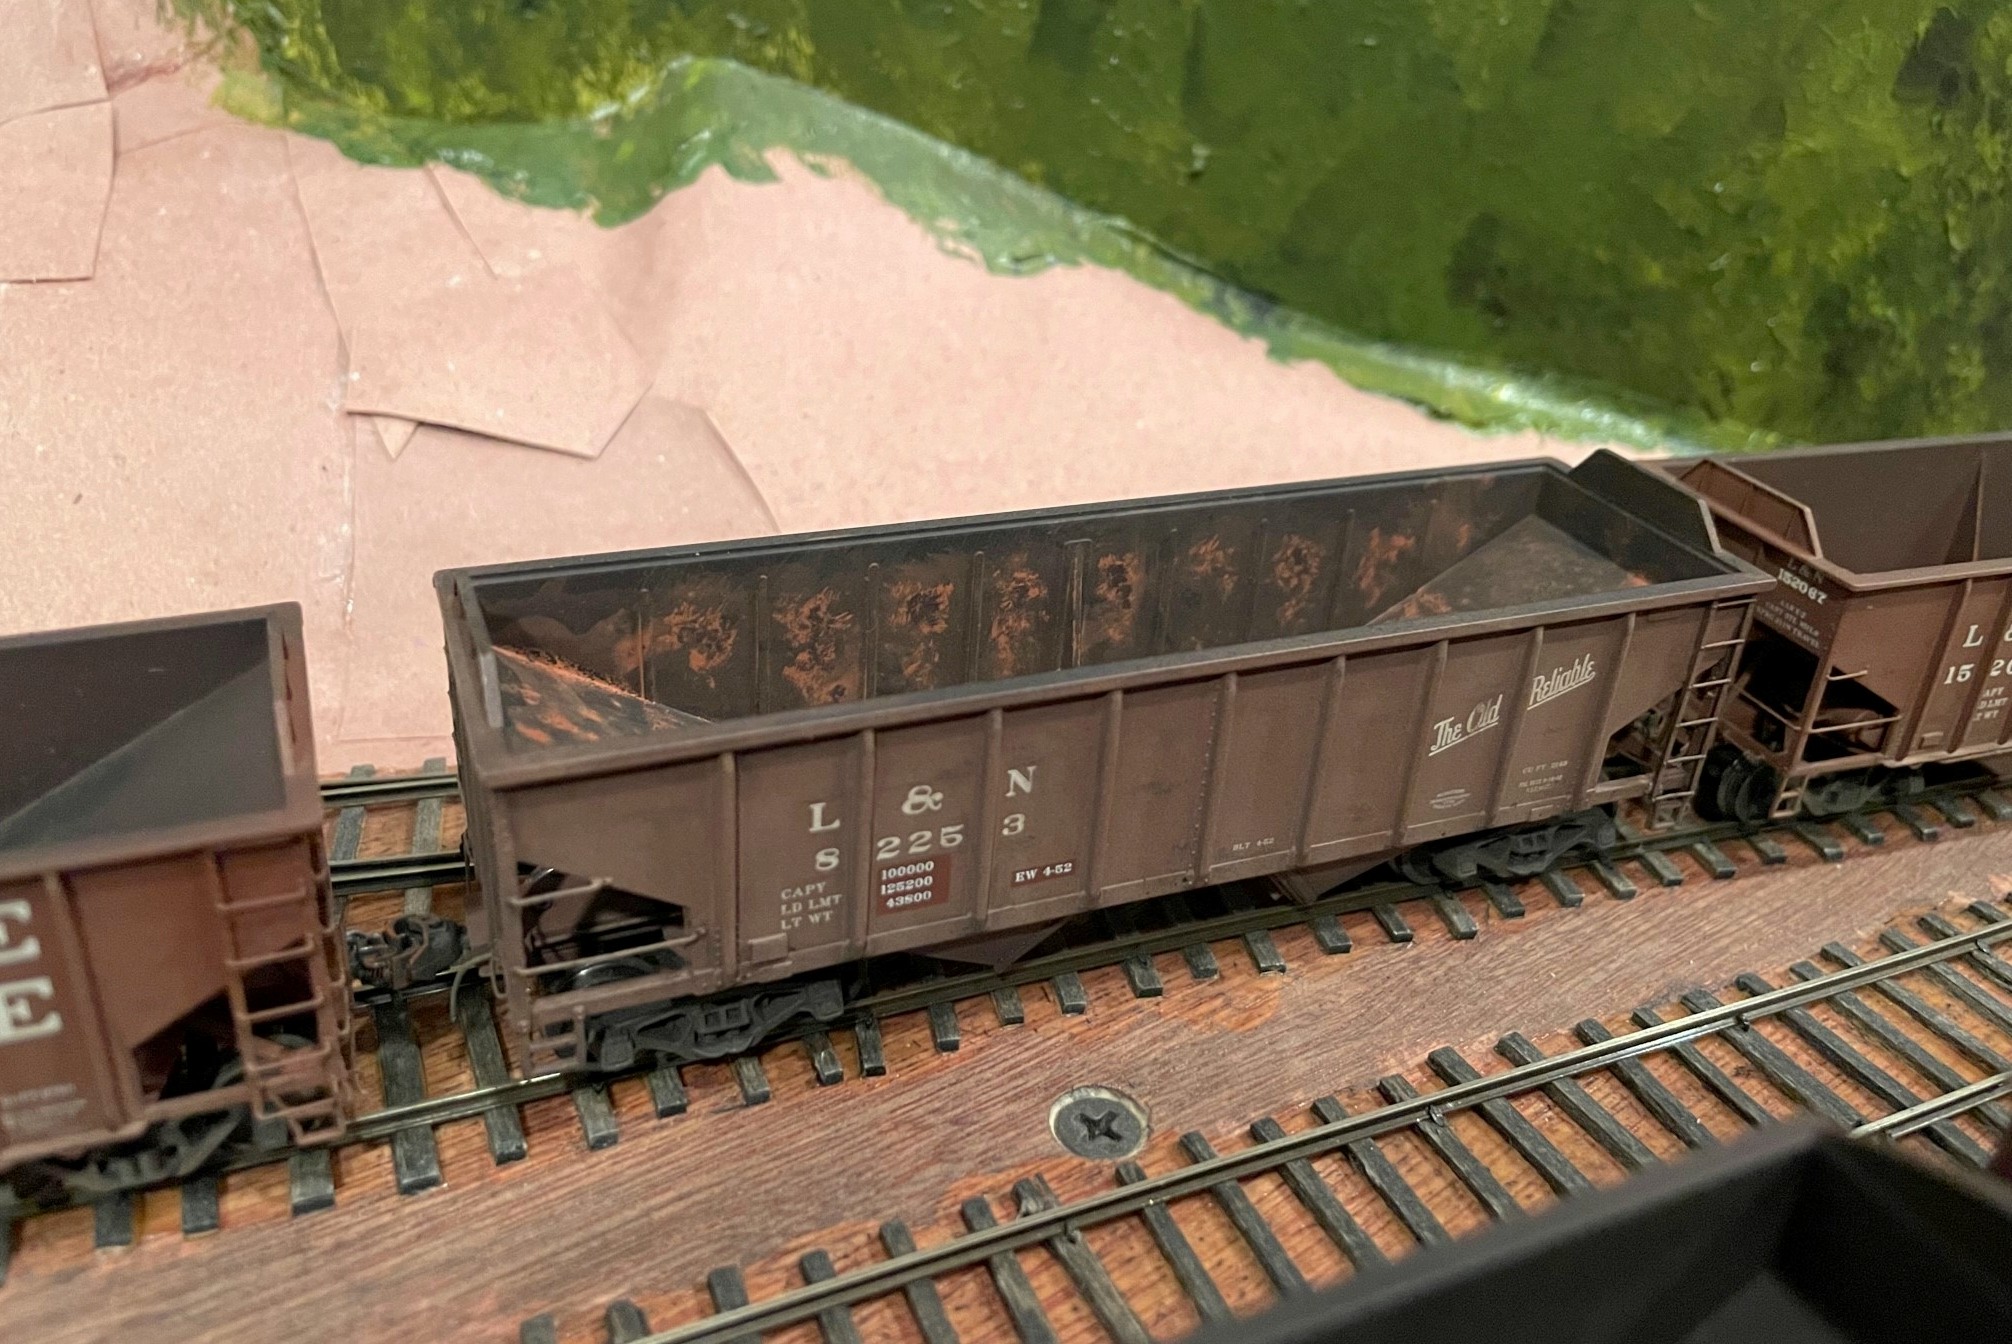
The Southern 50T offset hopper is a factory-painted Athearn model from a set of six (more of these to do). The roman lettering was common in the early ’60s and was almost entirely phased out by 1970. I wanted to model it in its last year or so of old paint. Detail-wise, it got the narrowed grab treatment, a new Kadee brake wheel, and a few wire details.
These two ex-Central of Georgia hoppers started as Roundhouse kits but are full of added and modified parts
The most work-intensive of the bunch were the two ex-CofGa 70T hoppers. These began as factory-painted Roundhouse kits (one used, one “new” but very old stock). Up to this point, I’ve been content to use the Atlas Trainman version of this car which is a pretty good stand-in. I also use the Atlas cars for my “primary” Southern 70T hopper fleet, and in reality, the Central of Georgia cars are 14″ shorter in length (40’6″) than the Southern’s big 70300-73749 class of cars (41’8″)… crazy me, I thought “wouldn’t it be cool to have the ex-CofGa hopper be noticeably shorter in a lineup?” Let’s just say these cars need a LOT of work to bring them up to modern standards and to correct the most egregiously noticeable detail faults and missing details. Lots of styrene, cuts, and extra details later, these cars emerged. Perhaps I’ll do a whole write-up on them [see the full write-up here], but they do, indeed, look cool and distinct in a lineup of Southern 70T cars… was it worth it? Only to a hopper freak like me.
I spent more time than normal weathering the interiors of these hoppers using a combination of airbrush, washes, and dry brushing
Most of these models represent cars that were already 10-25 years old when I’m modeling them, so they got some pretty heavy weathering. I did some dry brushing of rust spots on the exterior. The Monon cars got some car-colored dry brushing to fade portions of the big “MONON” using pictures as a guide. On several of the cars, I masked off portions of the data (LT WT and LD LMT) and shop markings with rectangles of tape–when peeled off after the airbrushing, it looks like re-stenciled data which is appropriate for cars this age. I airbrushed them all with a light spray of flat tan to fade them a little and add some dirt, especially around the trucks and bays. I also airbrushed some flat black into the interiors–the older the car being represented, the more black it got. Next I used a wash of black with a little tan on the outside to darken the seams and corners and dull things down. On the inside, I used a wash of Vallejo “orange rust” and water and dabbed it on heavily with a big brush, letting it dry in splotches and in the corners (some got a couple coats). For the oldest cars, I drybrushed the interior with orange rust, particularly along edges and panel lines. Finally, I put dabs of Vallejo “dark rust” into the centers of the orange spots to make it look like an old but growing rust spot with fresh orange rust along the outsides and dark rust in the middle.
Overall, I’m pretty happy with the additions, and it’s fun to have a few “rust buckets” running around in the trains. Can’t wait to load ’em at the next ops session!
The 16 hoppers of the April 2022 class finished and ready for the next session
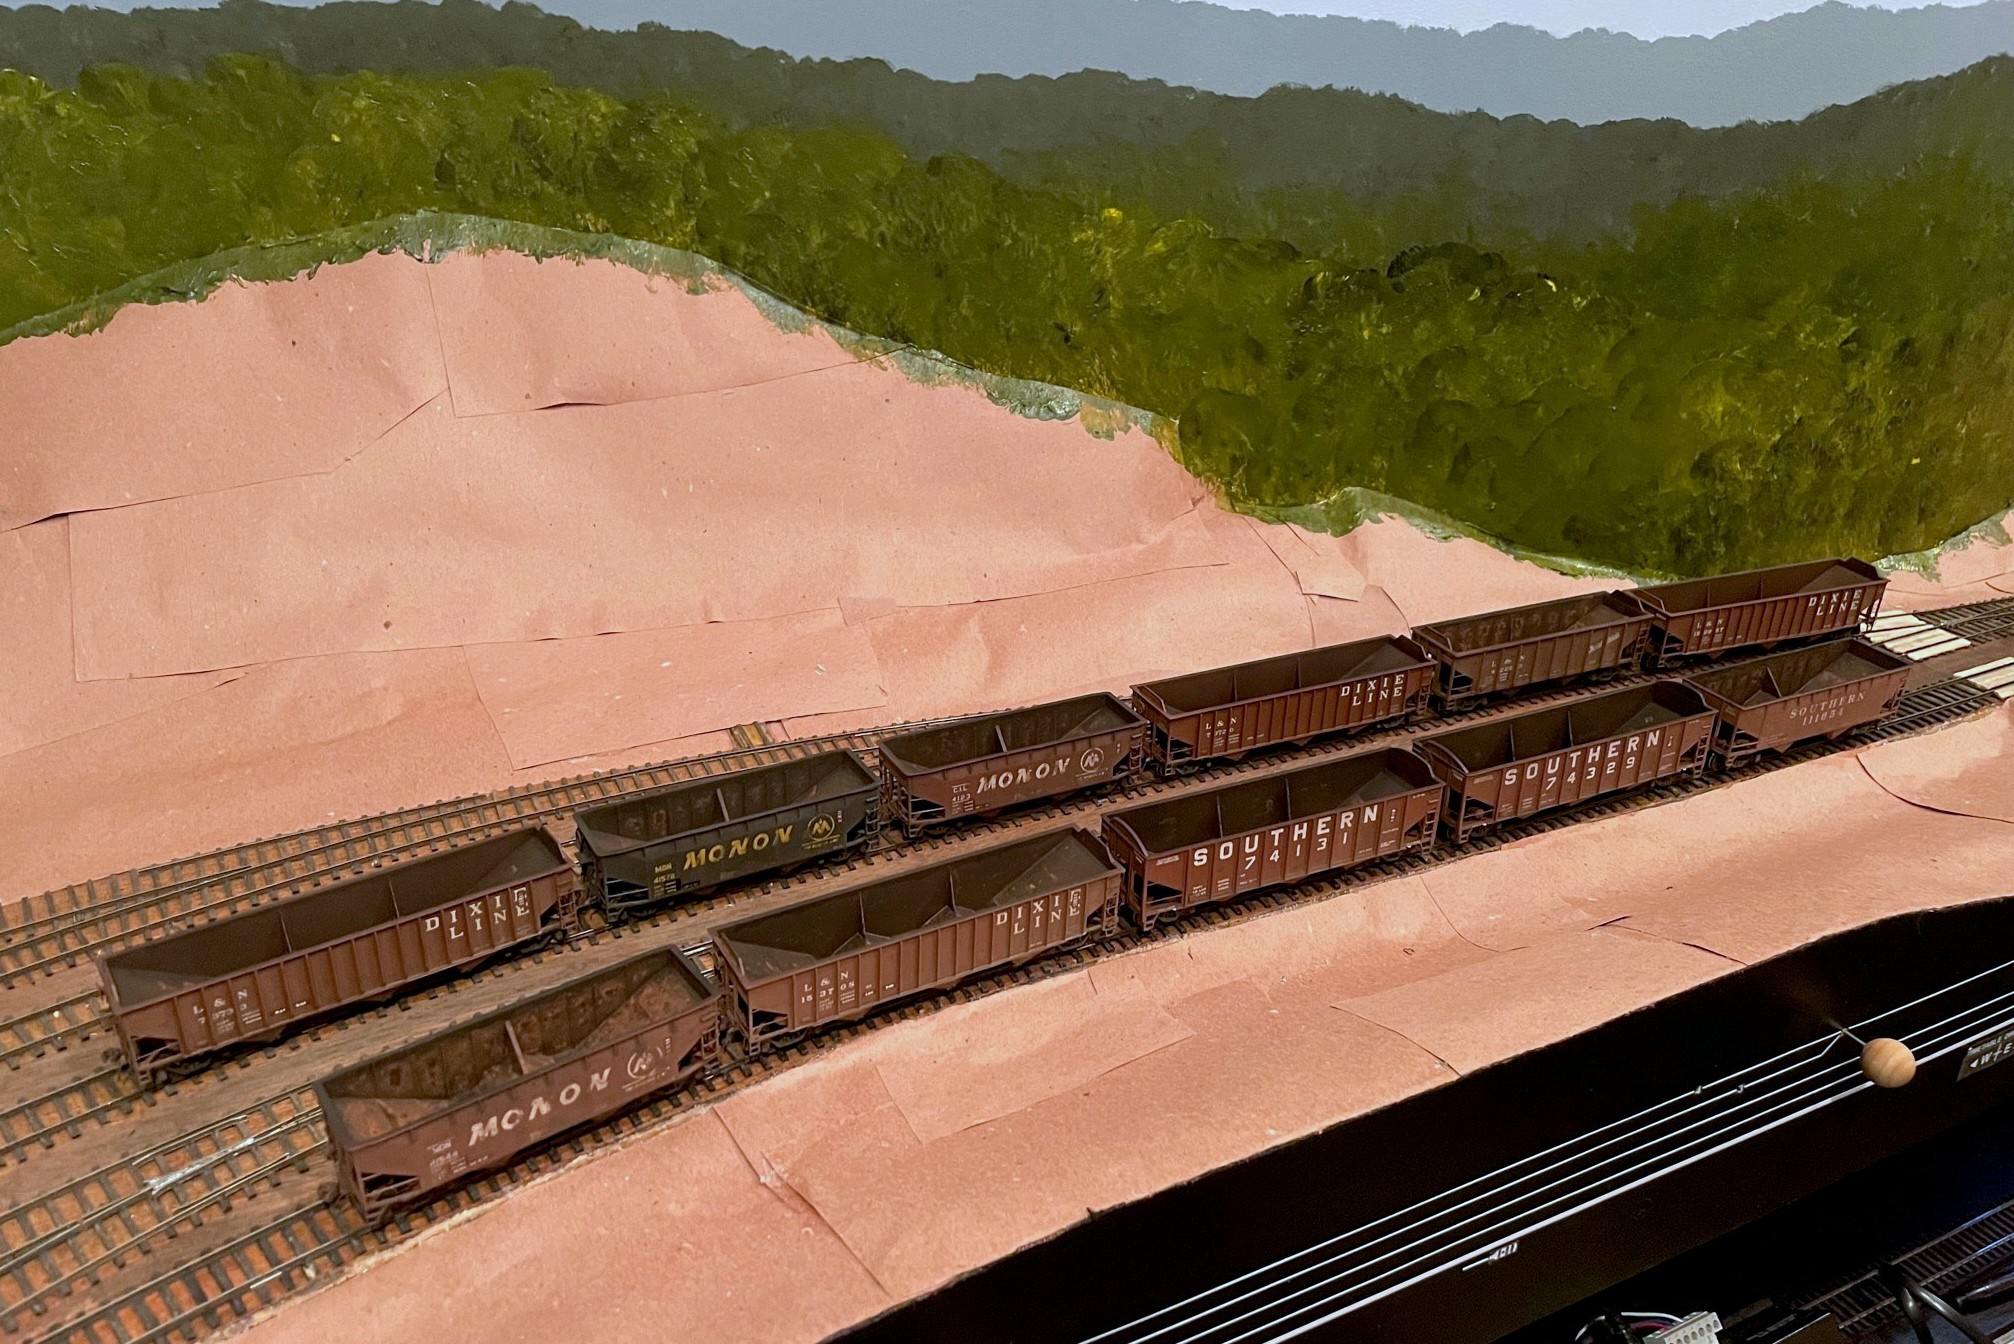
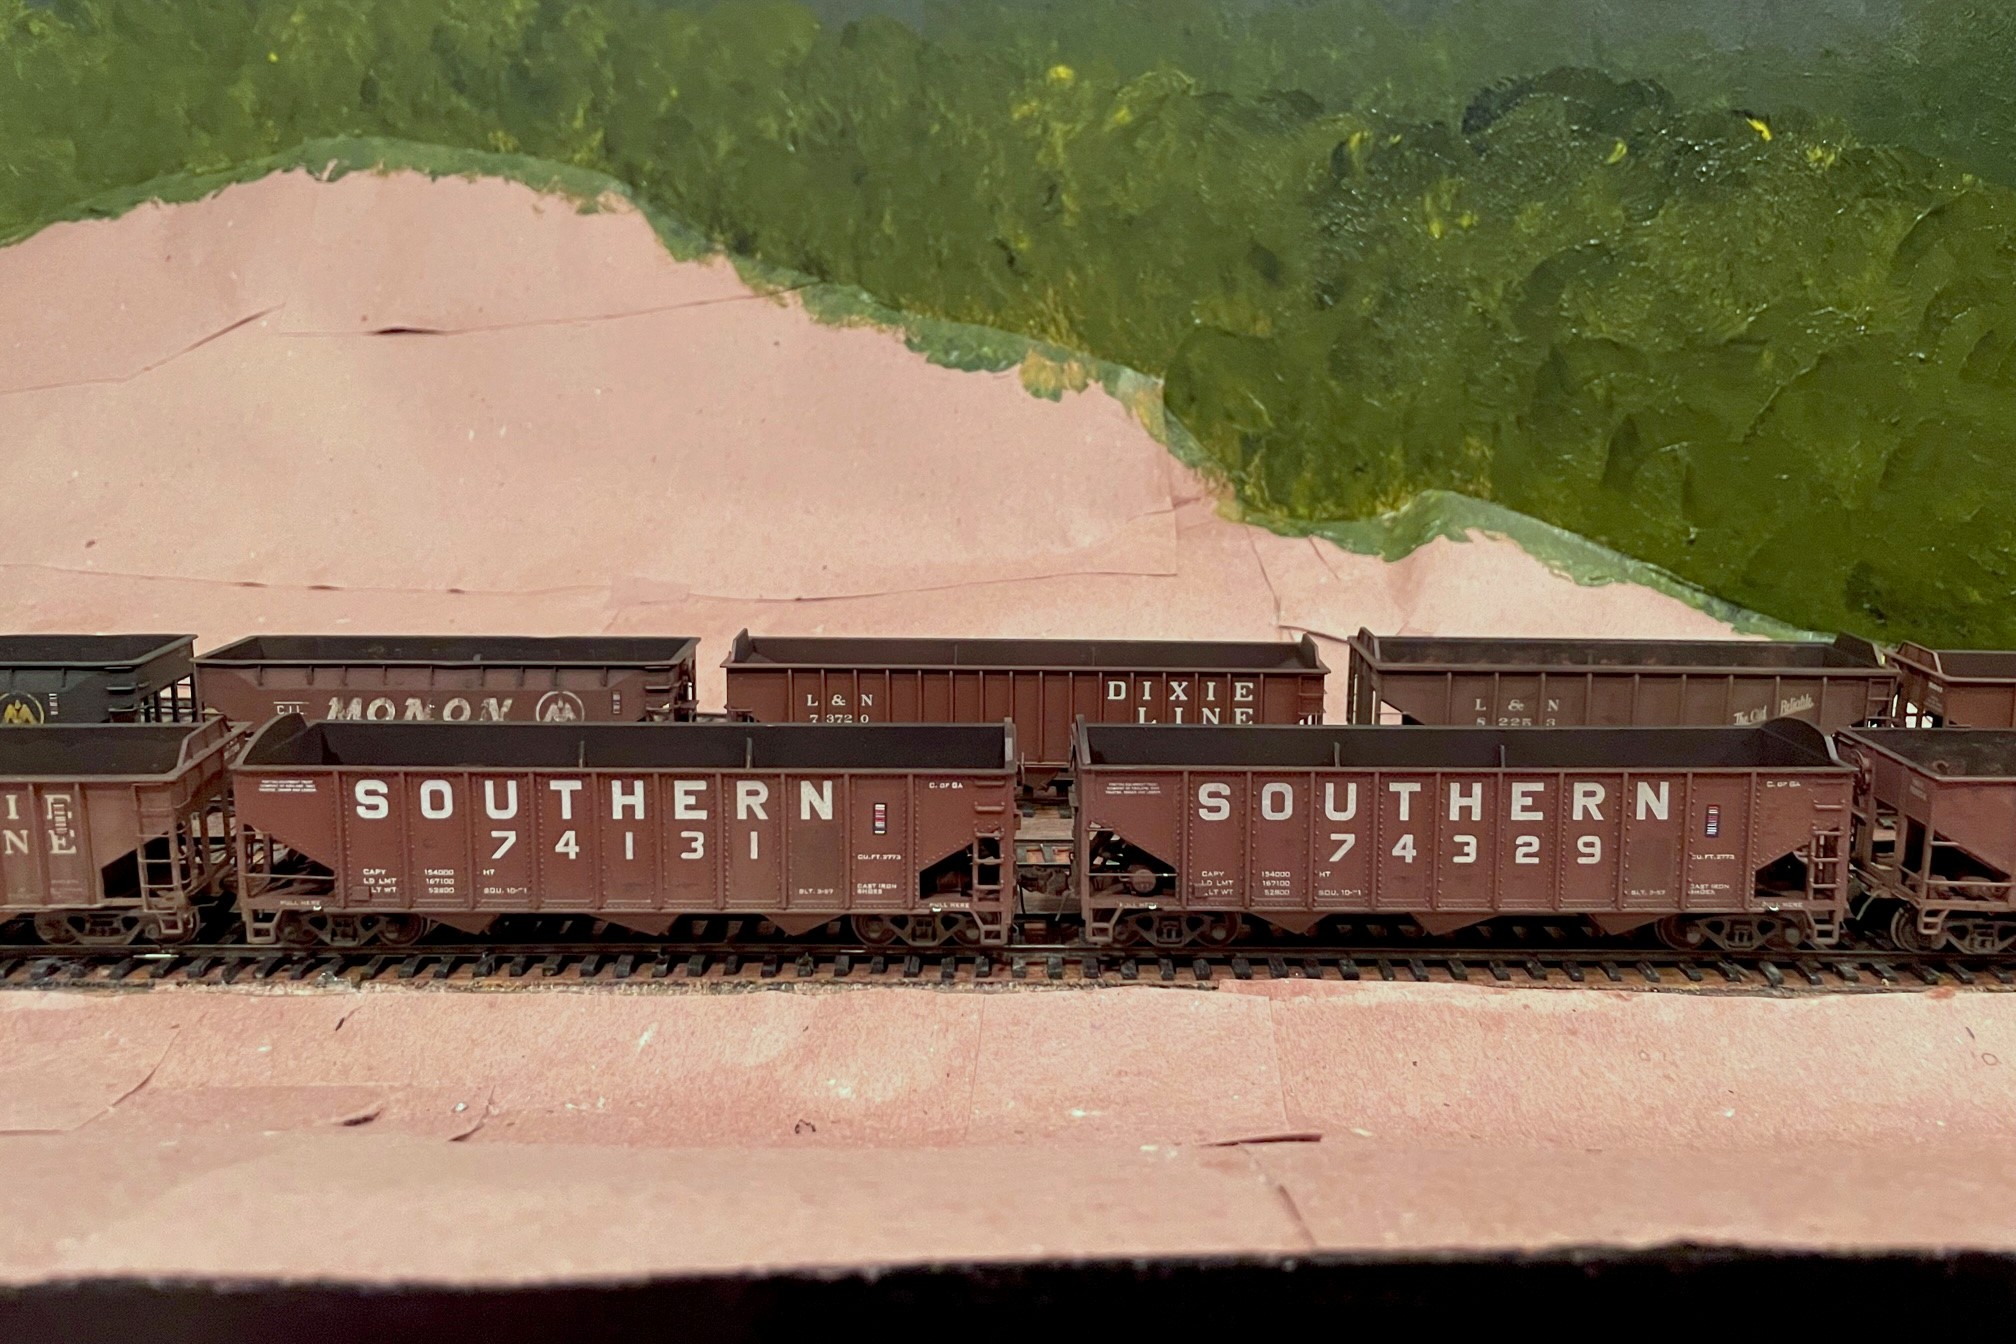
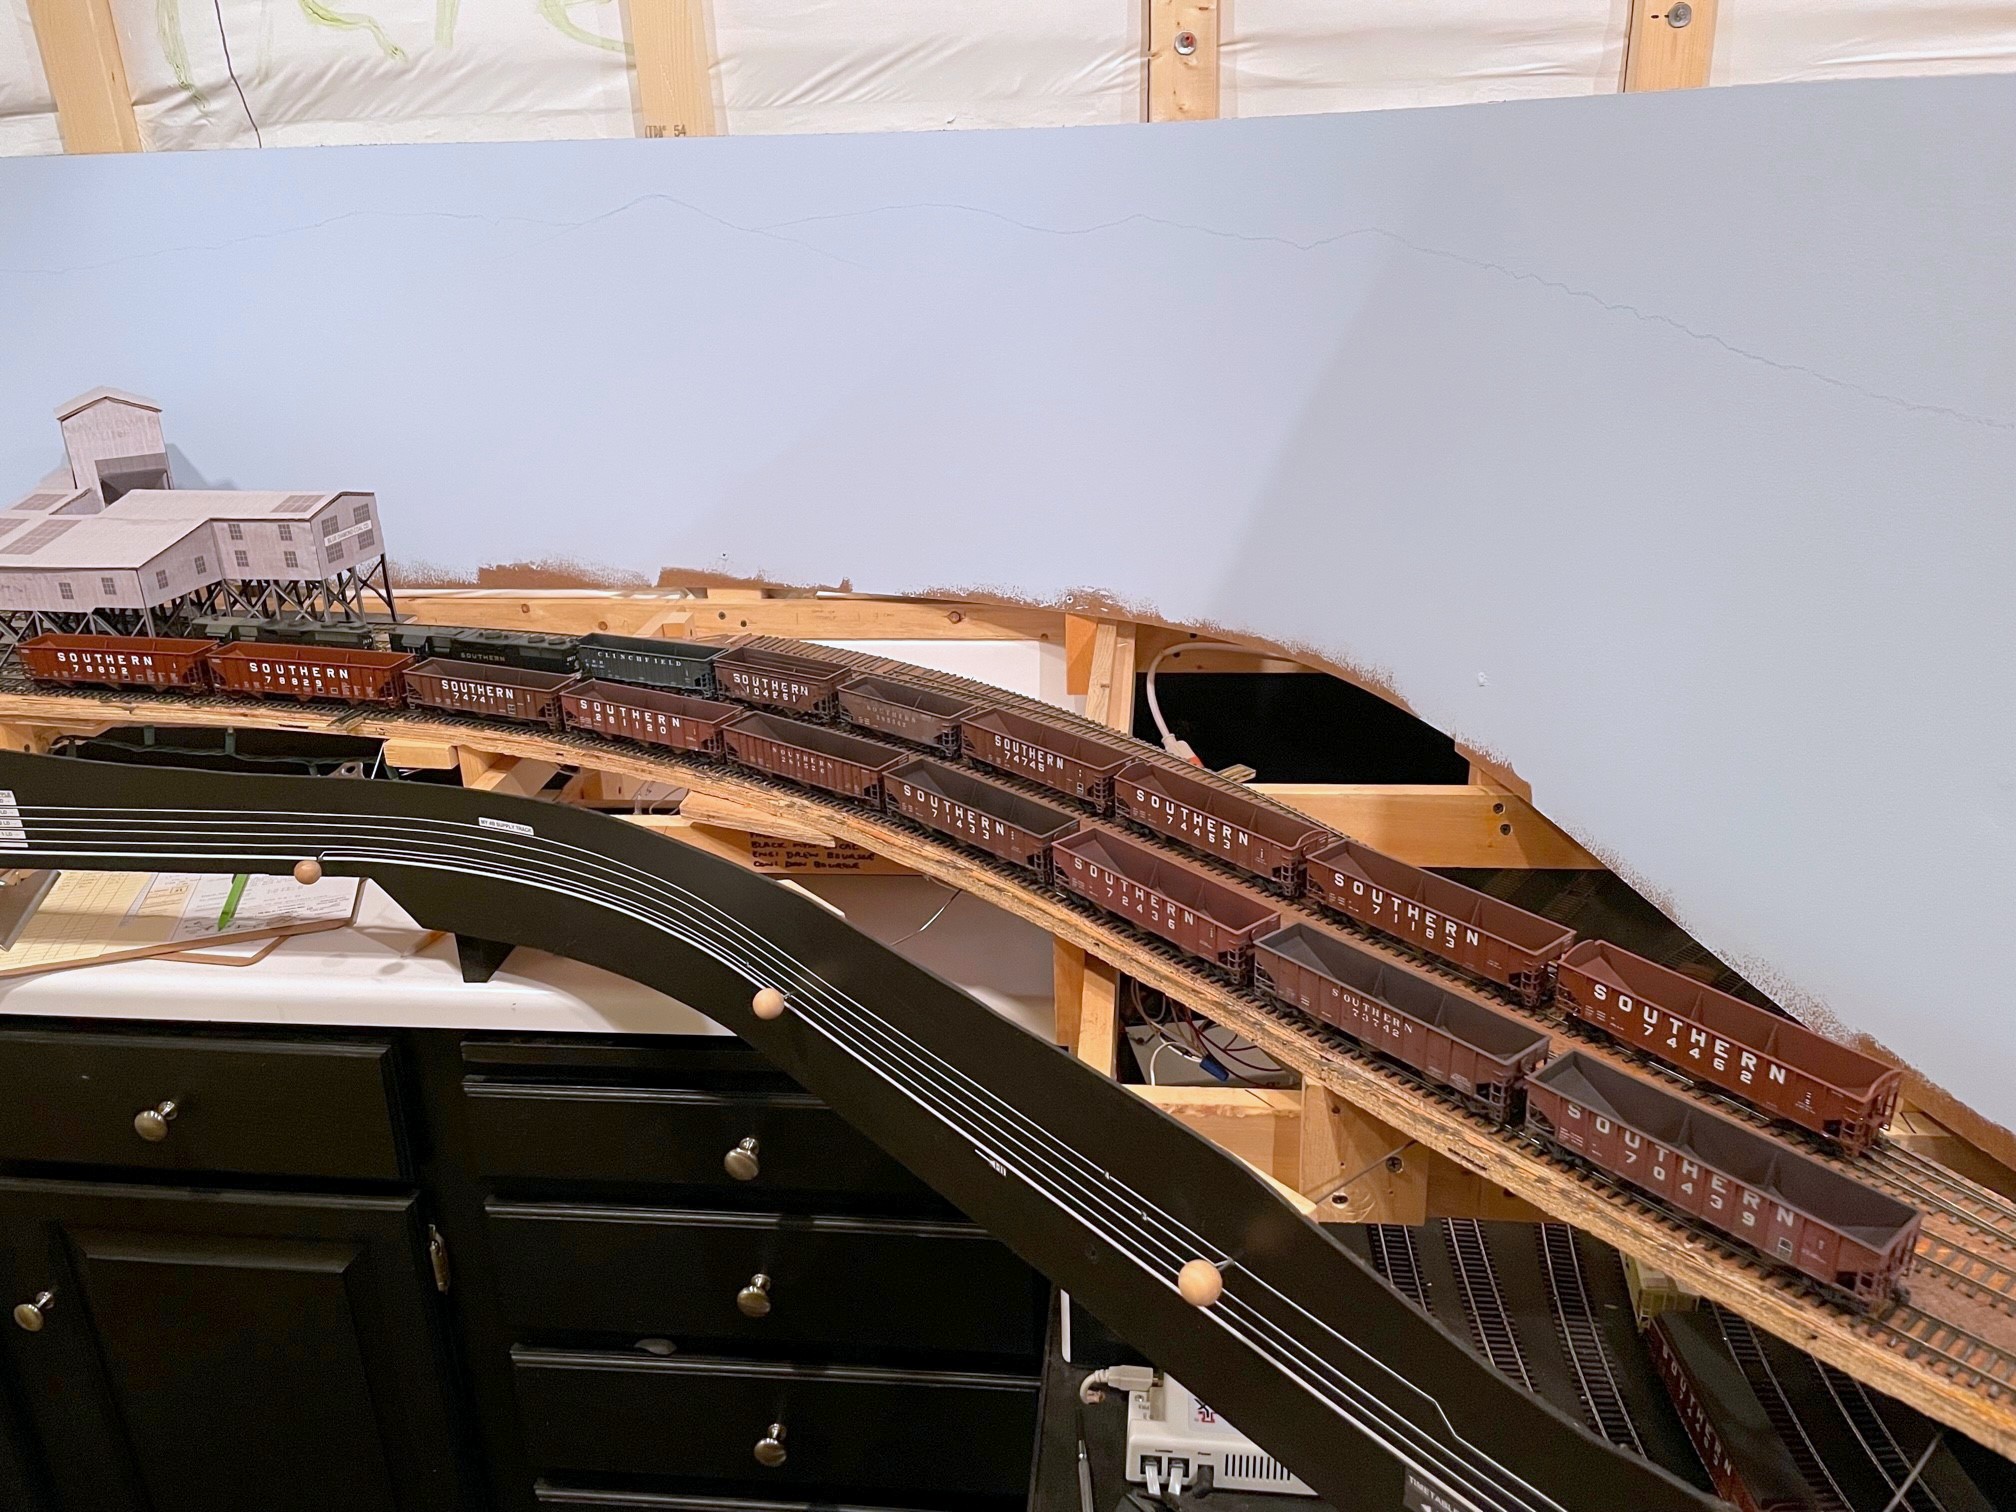
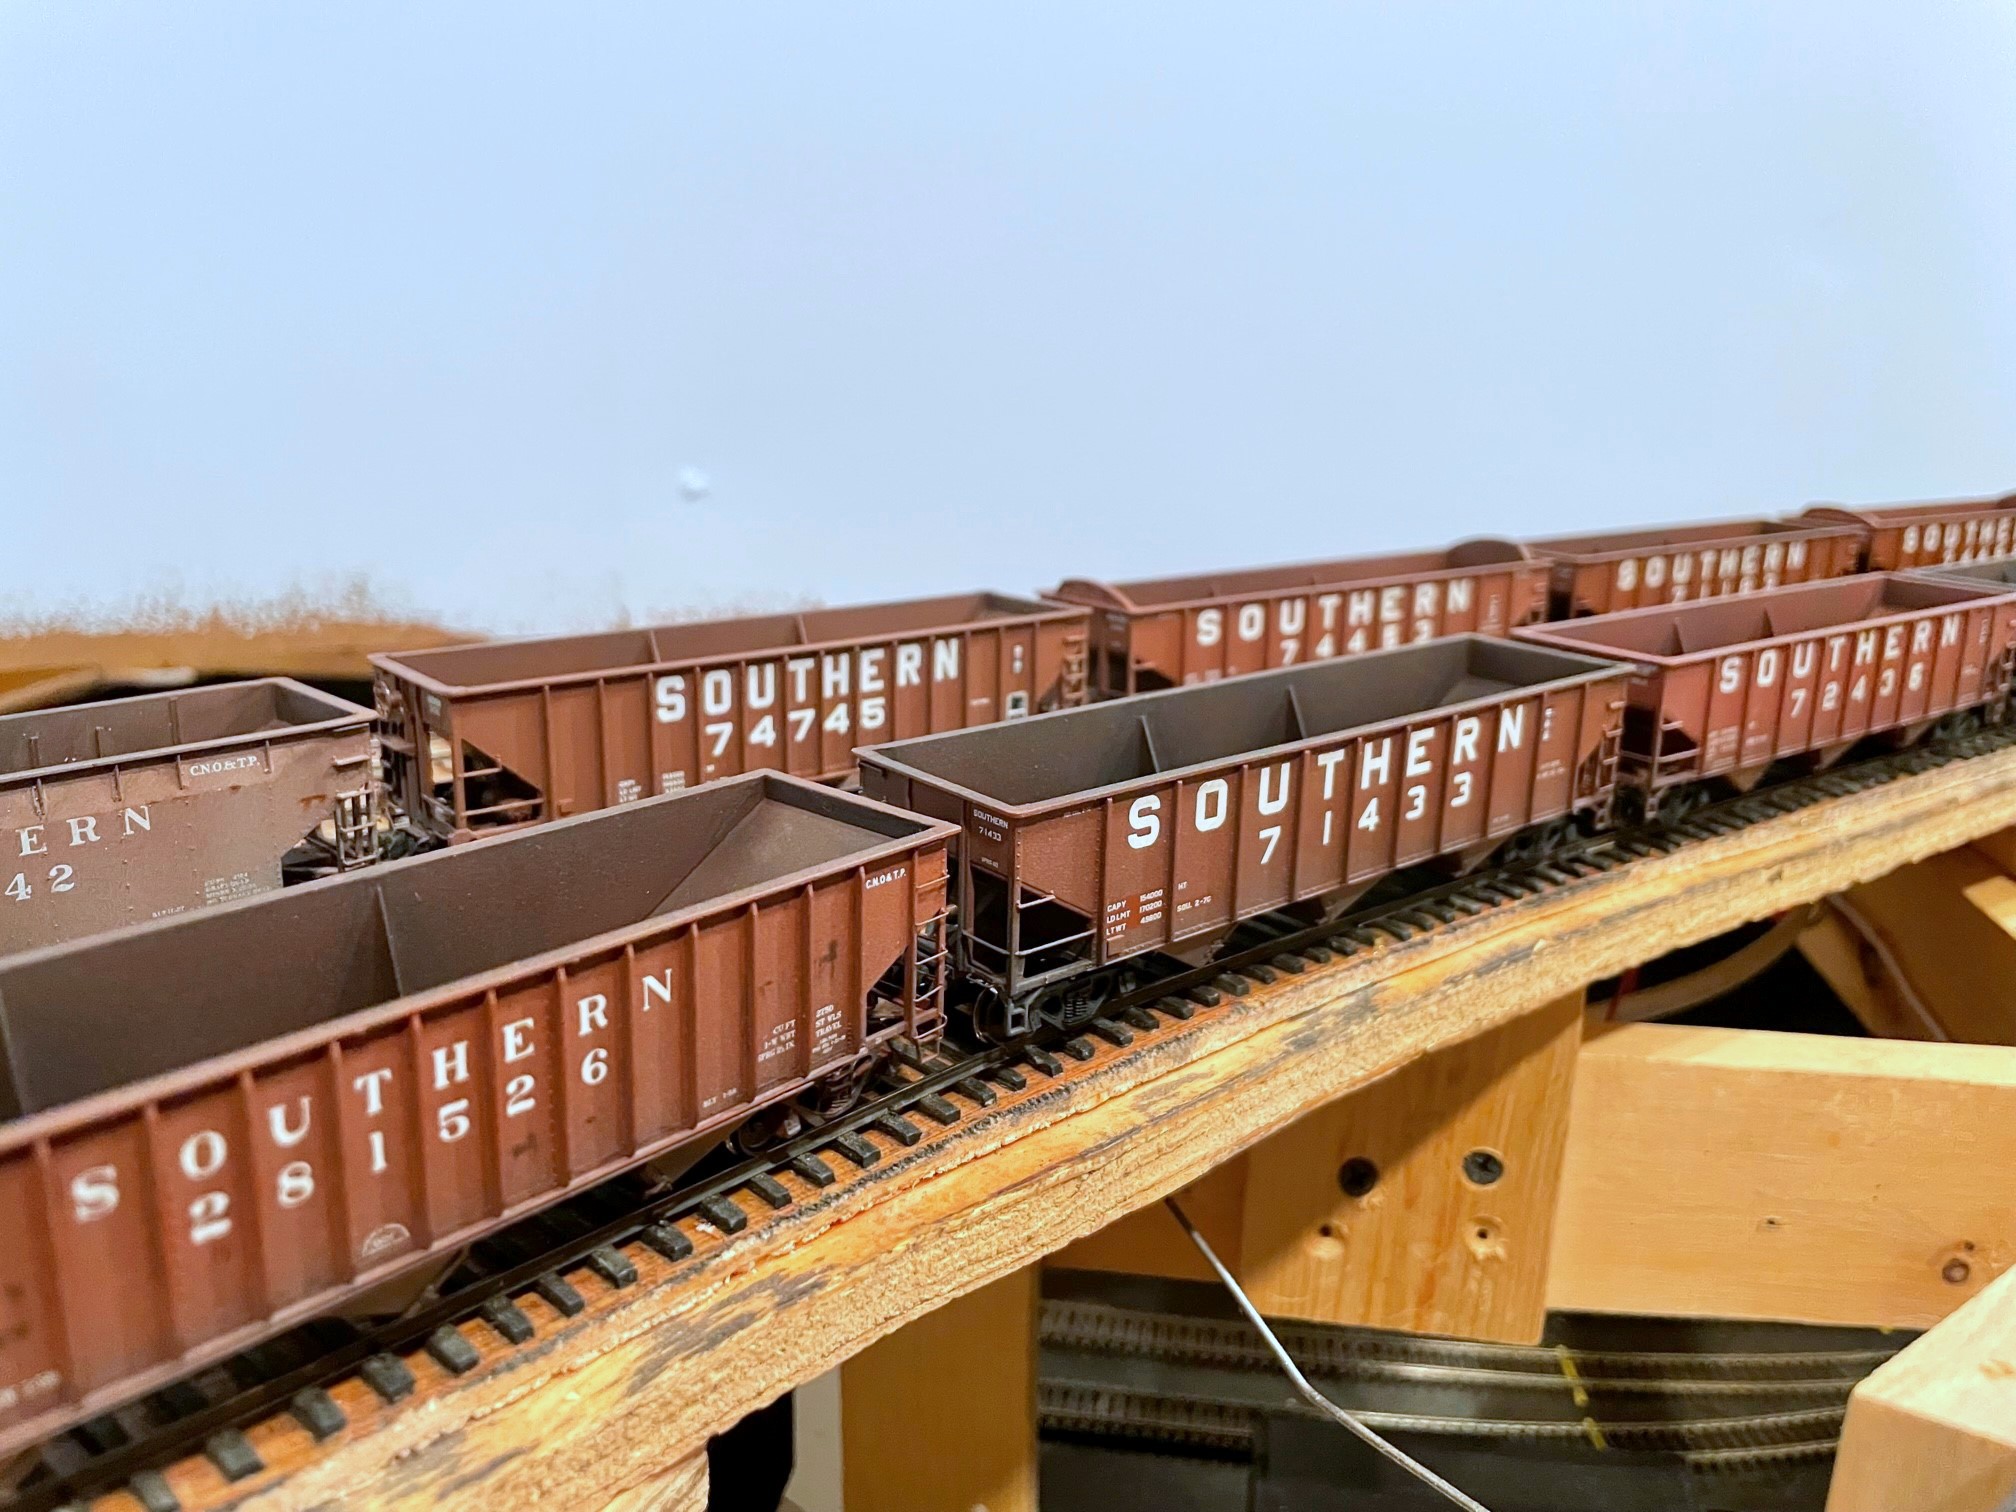
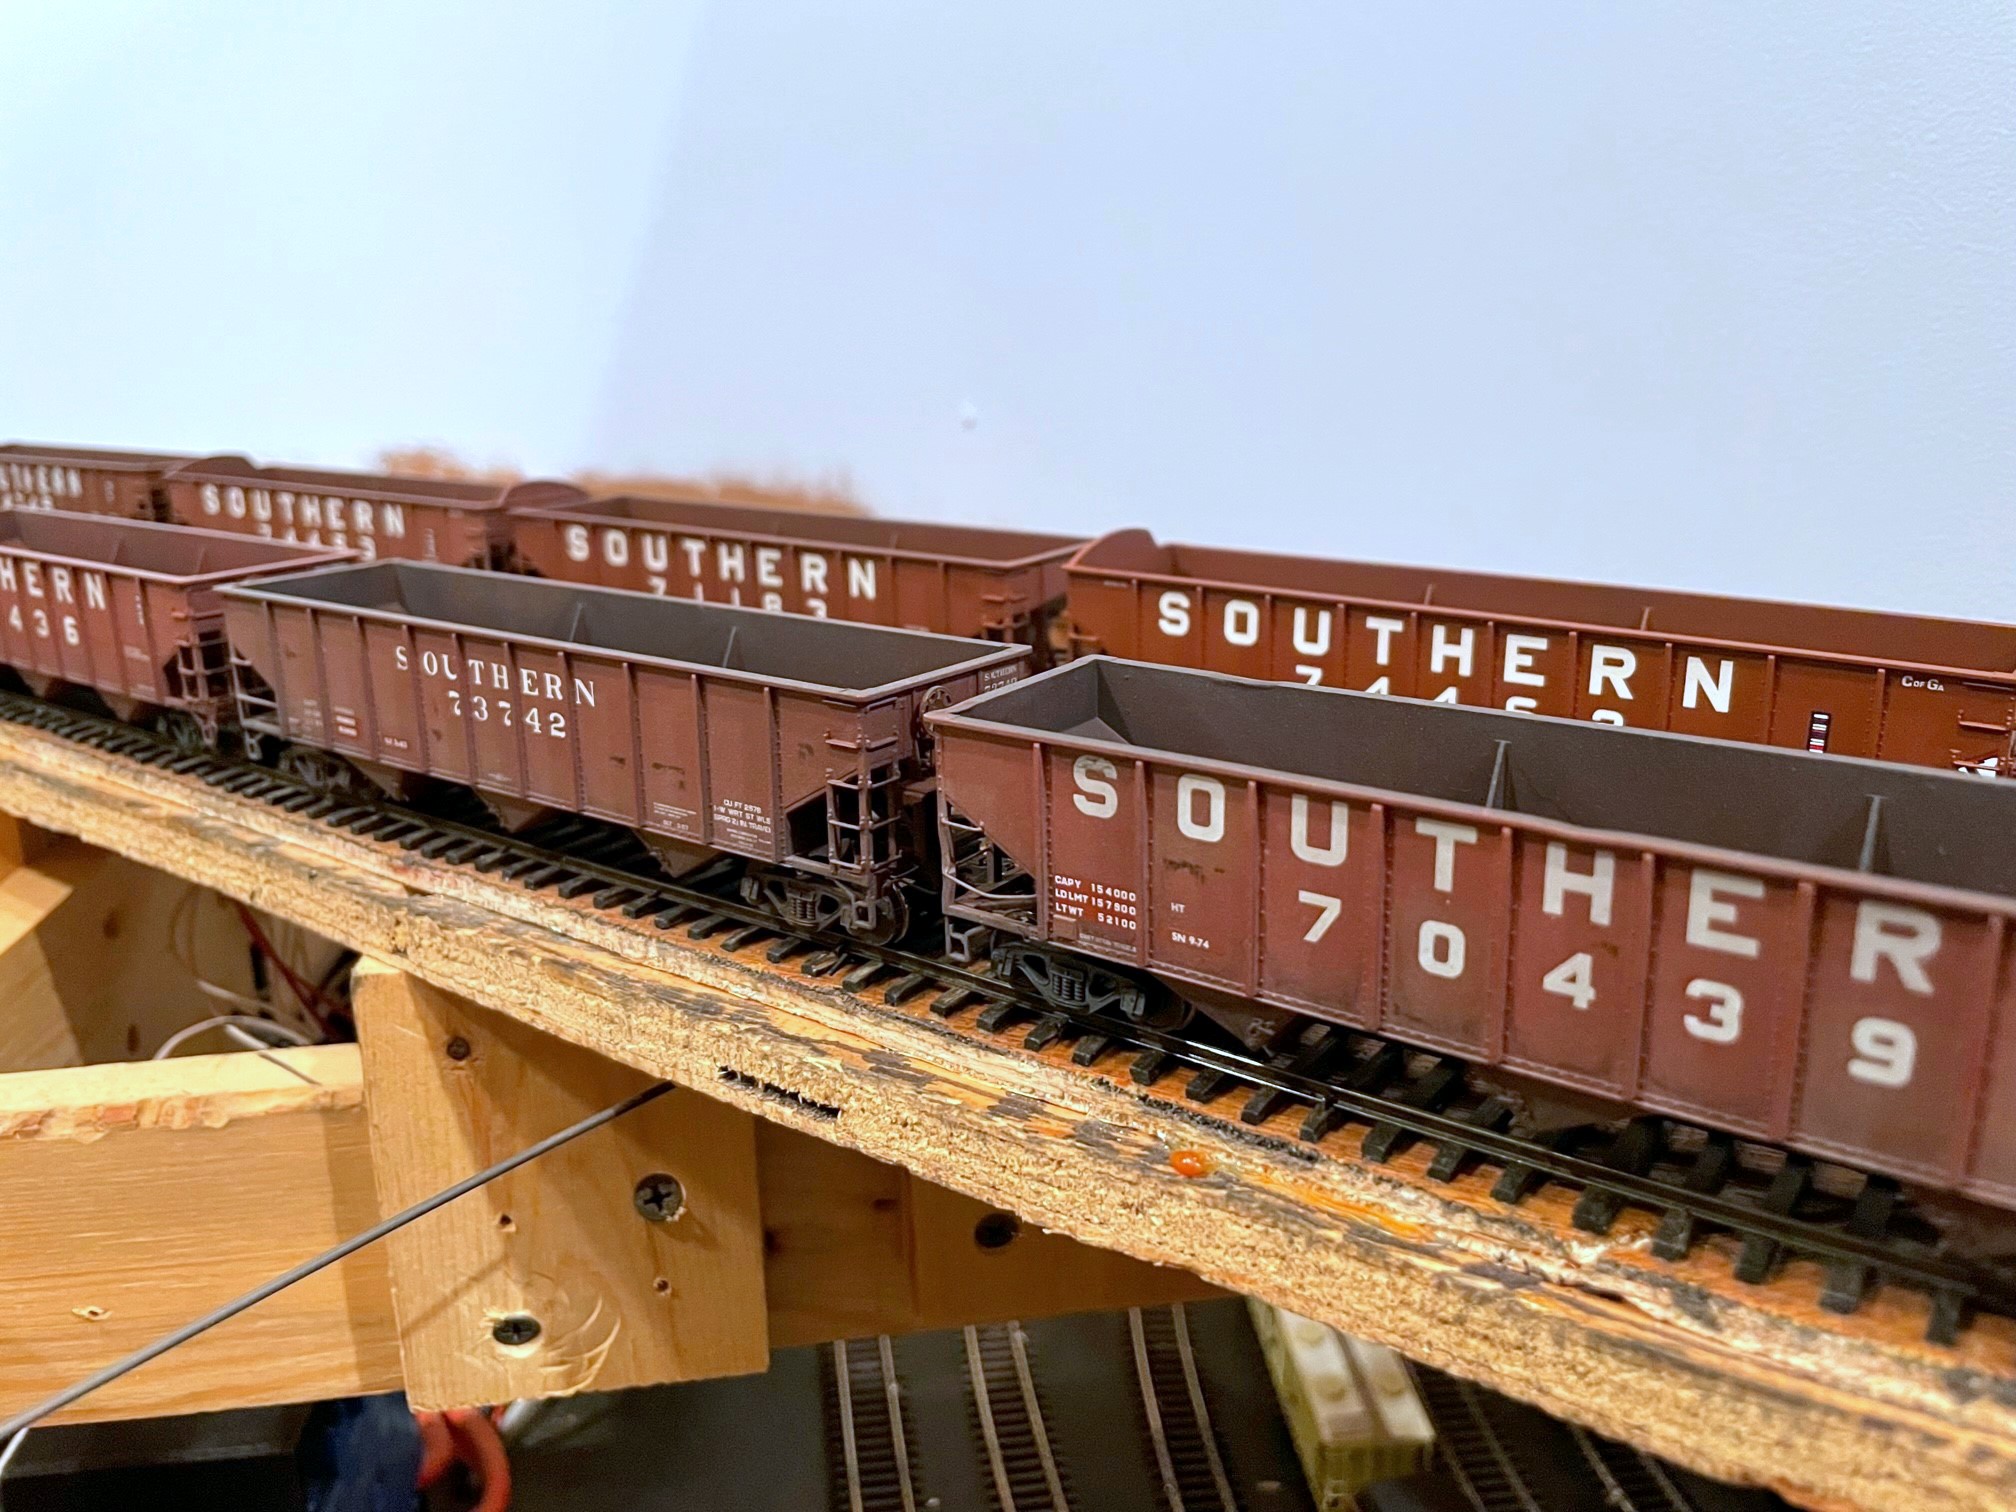
The St Charles Branch would like to welcome the Southern Hopper Class of April 2022 to the roster! The 16 cars in this graduating class are the largest group of cars I’ve ever finished at one time (and probably the largest group I’ll EVER attempt at one time). The 16 hoppers, including a foreign exchange student from the Clinchfield, represent cars across the layout’s range of ops session eras from mid ’60s (cars still in roman font) to the mid ’70s (brand new 100T hoppers). Consequently, all were weathered a bit differently from a 55T twin with dents and lots of grunge to brand new with just a little grime on the trucks and underside.
A Tangent 70T PS3 clone next to an upgraded Atlas Trainman car
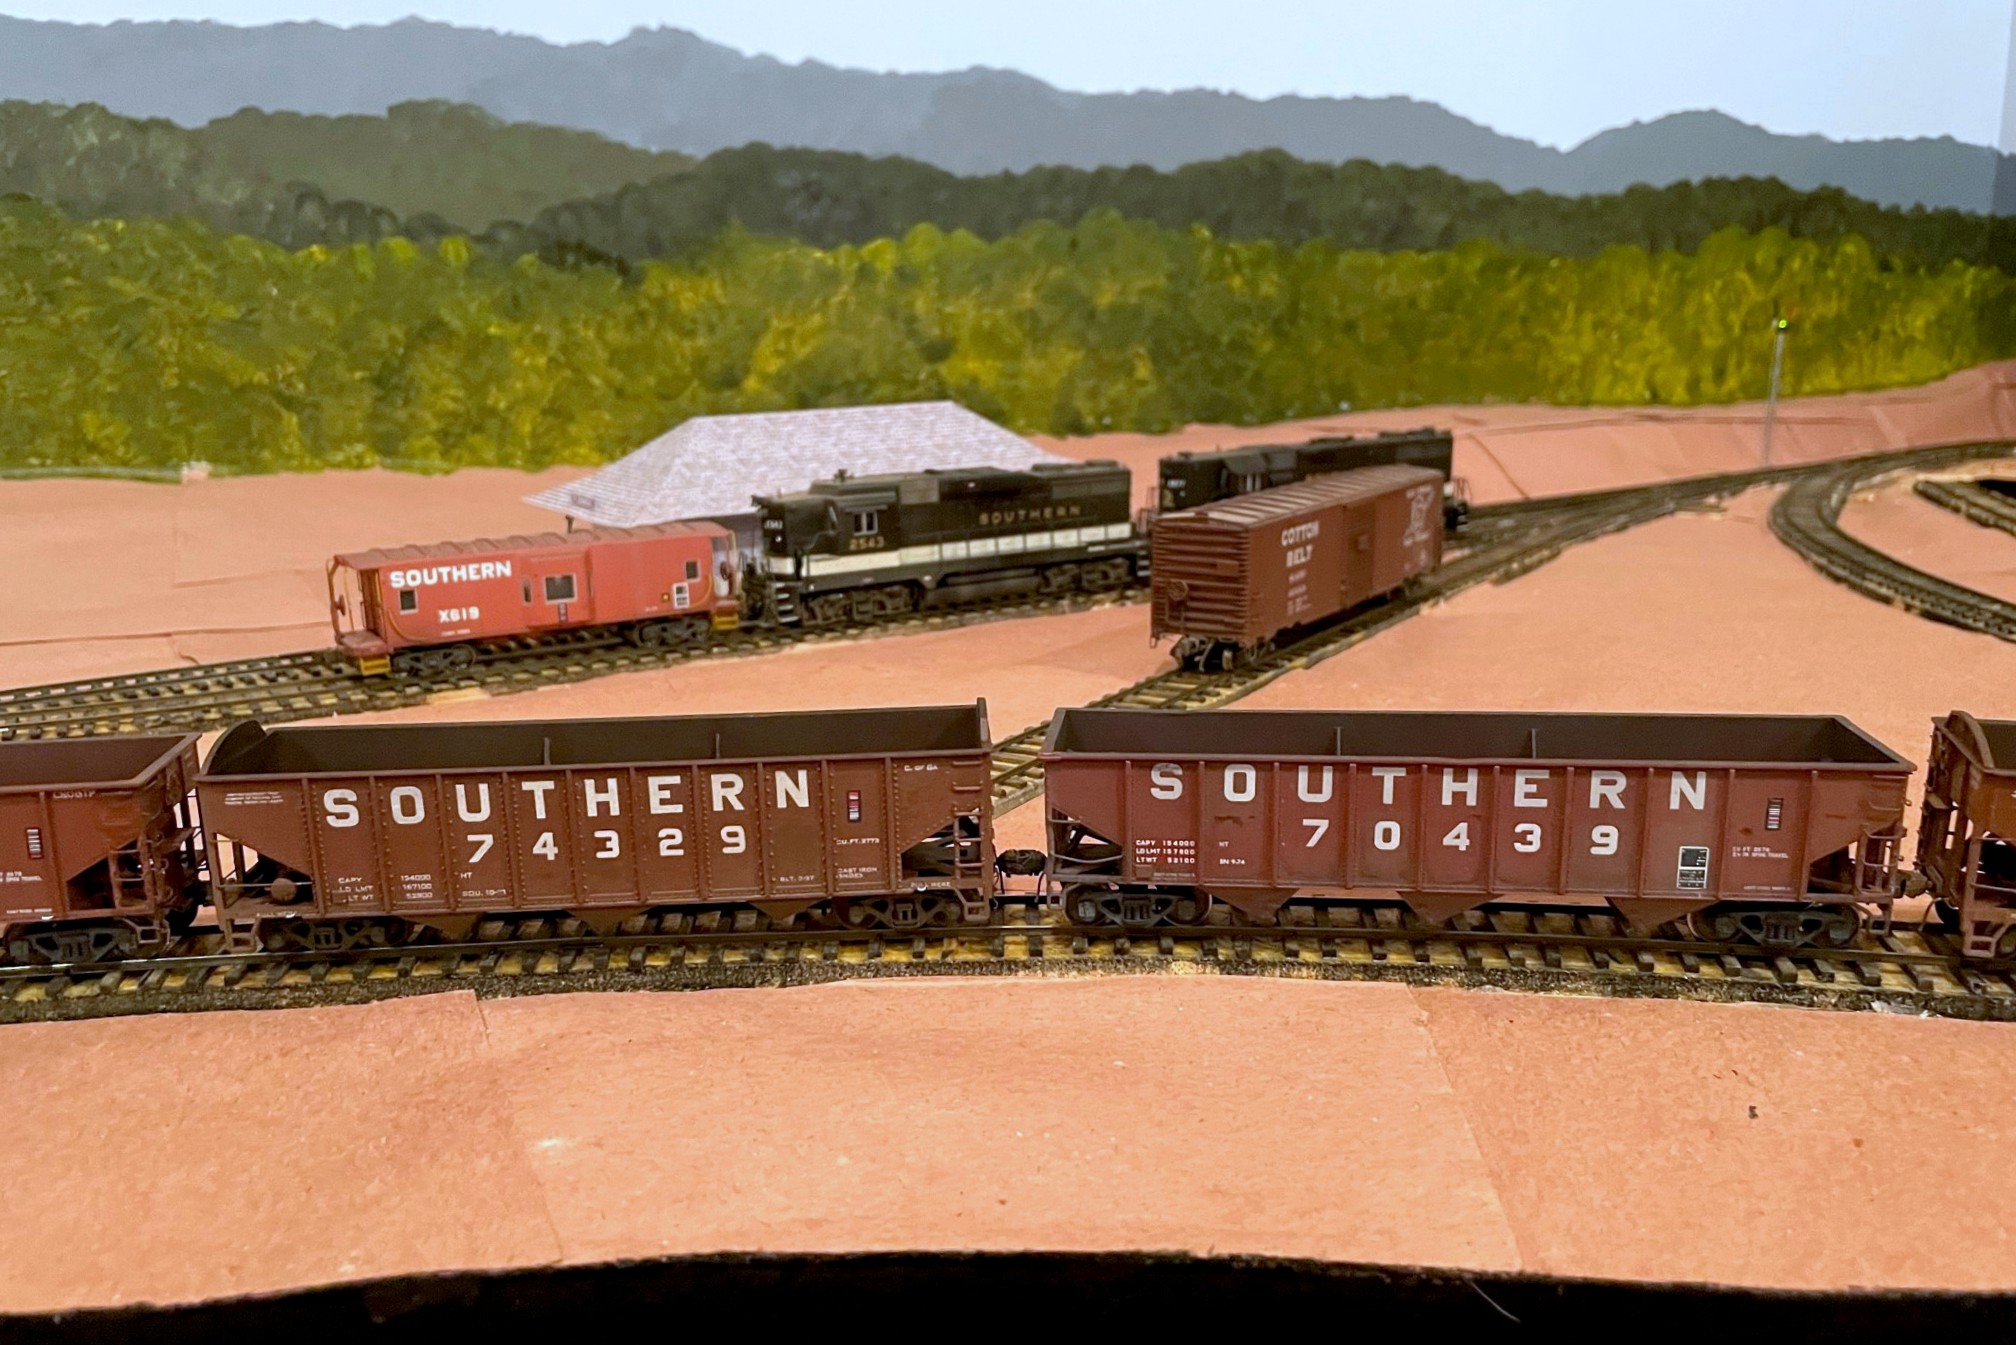
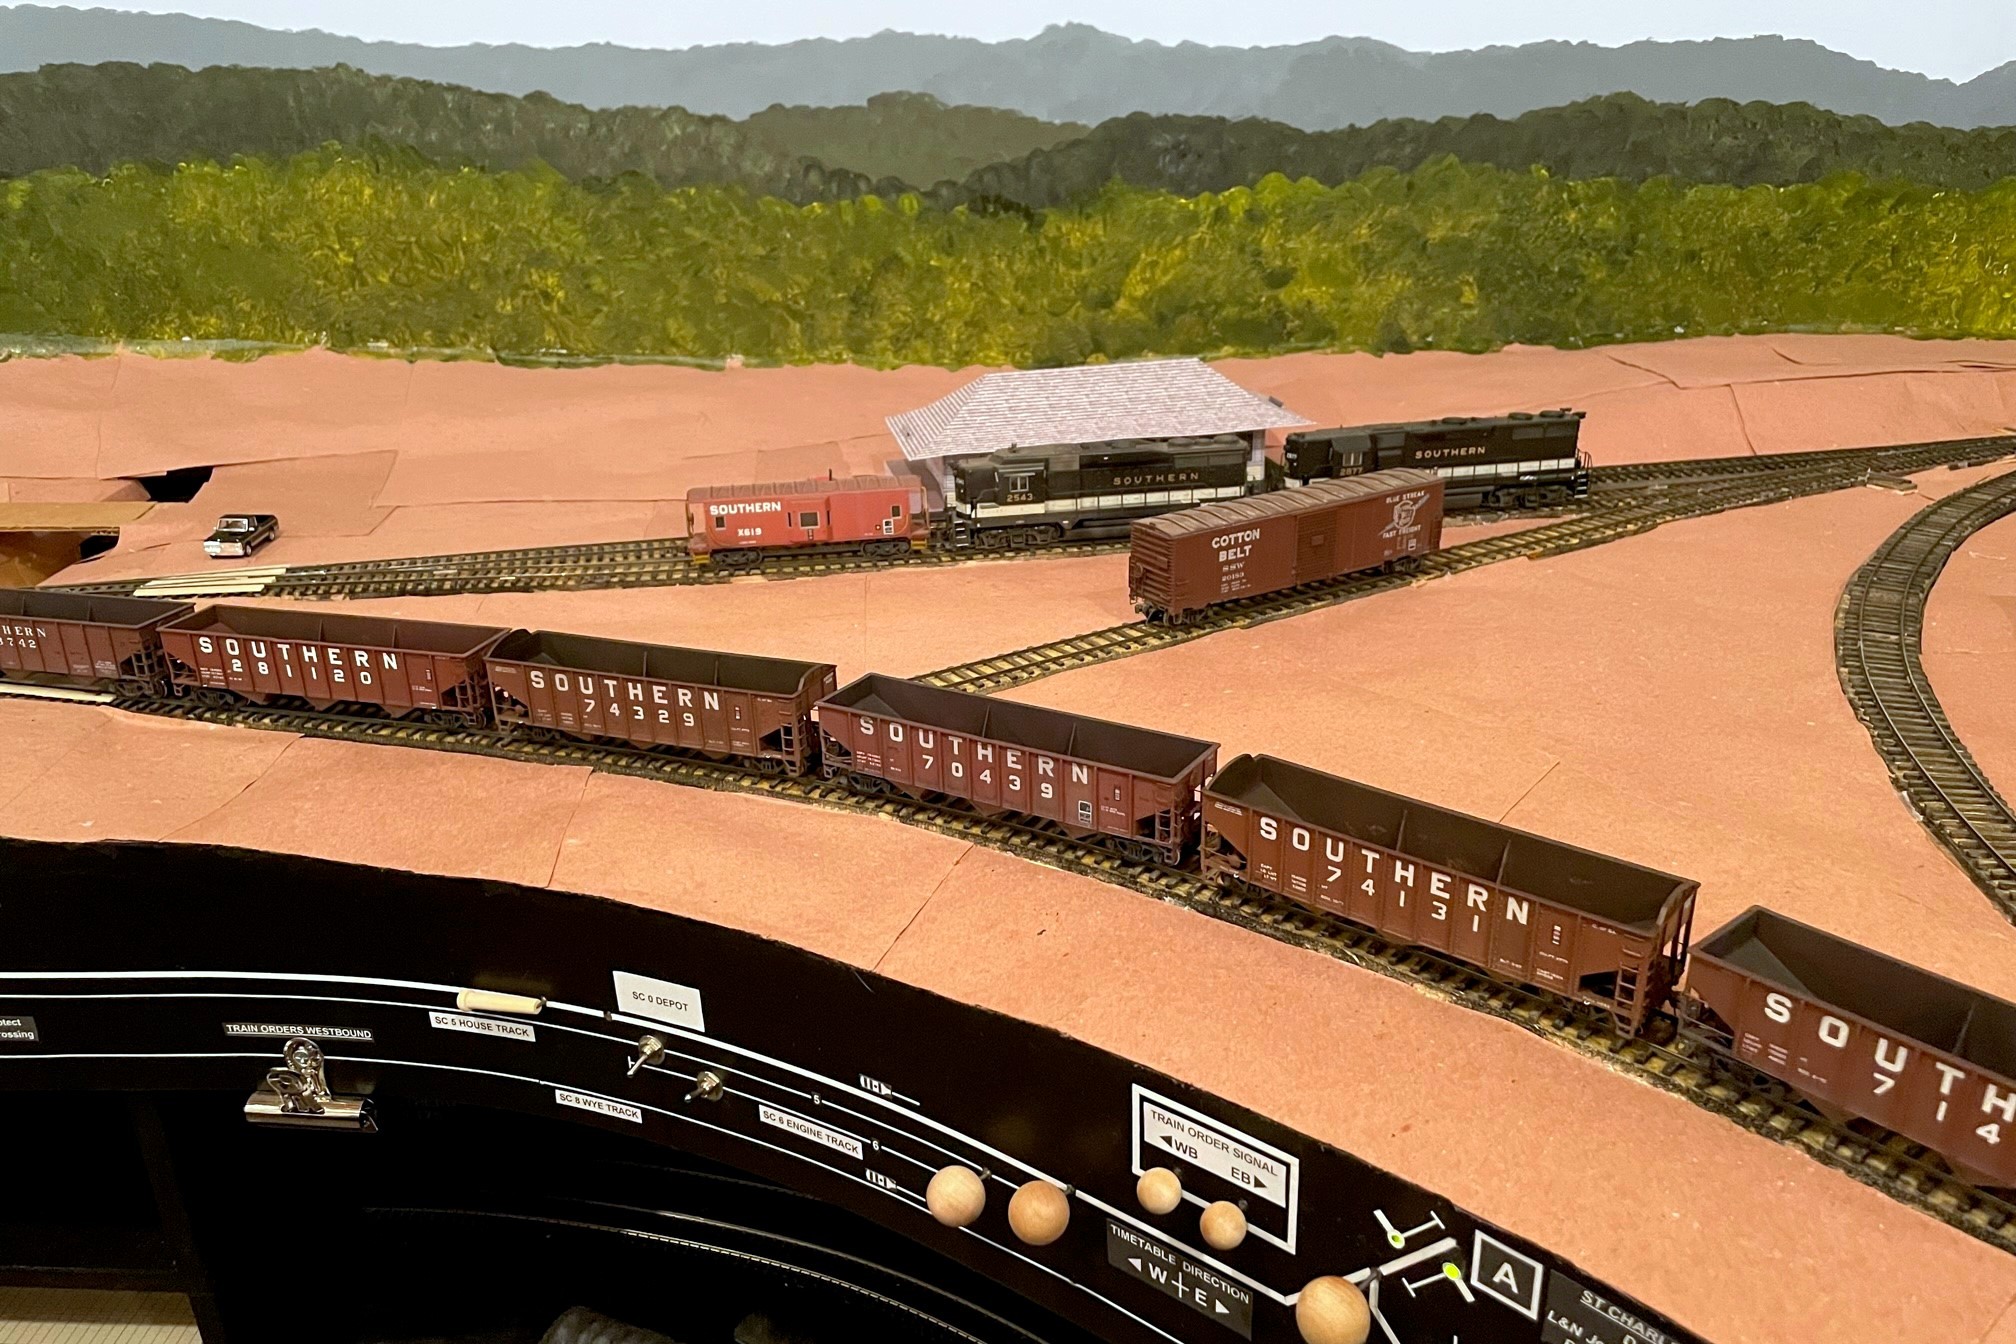
A few of the cars (CRR 70T and 50T extended-height war-emergency rebuild) have been complete and just awaiting weathering for several years. Some of the cars have been running on the layout for a while but didn’t yet have their full set of details or weathering. The bulk of the cars are Atlas 70T Trainman hoppers, which I love because they’re relatively cheap but have good wheels and trucks and great paint for budget cars. Some Trainman hoppers got a full set of new grabs (did this a while ago). Most Trainman hoppers (along with a pair of Bowser/Stewart 12 panel hoppers) got the standard treatment of getting the grabs shaved down to a more reasonable thickness front-to-back using an X-Acto blade. Other added details include Kadee #5s, plastic bits for tack boards and door bars, wire grabs adjacent to the couplers, homemade tow loops, homemade train lines (copper wire from Cat 5 cable), and homemade coupler cut bars (bent from .012″ brass wire on a homemade jig). A few got dents added in the top sill by softening them with a 100W lightbulb. A few of the cars came with heap shields (correct only for a small number of ex Central of Georgia cars) that got removed as well. I also swapped out the trucks on the Tangent 100T cars–I decided I wanted cars that roll well more than neat spinning roller bearings.
Two of the more heavily weathered hoppers of the batch–note the dents in the top sill of 70439
All but one of these cars is factory painted which saves a TON of time. I changed some of the numbers by scraping them off gently with an X-Acto chisel blade (along with the later round “O”s on some of the Atlas cars) and replaced them with decals. Most cars received ACI labels (1967+) and a couple got lube plates (1974+). Before weathering, I covered some of the weight and shop stencils with rectangles of masking tape to represent re-stenciled cars. I ran them through a weathering assembly line that included coats of various thickness of airbrushed flat black followed by light tan. I then painted out a few more weight panels with fresh oxide red and added some stencil data in a different font to a couple cars. A few of the cars got some drybrushed rust marks too. Finally, most of the cars got a wash of flat black inside and out. Overall I’m really happy with how they turned out, but I don’t think I’ll ever assembly line 16 cars again… do you know how many wheel faces that is to paint? 16 cars x 8 wheels x 2 faces per wheel = a ton of wheels (that’s 128 wheels and 256 faces… don’t hurt yourself doing the math)! Still, it will be worth it to see coal trains with a lot fewer shiny cars in the mix.
The Tangent hoppers represent cars built in 1975 so weathering is minimal