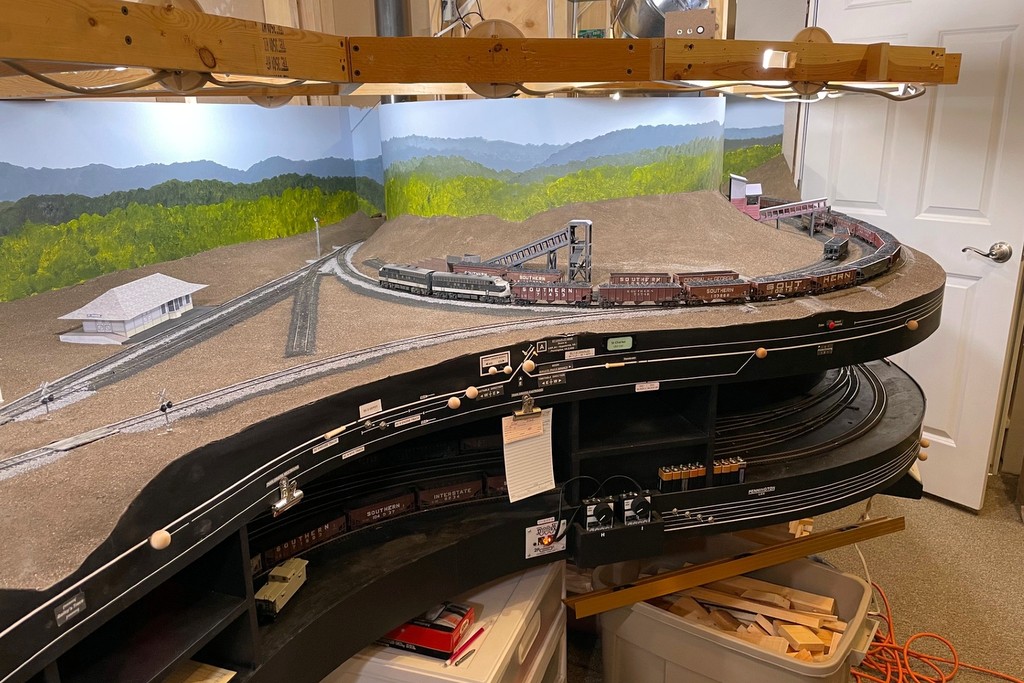
The first layout lights are in! Here’s the “cool white” that I like for daytime
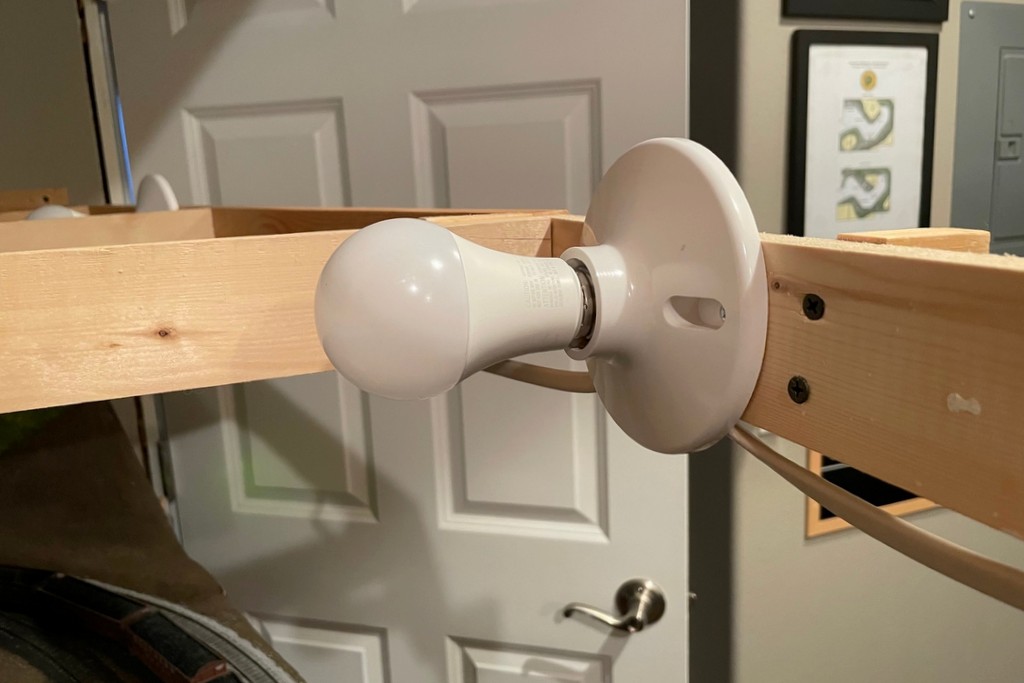
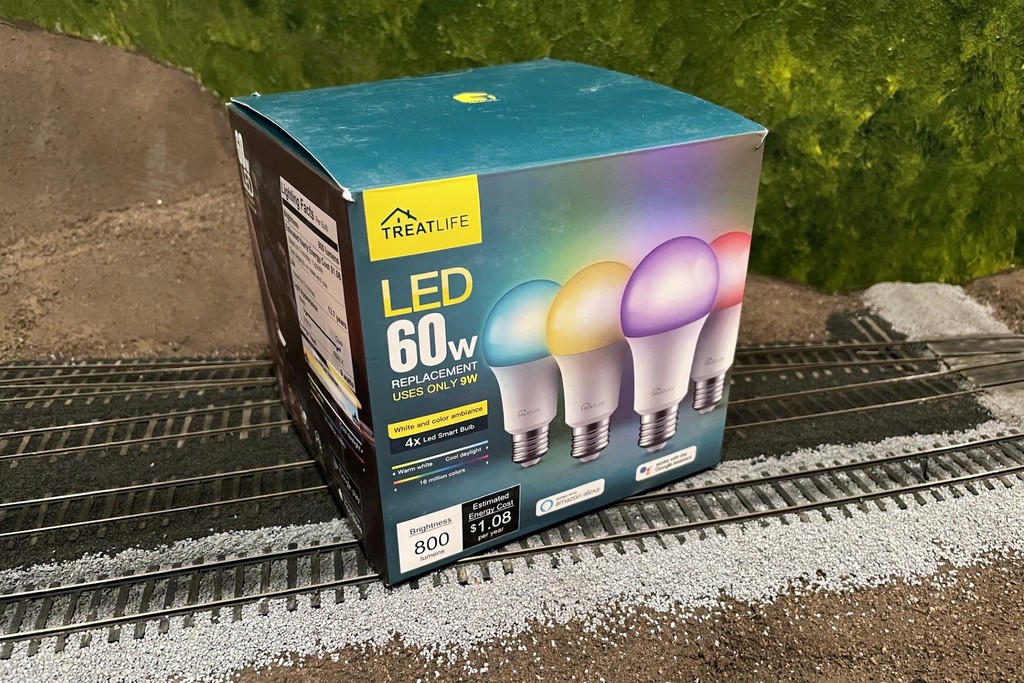
While my light is nowhere near as impressive as God’s light in Genesis, it still makes me glad to see a little more light on the trains in the basement. Now that I’ve got some upper-deck benchwork in, it opened the way to try out the layout lighting I’ve been wanting to do for a while. I’ve looked into LED strings and other bundled lights, but in the end, I’ve settled on using individual multi-color LED “smart lights” I can control with my phone. It’s not the cheapest solution (about $7 a bulb, and my layout needs 40), but it’s bright, and they’re customizable for a dizzying array of colors and brightness!
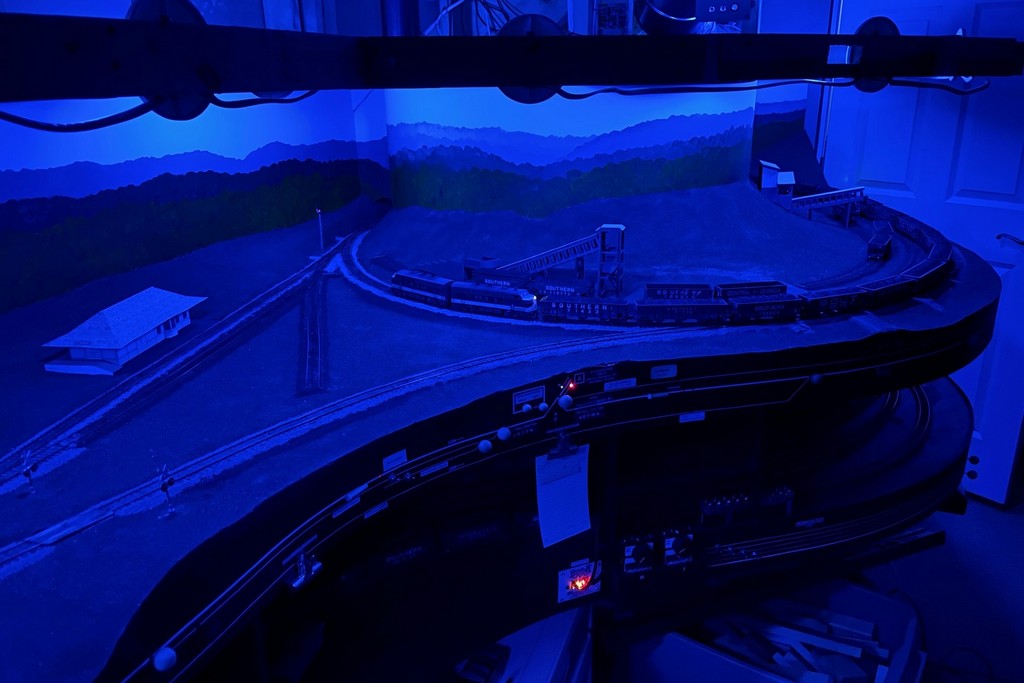
This is a more modern evolution of the lighting on my last layout which used cheap plastic fixtures and compact 40W lightbulbs. I was able to recycle the fixtures and wiring for this project, but the technology is so much better than my previous little analog dimmer. Not only are the LEDs brighter, but they run cooler, only use 9W each, and I can get a nice “cool white” that looks a lot more like sunlight than incandescent lights. I was also able to play around with the colors and dimmer, and a wide range of effects are possible including a nice moonlit night and a warm sunrise/sunset. It’s also easy to “group” them so one command changes all the bulbs simultaneously.
The dimmable, multi-color LEDs can give a lot of different moods like this “moonlit night”
I’ll keep playing with them to try to mitigate the glare spots and shadows. I’m also going to figure out a way to automate going from nighttime to sunrise to day–I’m sure it’s possible with all the Smart Home controls out there now. One thing I hadn’t counted on is the lit portion of the bulb is about 2″ further out from the fixture than the old incandescents. For now that’s creating more shadow along the front of the layout than I’d like. When I put the valance in for the upper deck, I’m inclined to move it out over the aisle a few inches to try to improve this, and I might mount a few of these in the overhead fixtures as well. For now, I’m calling this experiment with 8 bulbs a success, so now I’ve ordered more to keep working around the rest of the layout.
The fixtures for the lighting are simple plastic screw-in basesHere’s what I’m using, TreatLife 60W equivalent (9W actual) multi-color LED smart lights
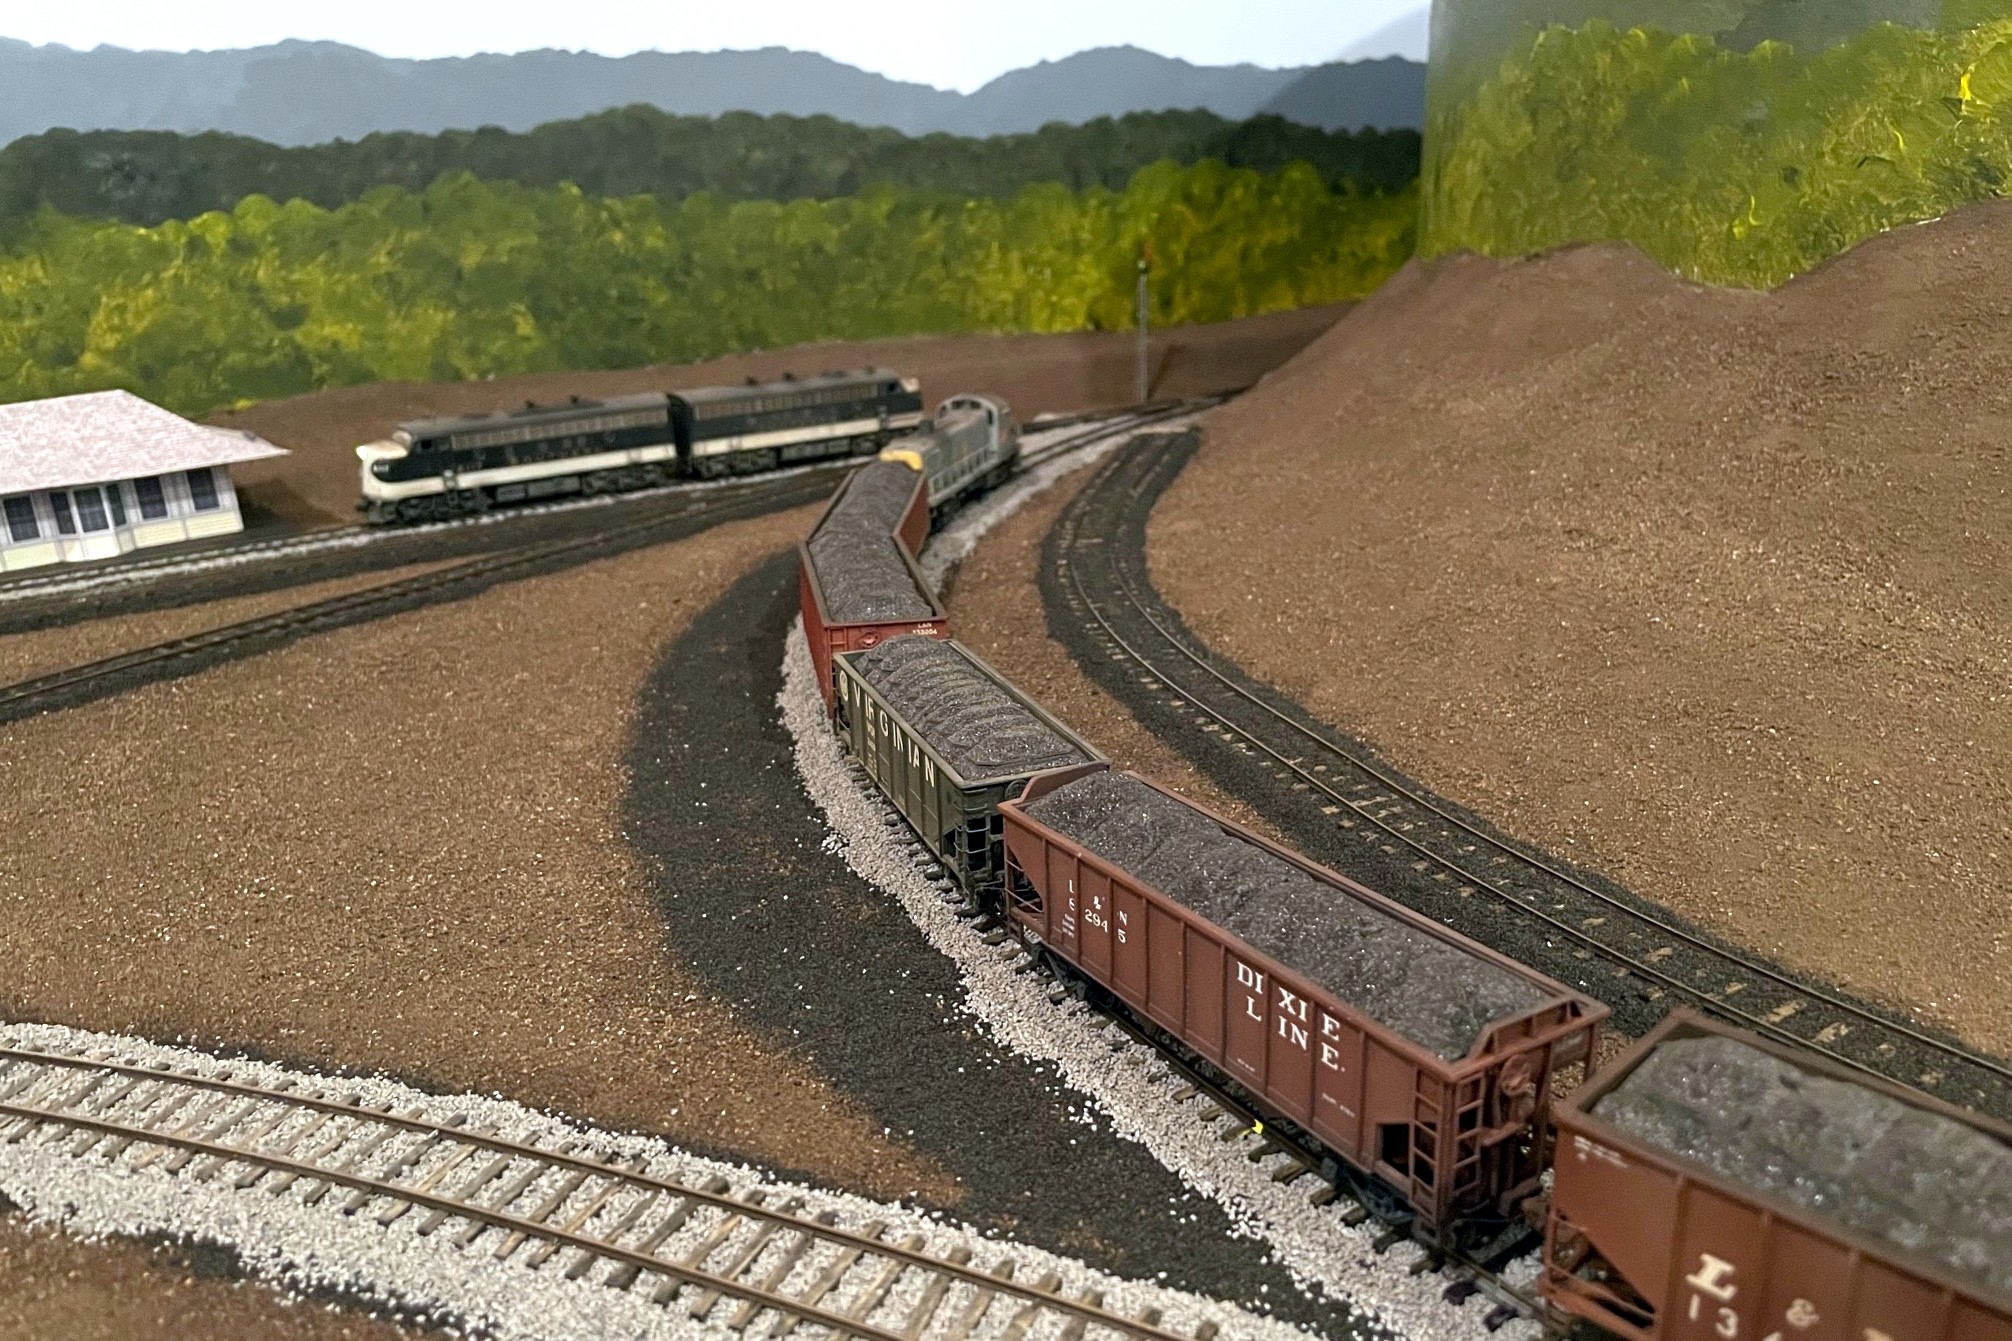
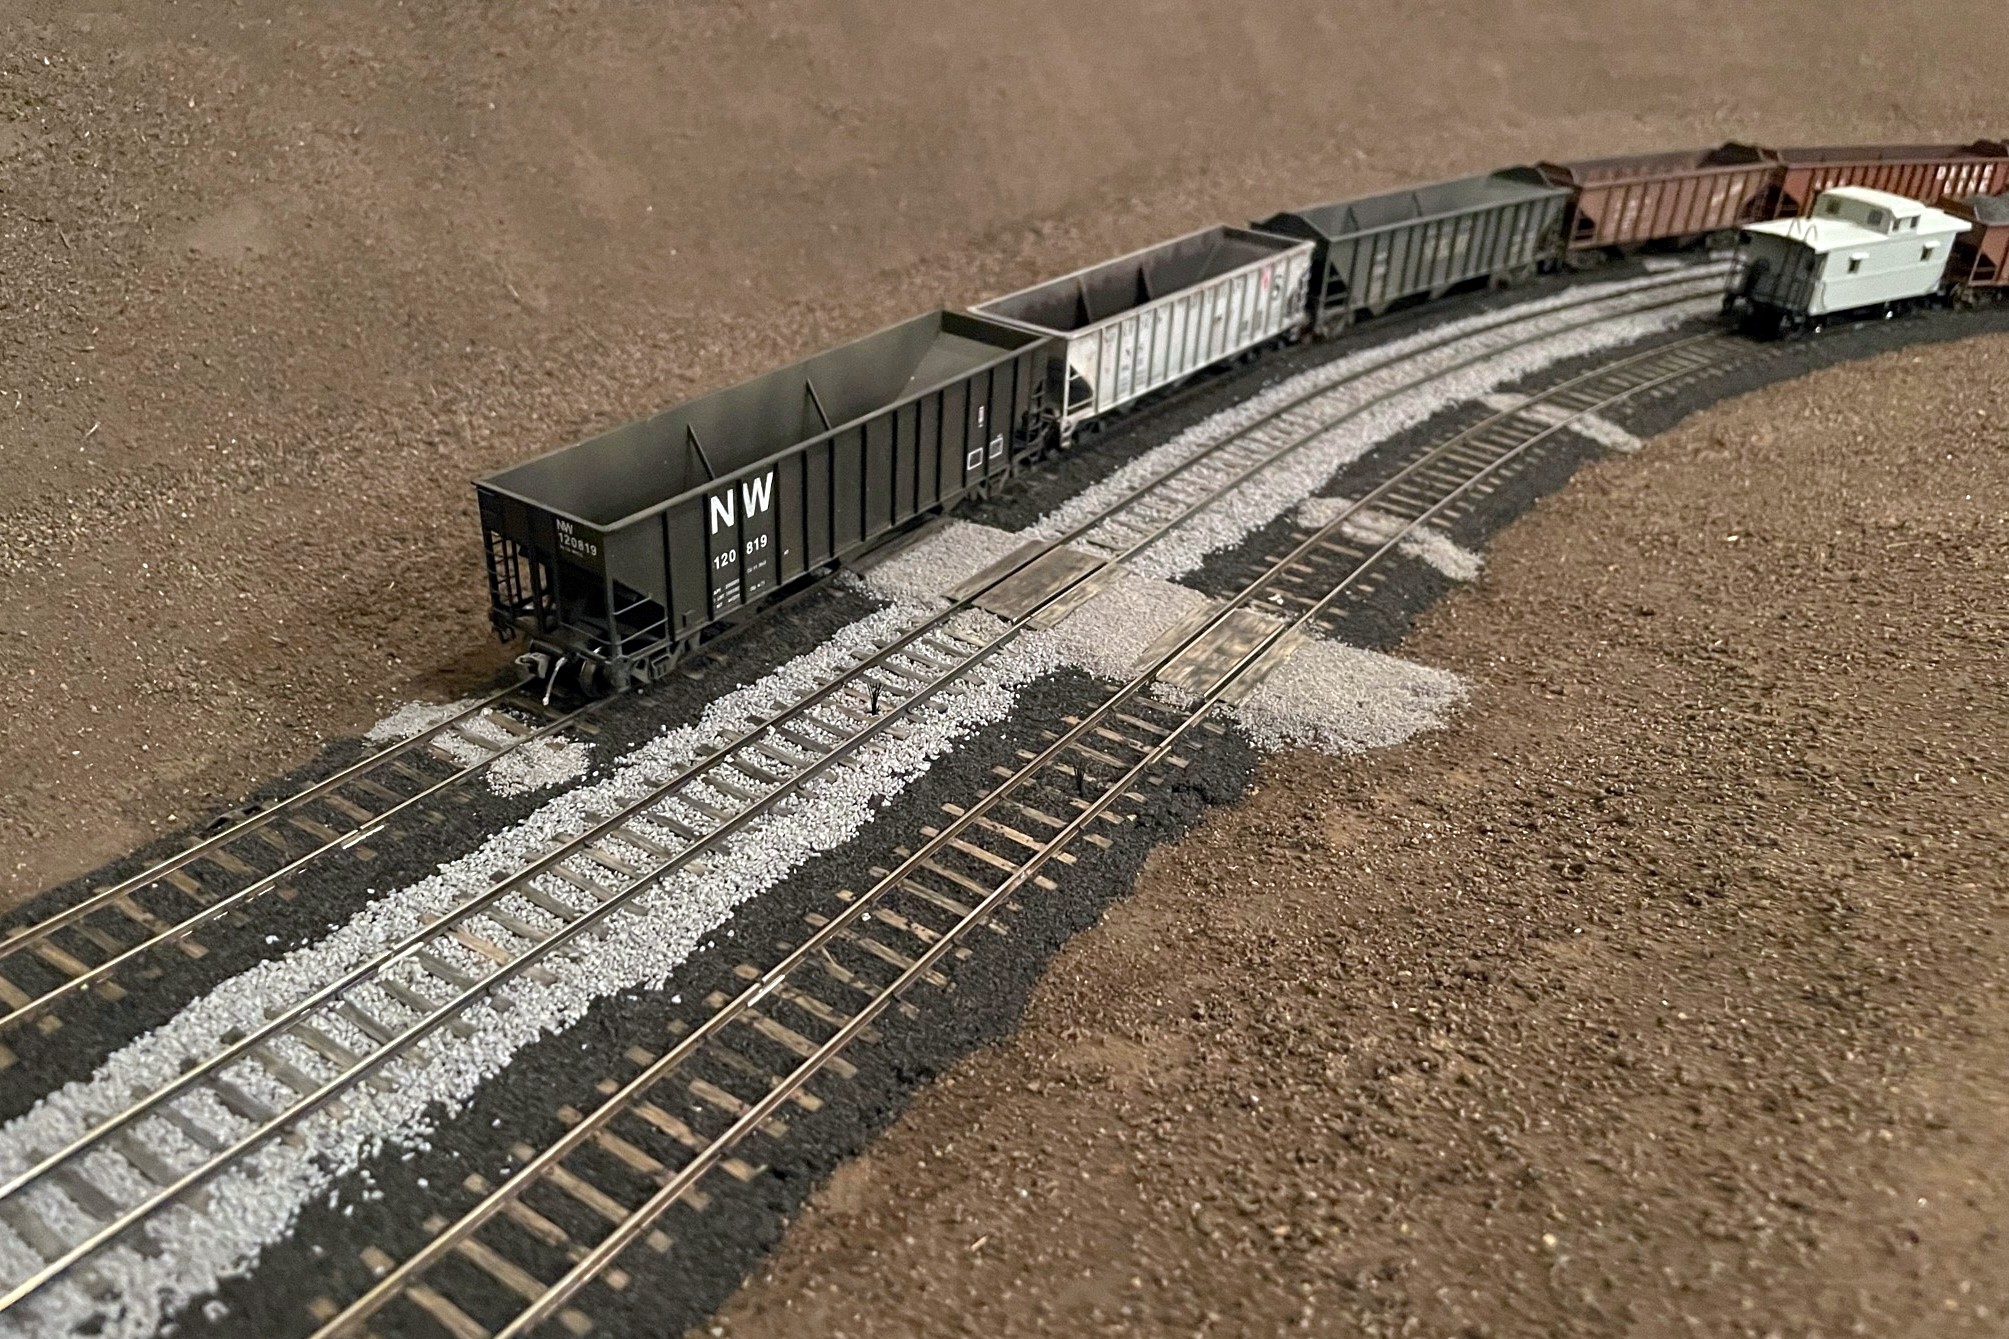
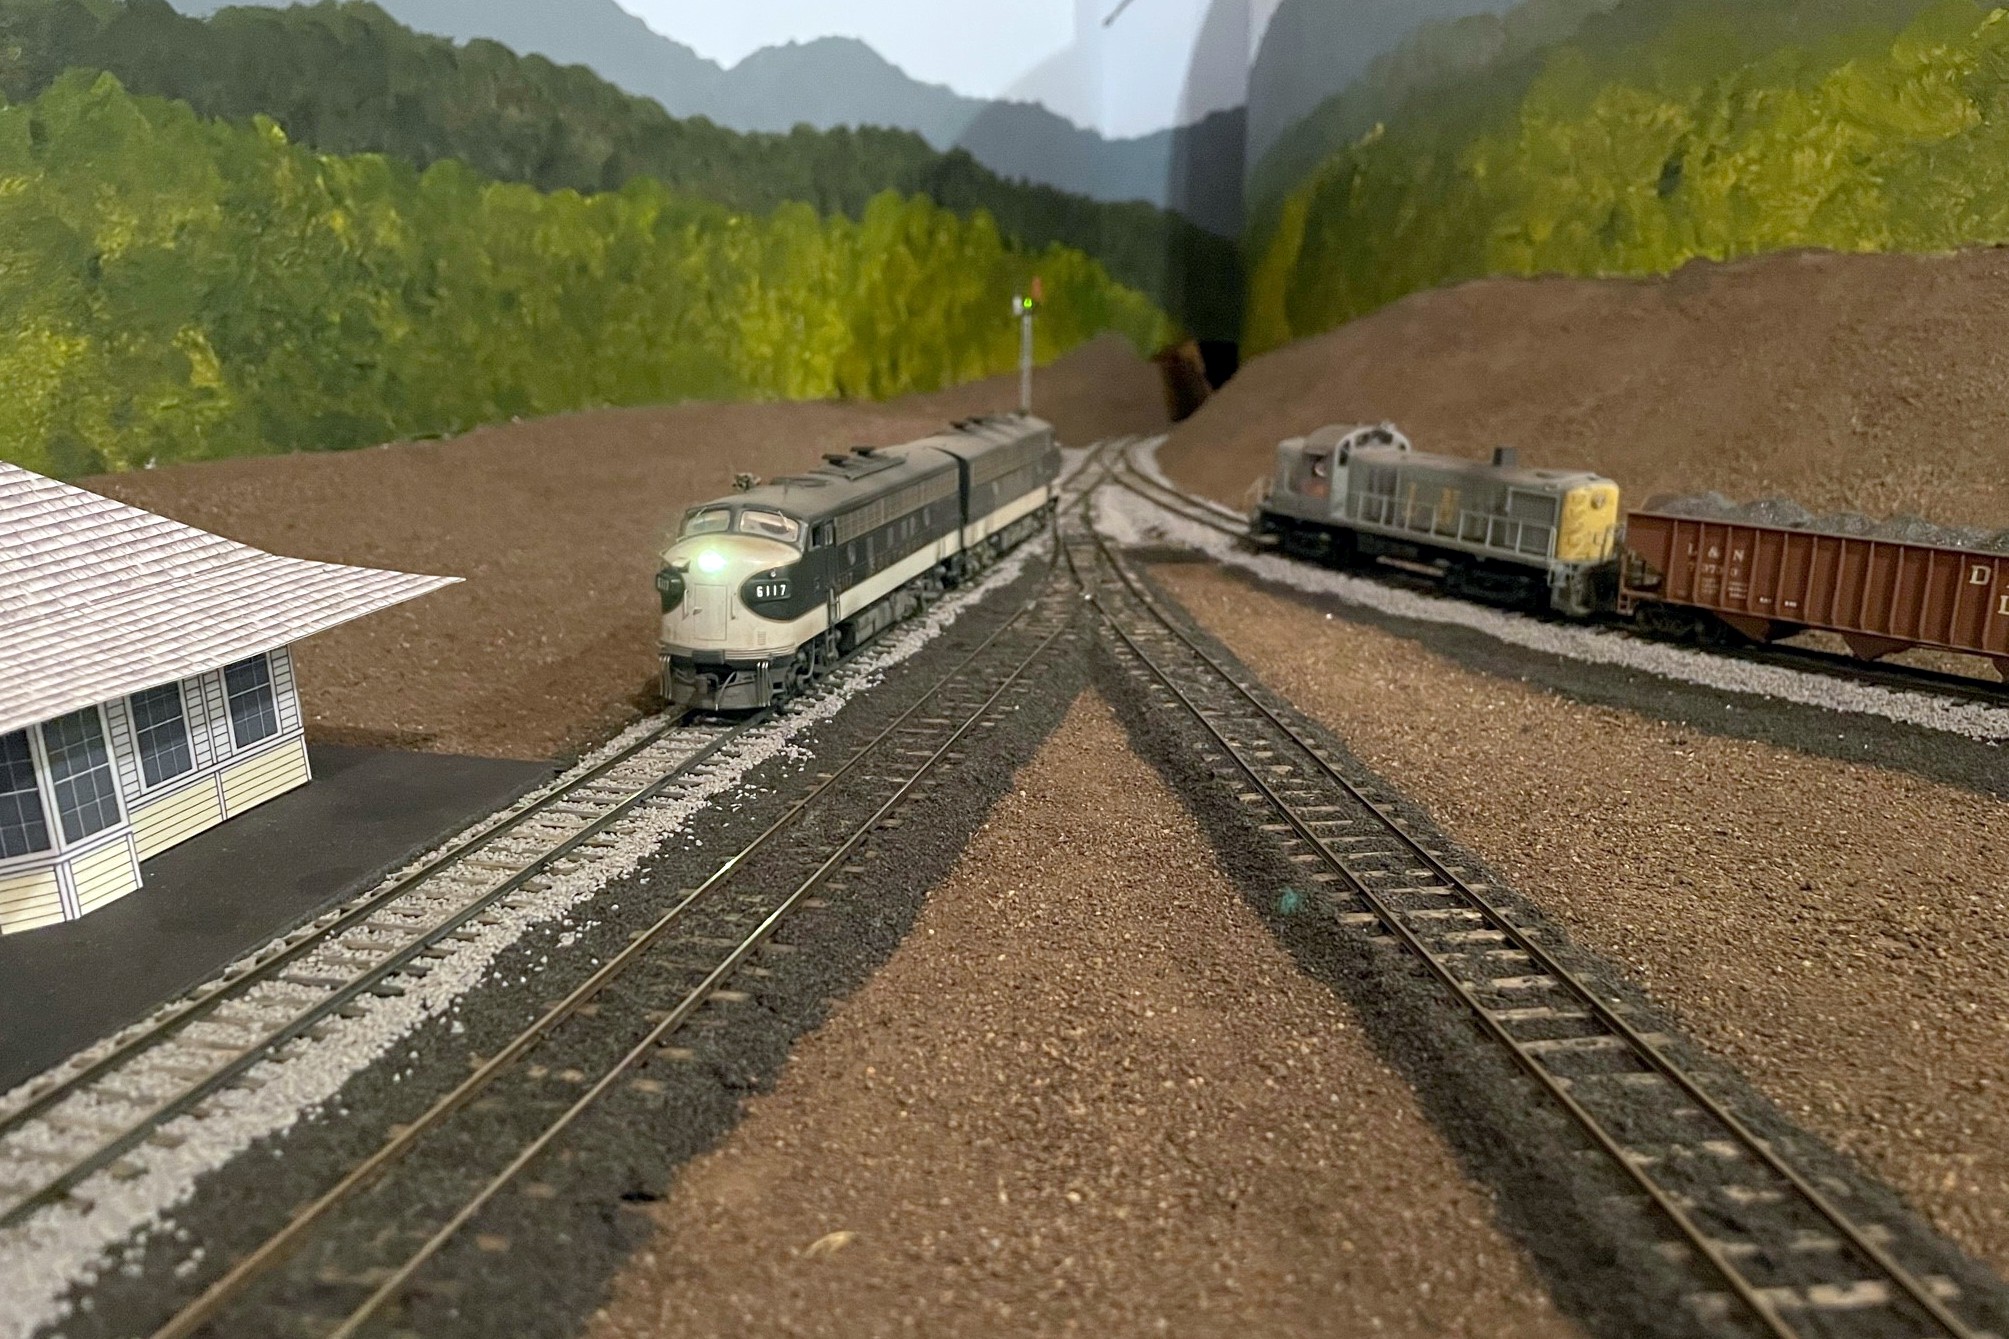
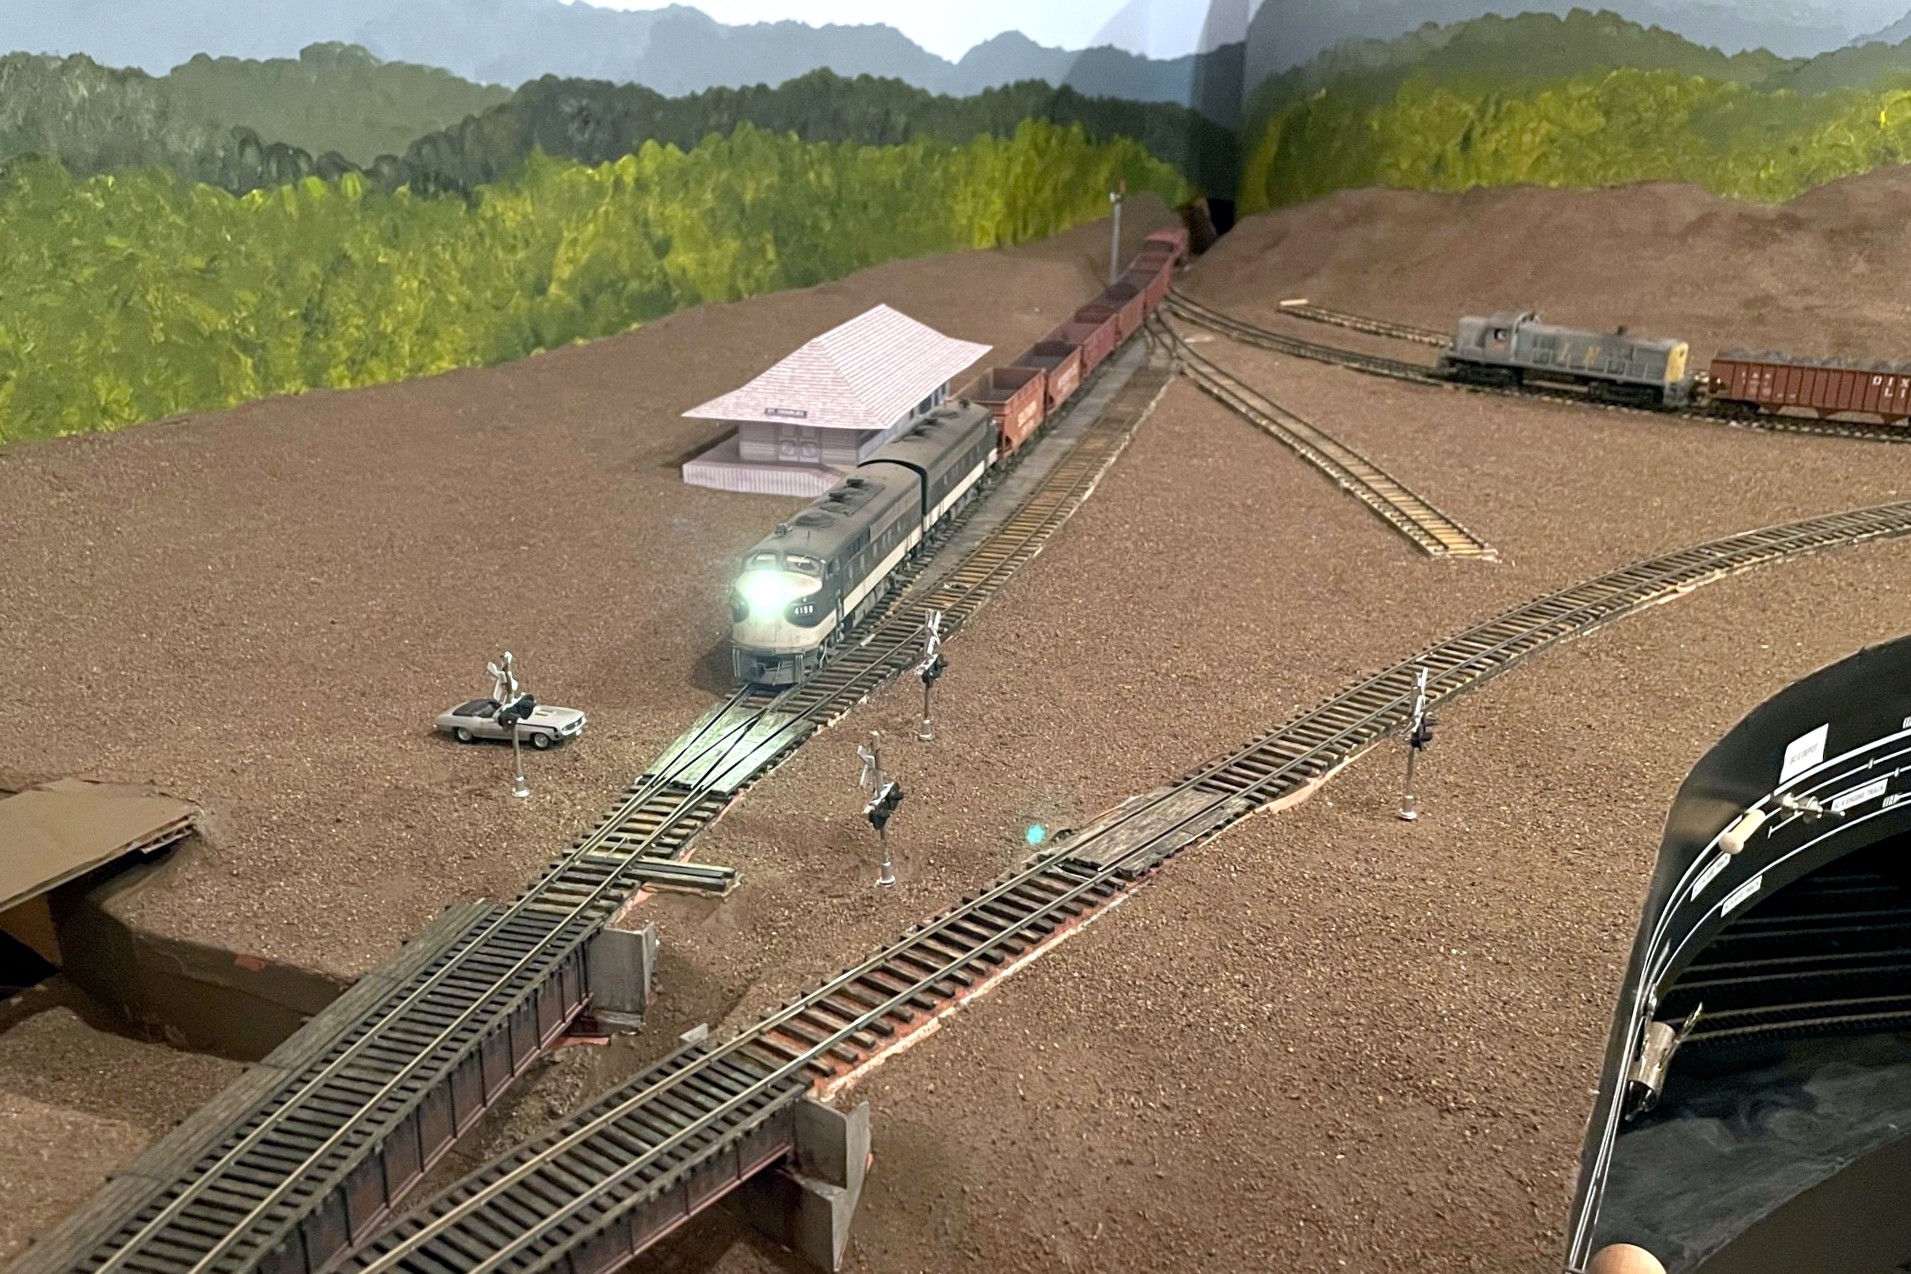
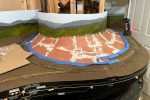
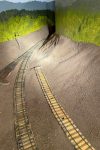
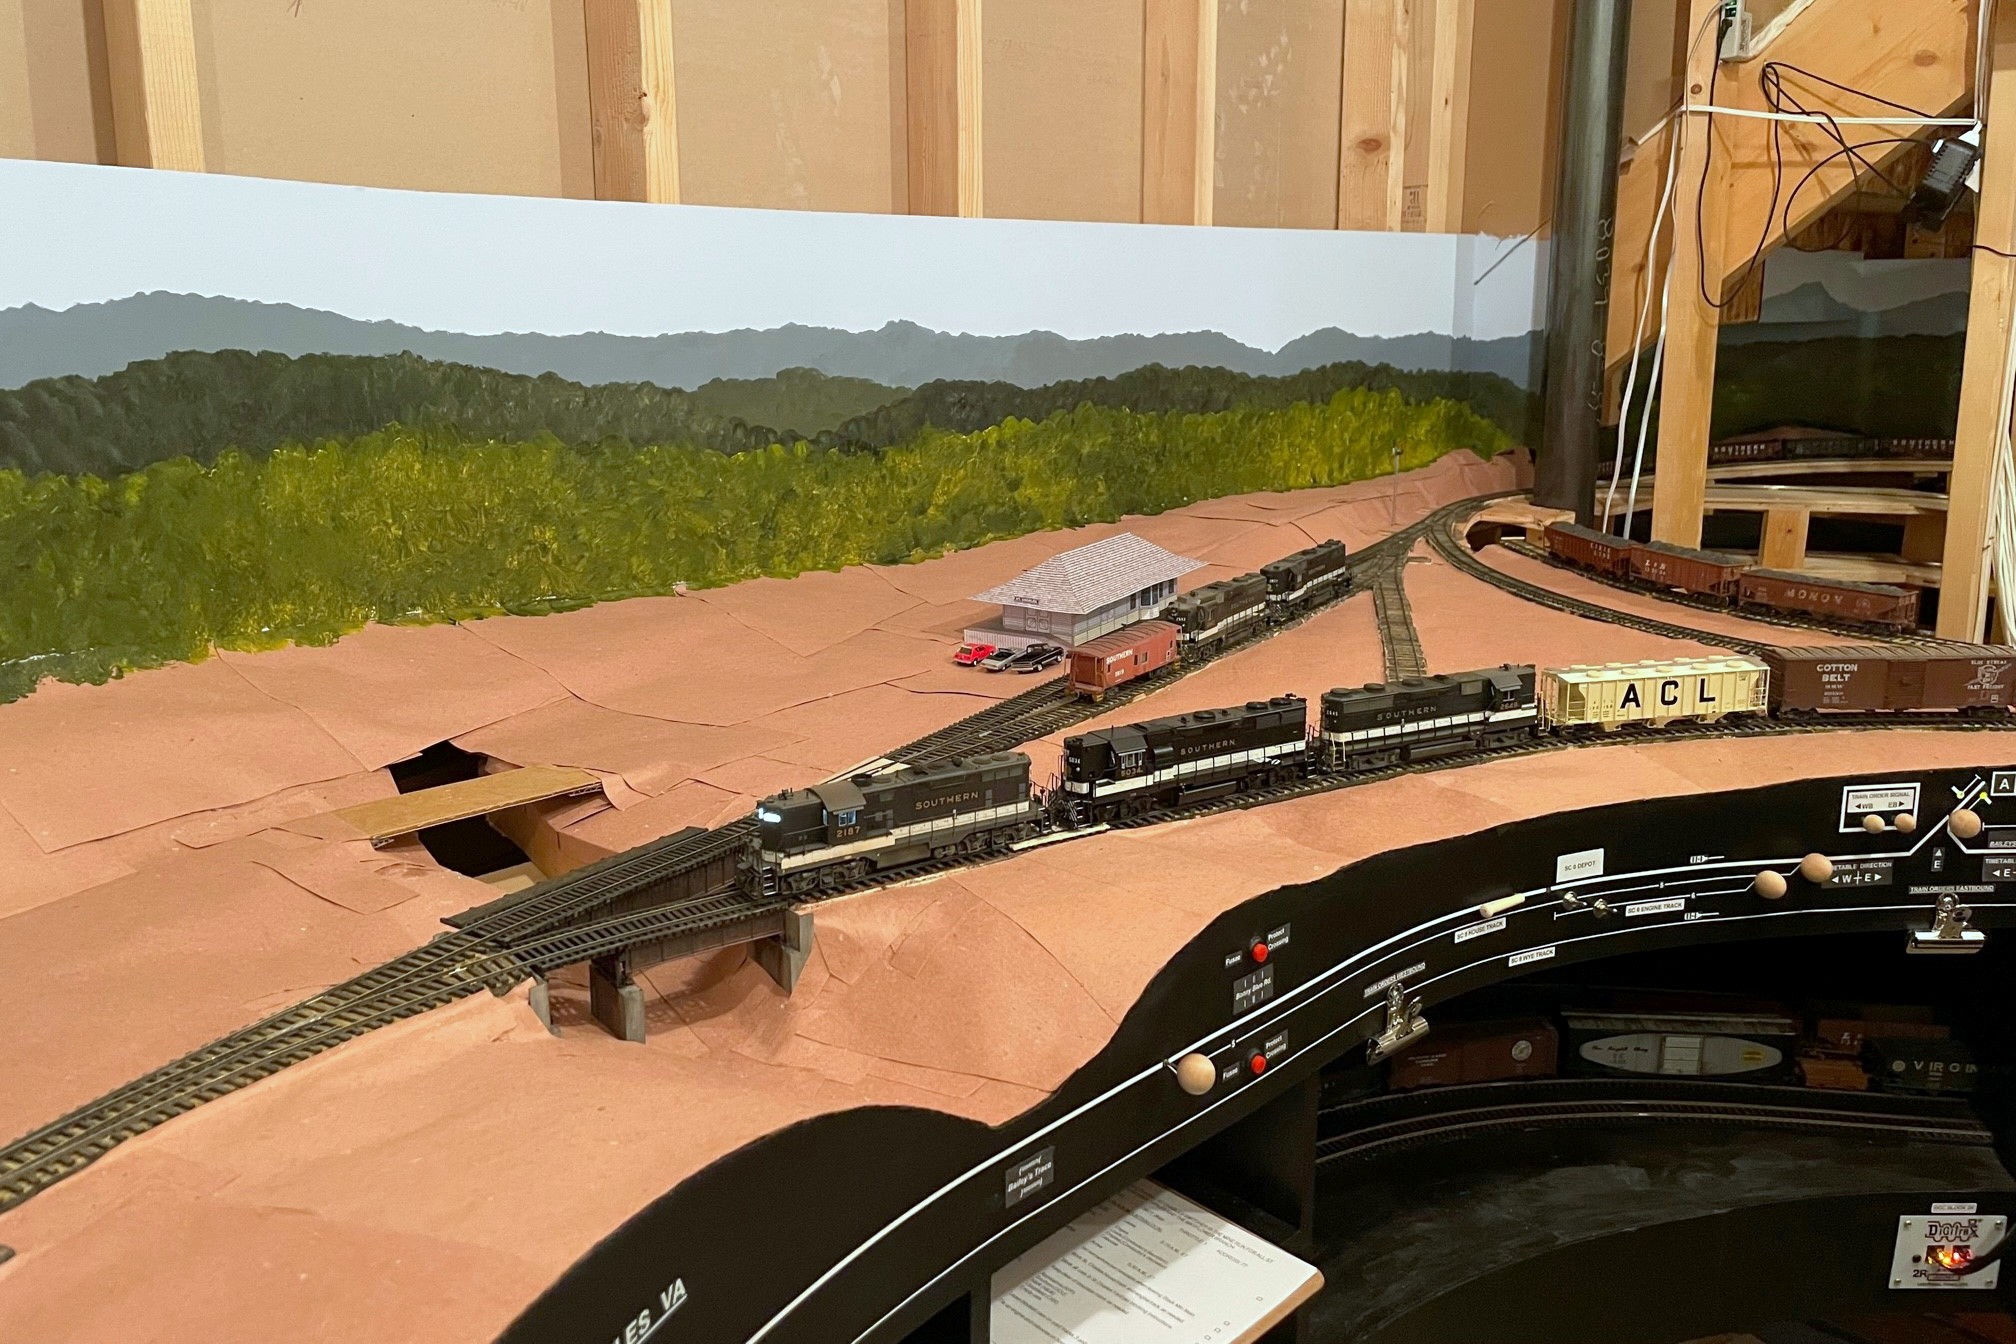
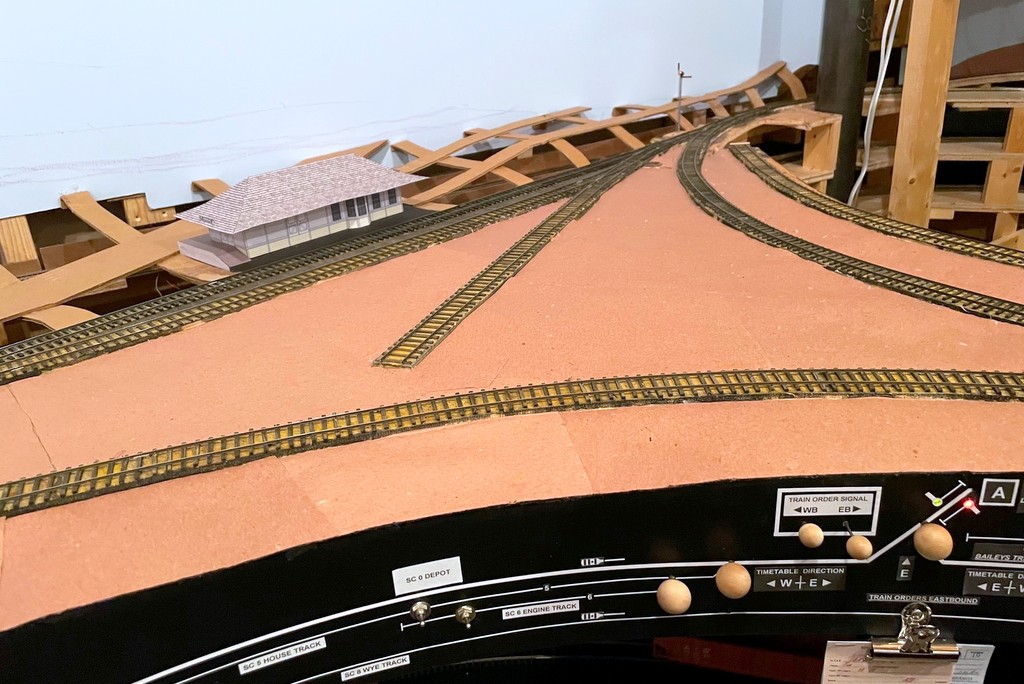
Here’s the St Charles wye with ballast. Note the area of cinders where a track used to be
While I finished the basic scenery forms on the lower deck a few weeks ago, I decided it would be better to ballast the tracks before adding the upper deck benchwork while I still had good access to them. I’m so glad I did because ballasting gives the scenes a much more “finished” look even though there’s still a ton of scenery work to be done. I’ll be honest, I was dreading ballasting the track–I had little experience with ballast, but from that experience I saw it as a frustrating, tedious, and time-consuming job. I have now changed my tune! While it’s still time-consuming, I was able to learn and mature my techniques quickly to avoid the frustration and tedium, so I’ll pass along my method here.
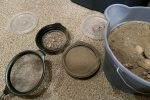
First, I had to determine what kind of ballast I needed. This wasn’t as straightforward as I’d hoped. As best I can tell, most of the tracks in my area were at one time ballasted in cinders harvested from steam locomotives. The steam locos went away in the 1950s, and with them the ability to get cheap and ready cinders for ballast. Photos from the ’80s and ’90s clearly indicate most everything got covered in rock ballast–would the cinders still be around in the 1960s and ’70s? After some digging online, I found that cinders in many places lasted for decades after steam, and in the coal fields, it’s tough to tell cinders from spilled coal anyway, so an added incentive for cinders, at least on sidings and secondary tracks. For the main tracks, photos show the Southern’s ballast in this area was a medium gray. I toyed around with trying to find some actual rock to use as ballast, but in the end I decided on good old Woodland Scenics products made from crushed walnut shells because I can find it readily, it doesn’t cost an arm and leg to ship, and it’s pretty easy to work with. I used fine cinders and medium sized gray ballast in the big shaker containers for this project, and I was able to do the entire lower deck (12′ x 16′) with just under two shakers of each color (4 shakers total).
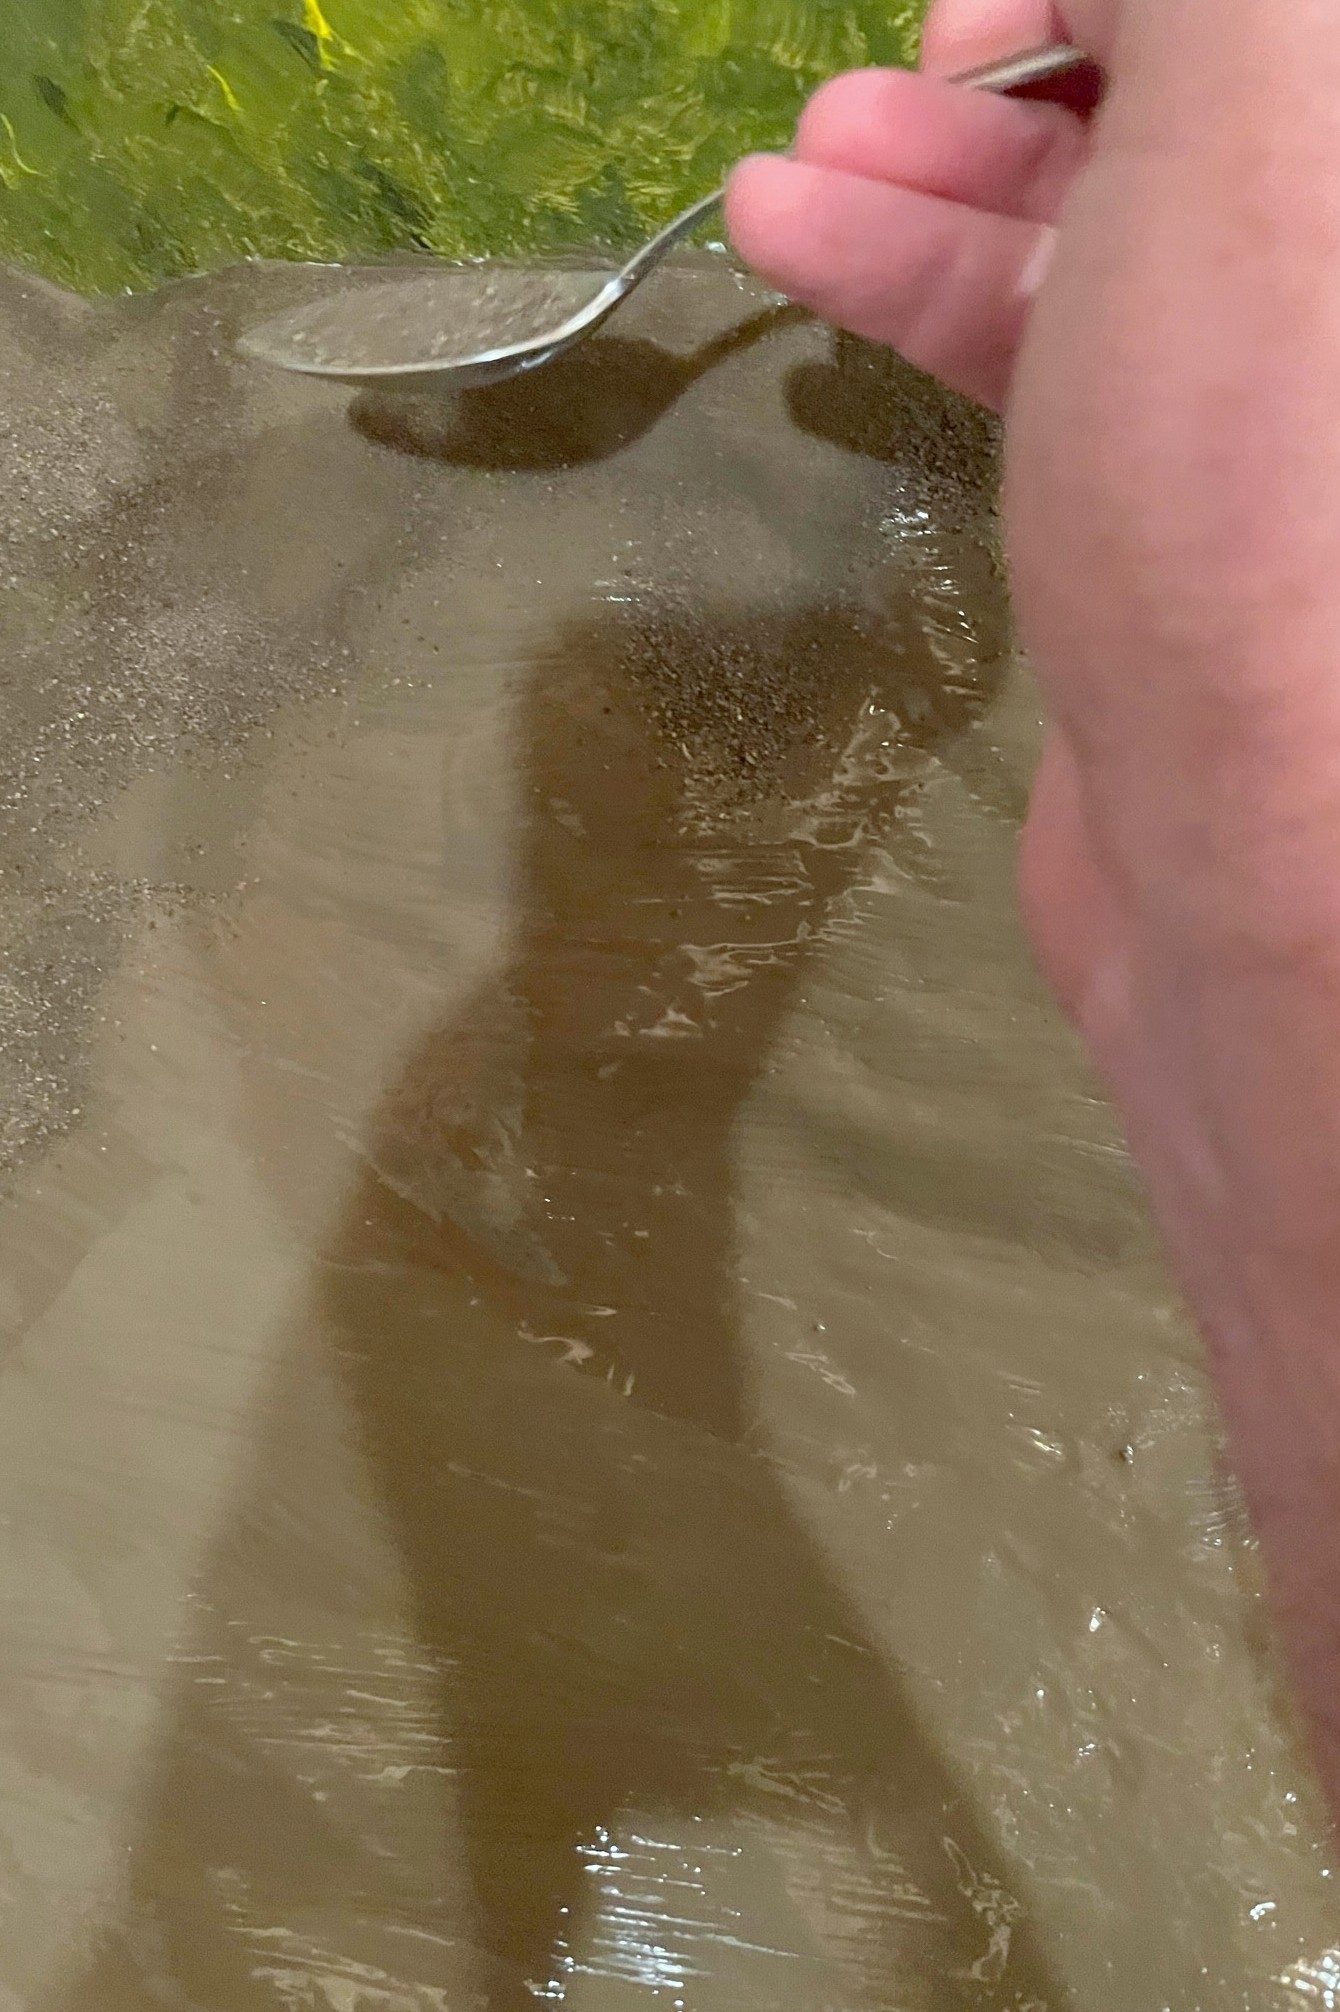
Second, I did a bunch of research on how to apply ballast, and I am so glad I did! In the end, I went mostly with the method Cody Grivno of Model Railroader lays out in the article here. The only other materials I needed were white glue (I bought a gallon), isopropyl alcohol (I used about XX oz), and dish soap. For tools, I used a spoon, a large flat brush, a white glue dispenser (like the ones kids use in school), two small jars with eyedroppers, a work glove, and my fingers. In the glue bottle, I mixed up some “just a bit wet glue” which is about 2 parts white glue, 1 part water, and a drop or two of dish soap–when you squirt it out, it should dissipate from its bead but not run. In one of the jars with an eyedropper, I made a mix of “very wet glue” of about 1 part glue, 6 parts water, and a drop or two of dish soap–it should look about the consistency of milk and absorb into the wet ballast (I’ll explain that in a minute) after a few seconds. You’ll need a LOT of the very wet glue, so you can either make a big batch or mix it on-demand when you run out (what I did… it was a lot of trips). The remaining jar and eyedropper are for the isopropyl alcohol.
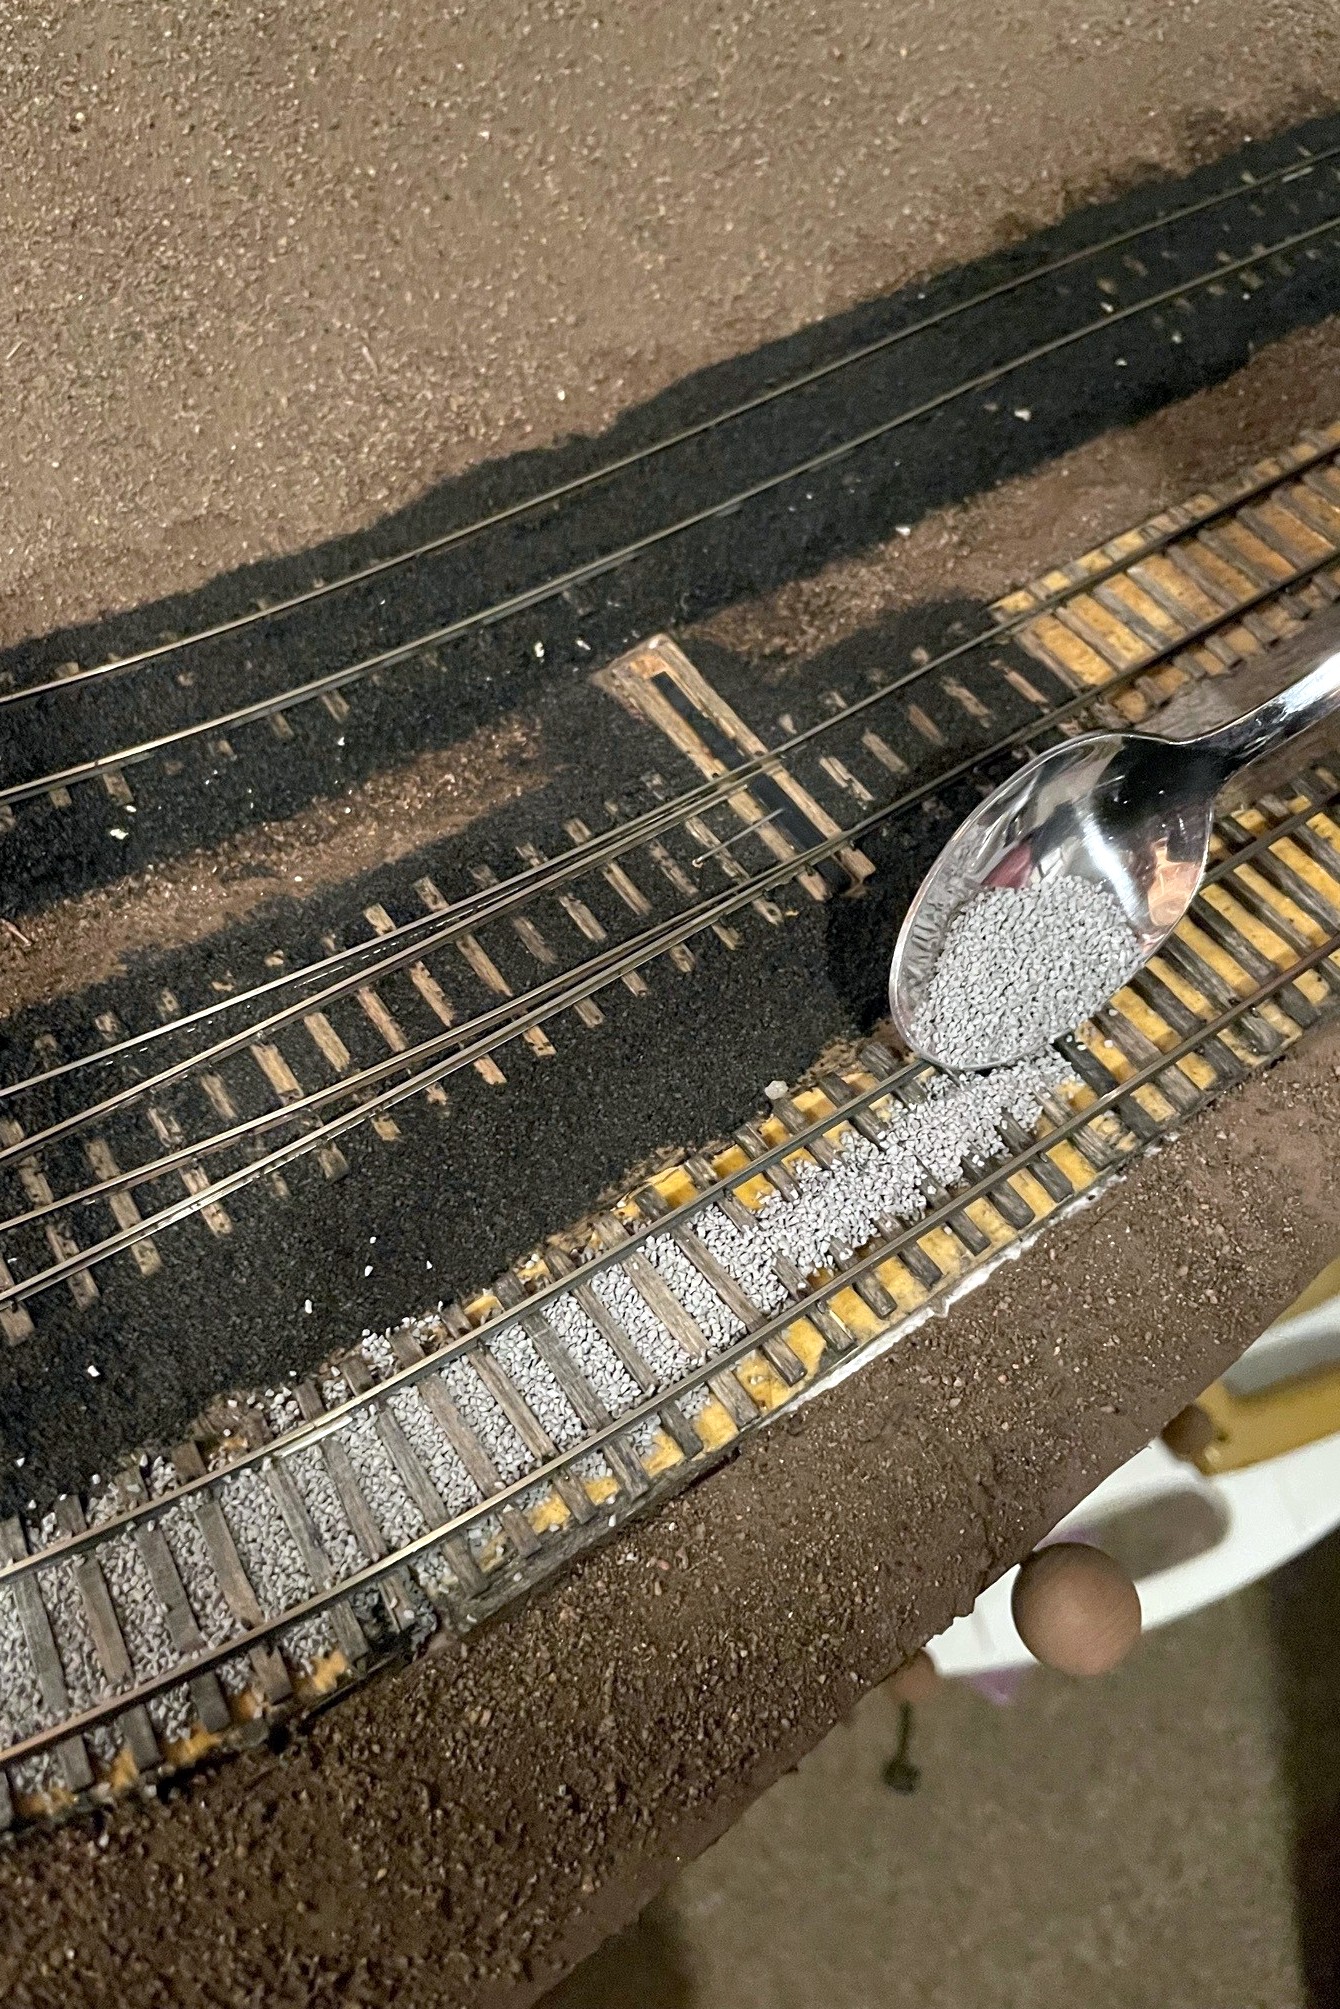
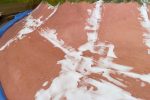
Step 1. Lay down a pile of ballast in the gauge between the railsStep 2. use a finger to spread the ballast between the ties, moving excess to the next section
I worked on the track in about 2 foot sections, usually one track at a time. If you’re doing two ballast colors, determine which ballast should be “lower” and work on that one first–for me, the cinders were replaced by ballast rock, so where they overlap, I did the cinders first. With about half-a-spoonful of ballast, I first apply it to the “gauge” (inside the rails) of the track. It takes a few tries to get a feel for how thick to lay it, but it becomes routine pretty quick. You want just enough that when you spread it the ballast fills the space in between the ties and rails with little on top of the ties and nothing on the rails. I found my finger to be an effective spreading tool, and I just rub it back and forth down the tracks, rubbing any excess ballast to open areas. Cody glues his ballast at this point, but I found it easier to lay the edge ballast first. I applied ballast to the edges by first running a bead of glue from the bottle down the side of the subroadbed and on top of the scenery–this helps the “slope” to hold better. Next I used the spoon to apply ballast inward toward the rail from about the edge of the ties until I couldn’t see the edge of the subroadbed any more. I used my finger again, first to poke the ballast under the rail a bit, then to wipe off the tops of the tie edges, and then to pat down the sloped edges until they looked smooth. I used a brush to clear off any unwanted ballast to outside the range of the glue (I vacuum it up later) and to remove any stubborn ballast from areas my finger couldn’t get to.
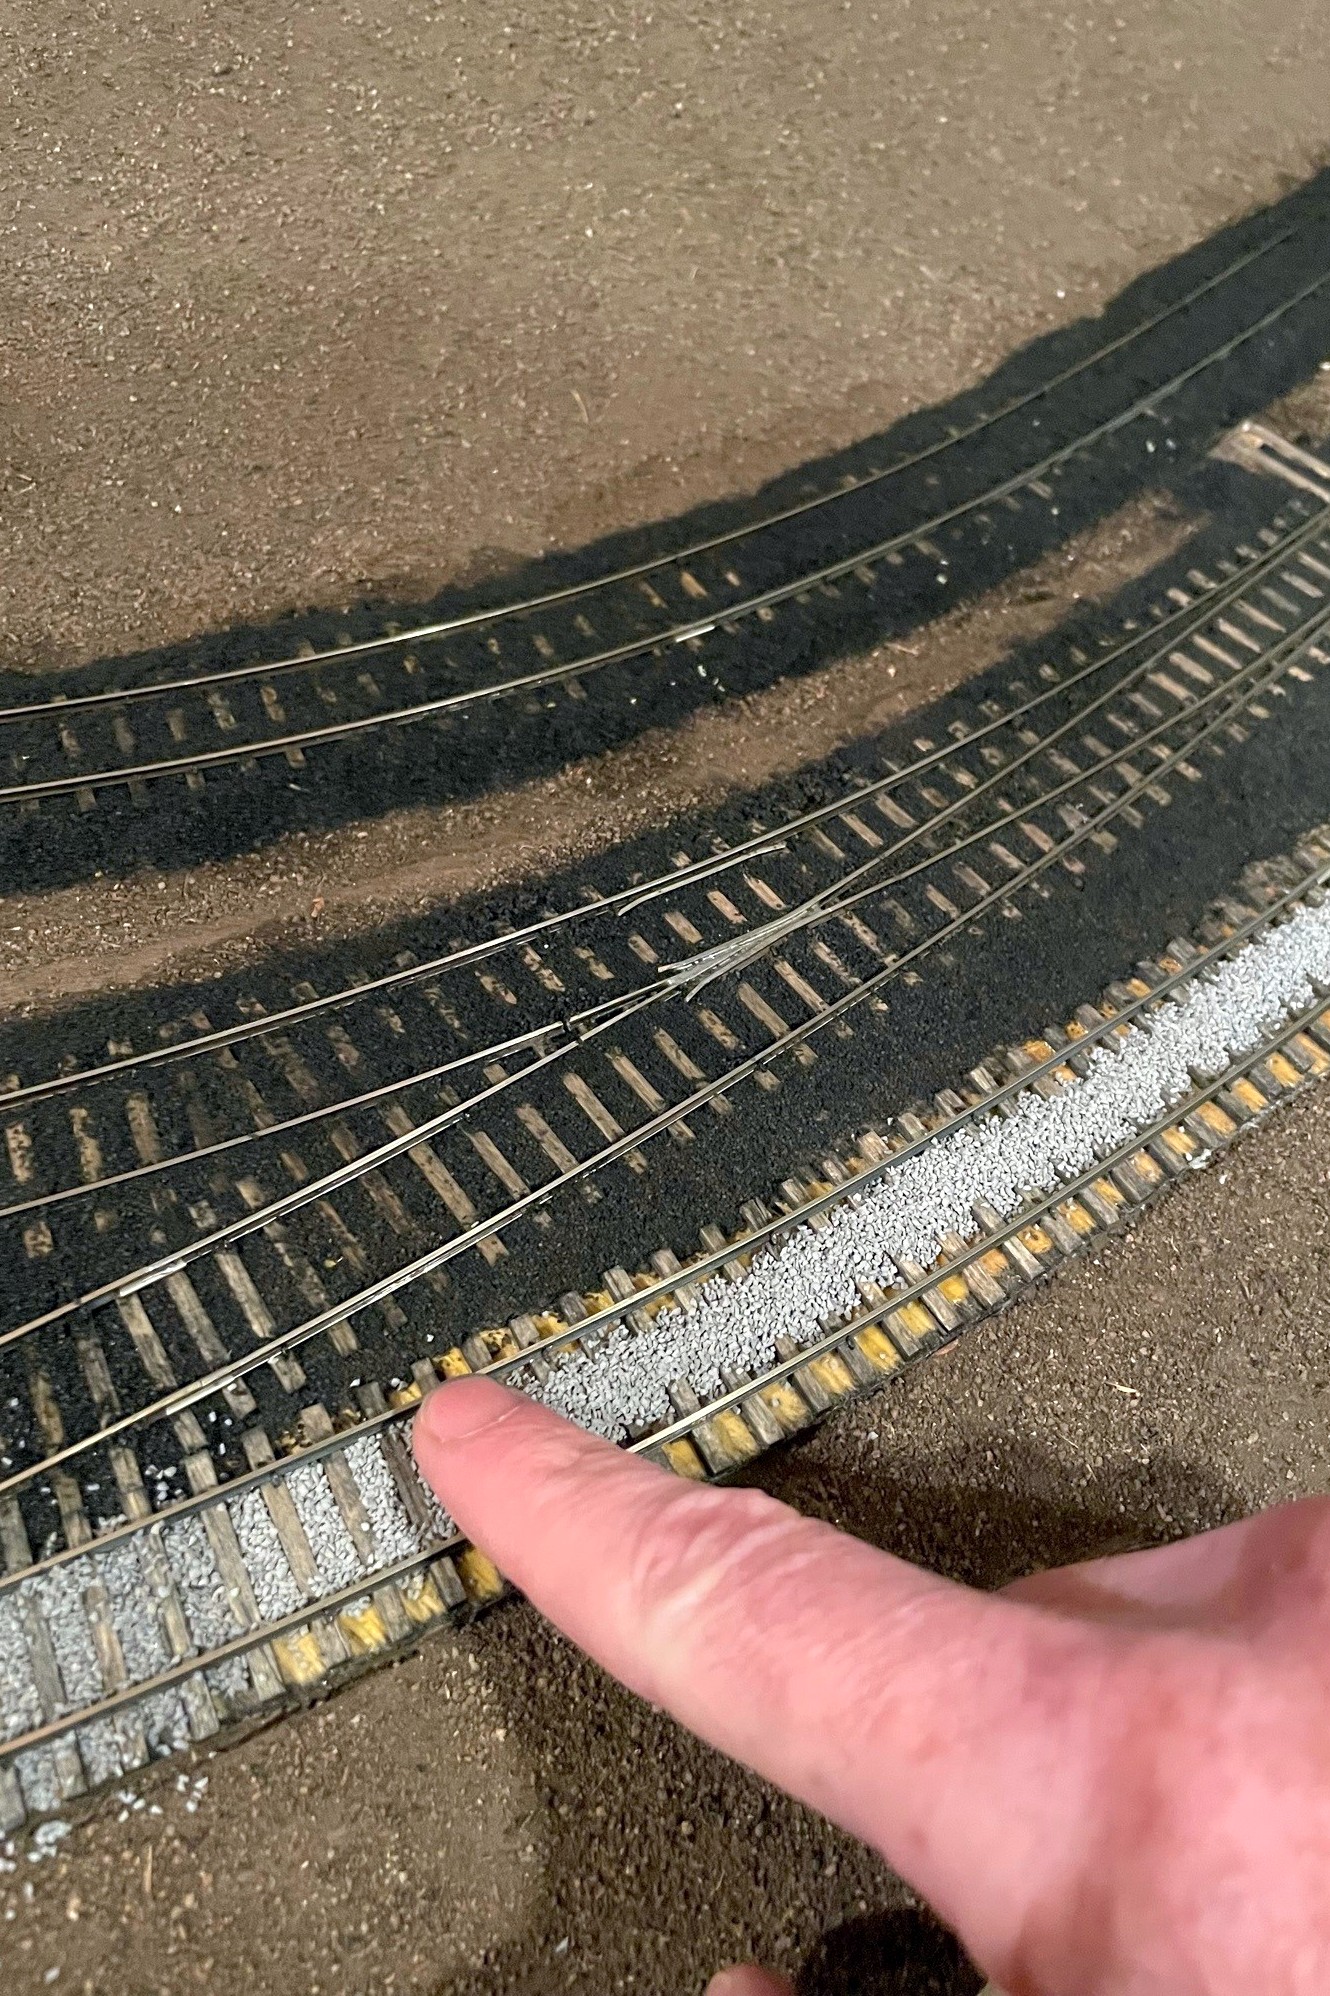
Step 3. Add ballast to the edges of the track, use a finger to work it into the ties, then use a finger to clean it off the ties and shape the slope
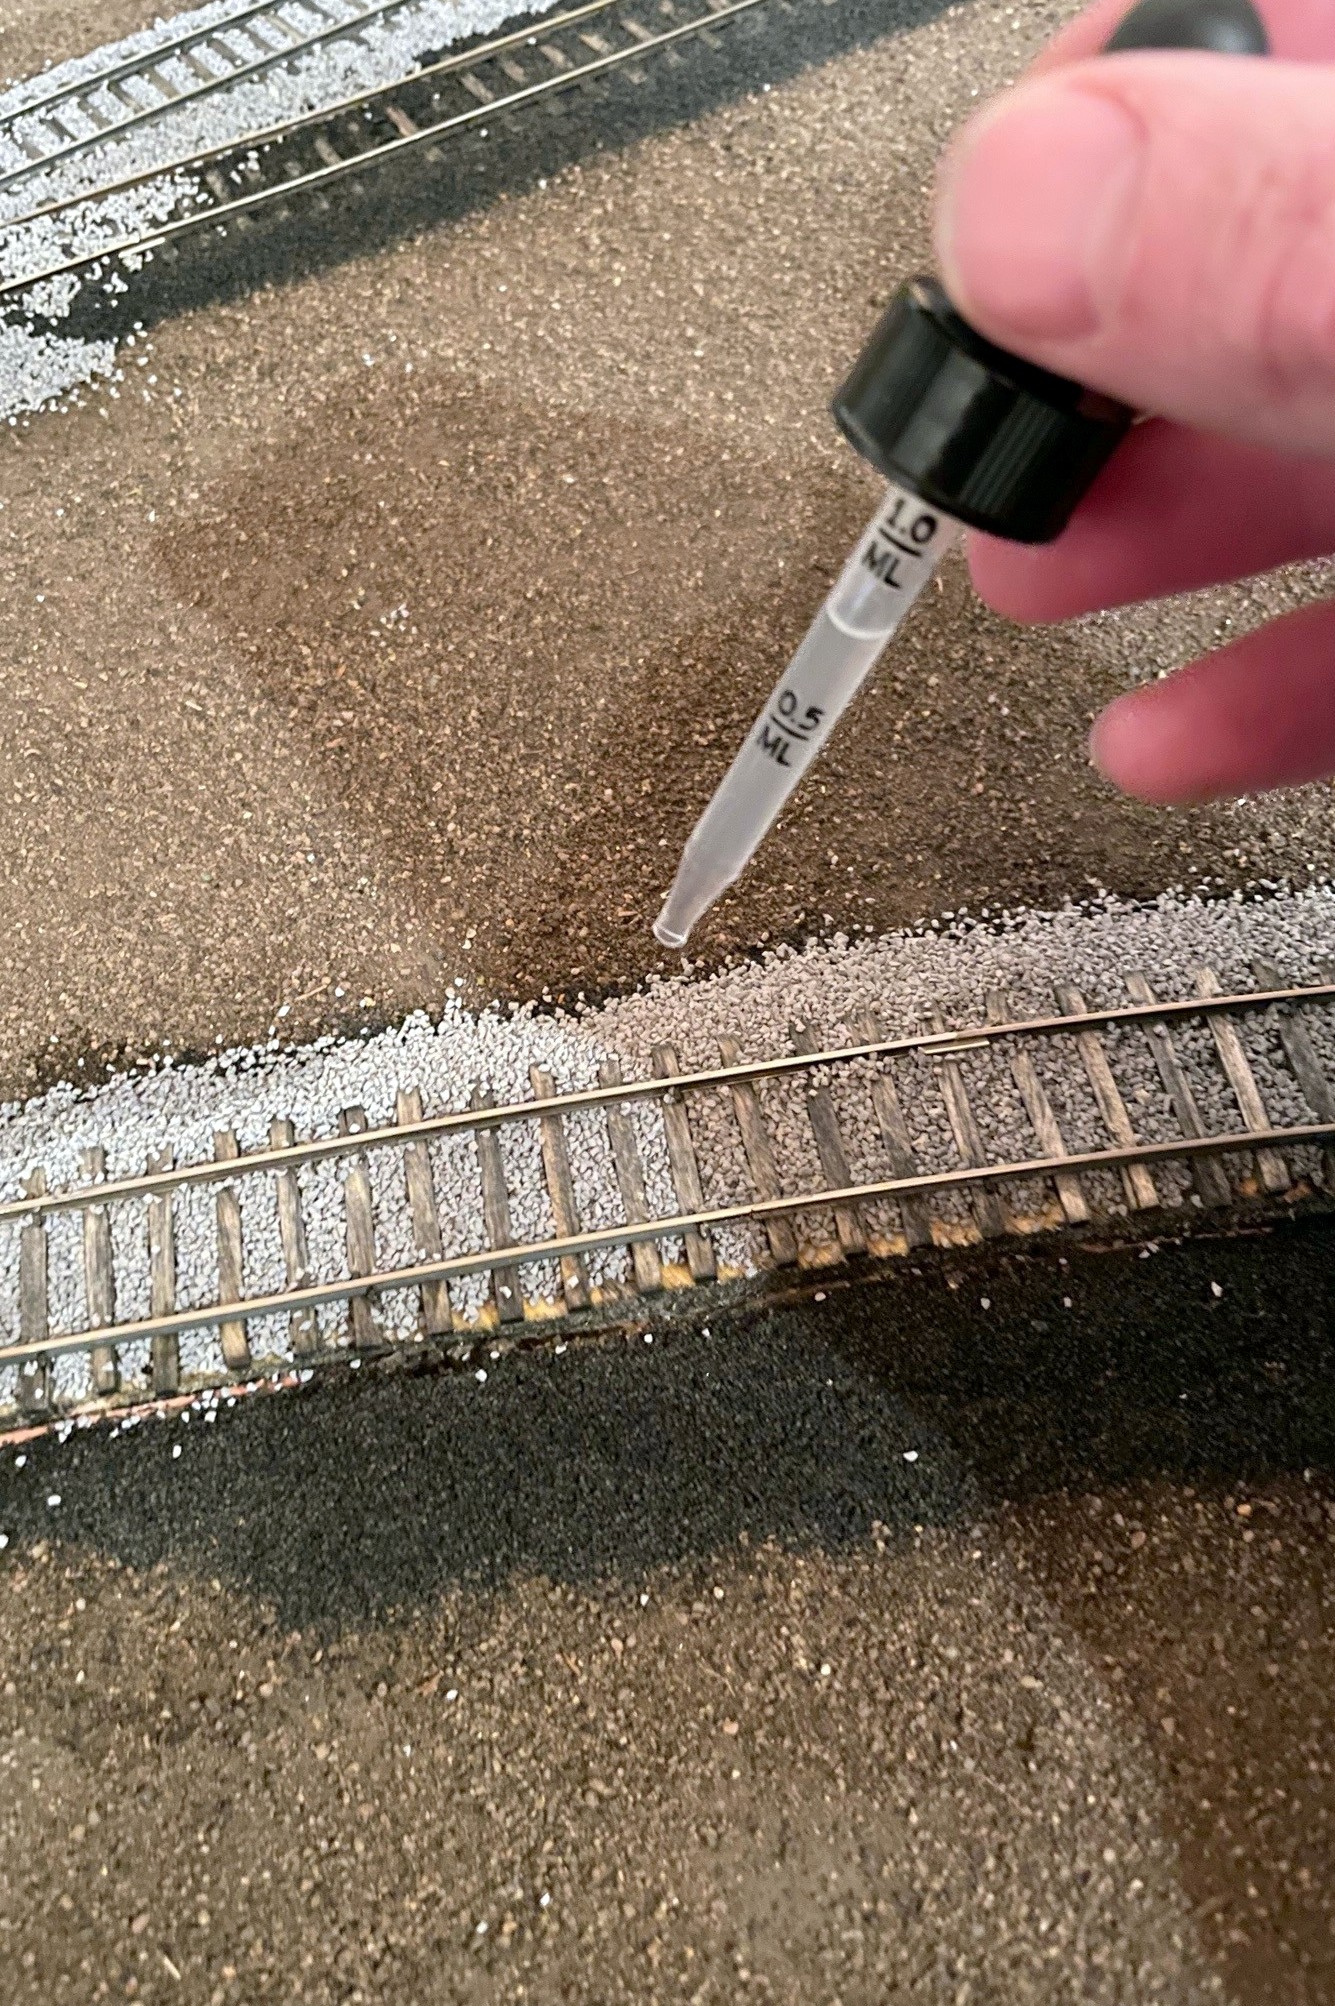
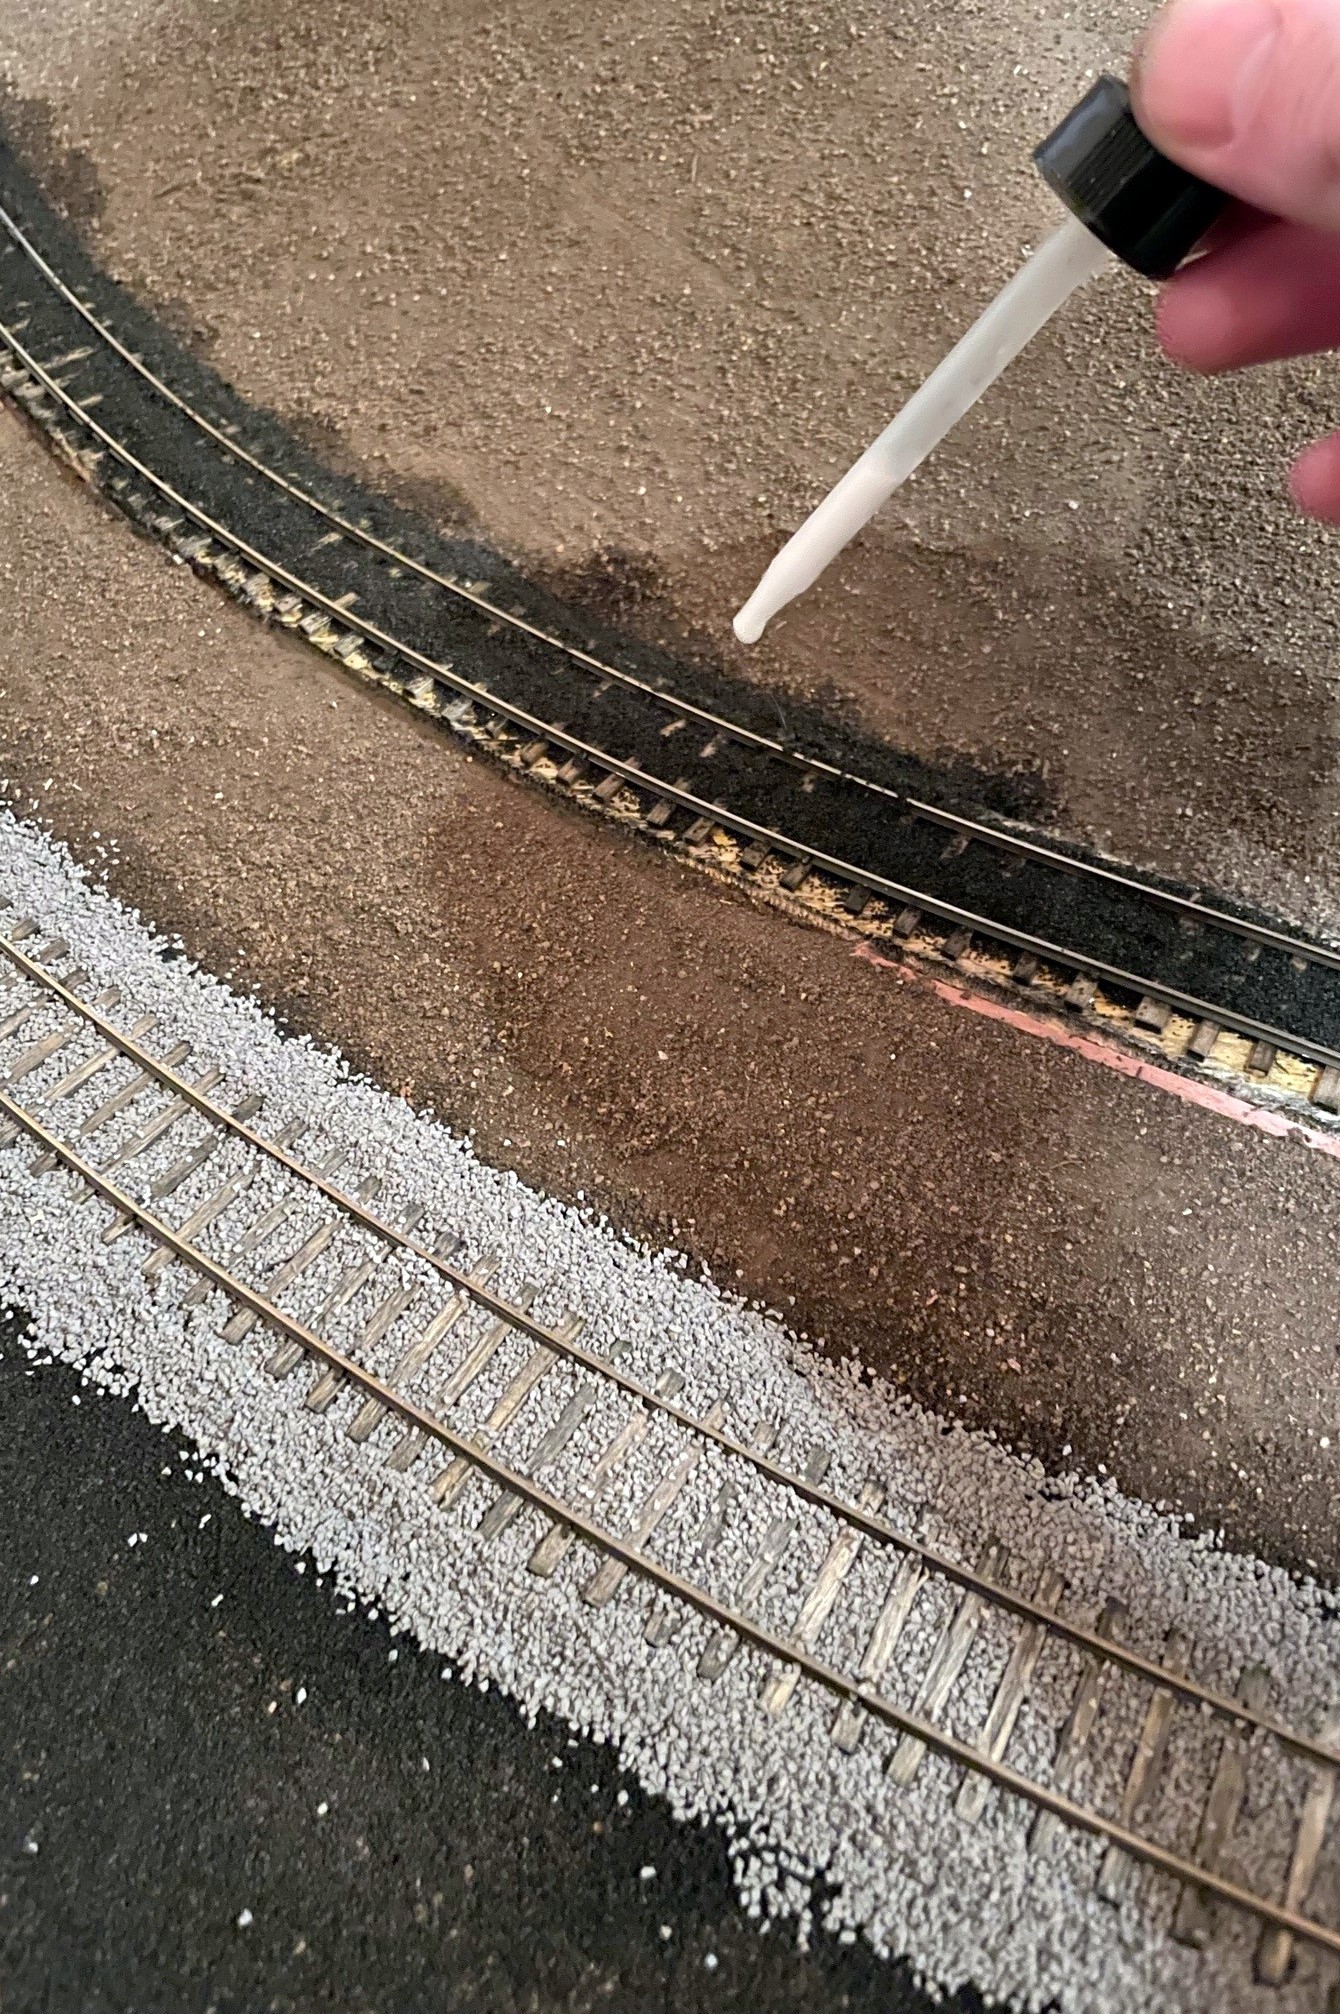
Once I’m happy with the ballast shape, I glue it down. The critical part of this process is to USE THE ALCOHOL AS A WETTING AGENT FIRST! If you just add the glue, the ballast will float (and float away) which makes a frustrating mess. You can avoid this by first saturating the ballast with an eyedropper of isopropyl alcohol–just drop until everything looks wet. I follow the alcohol wetting with the very wet glue, making sure I apply drops to every section of ballast until things were saturated and it took a couple seconds for the glue to soak in. If you drop a big glob of white glue that somehow didn’t get diluted, no worries–just dilute it with some alcohol, and it will likely settle in just fine. I wet and glued each section by starting with the gauge between the rails, then moving to the edges. I found for the edges it’s better to start the alcohol low and work up to keep things in place, and its better to start the glue high and let it work down.
Step 4. Using a dropper, soak the ballast with isopropyl alcoholStep 5. Saturate the wet areas with wet glue
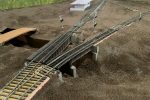
Turnouts require a bit more care, and I probably didn’t take all the care I should have… it worked out ok, but I spent a couple hours massaging my turnouts to get them working smoothly again. I spread the ballast a little less thickly between the ties to make sure the points wouldn’t catch, and I took care to avoid putting ballast in the area of the throw. No matter how careful I was, there was always some piece determined to get stuck in the throw, so I used the brush (and the occasional X-Acto blade) to fish out any offenders. I used the very wet glue sparingly in these areas, but there was still some glue that stuck to the top of the ties causing the points to stick a bit. I believe Cody’s method is to drop the glue in first, then add the ballast under the points, and I think I’ll try this next time.
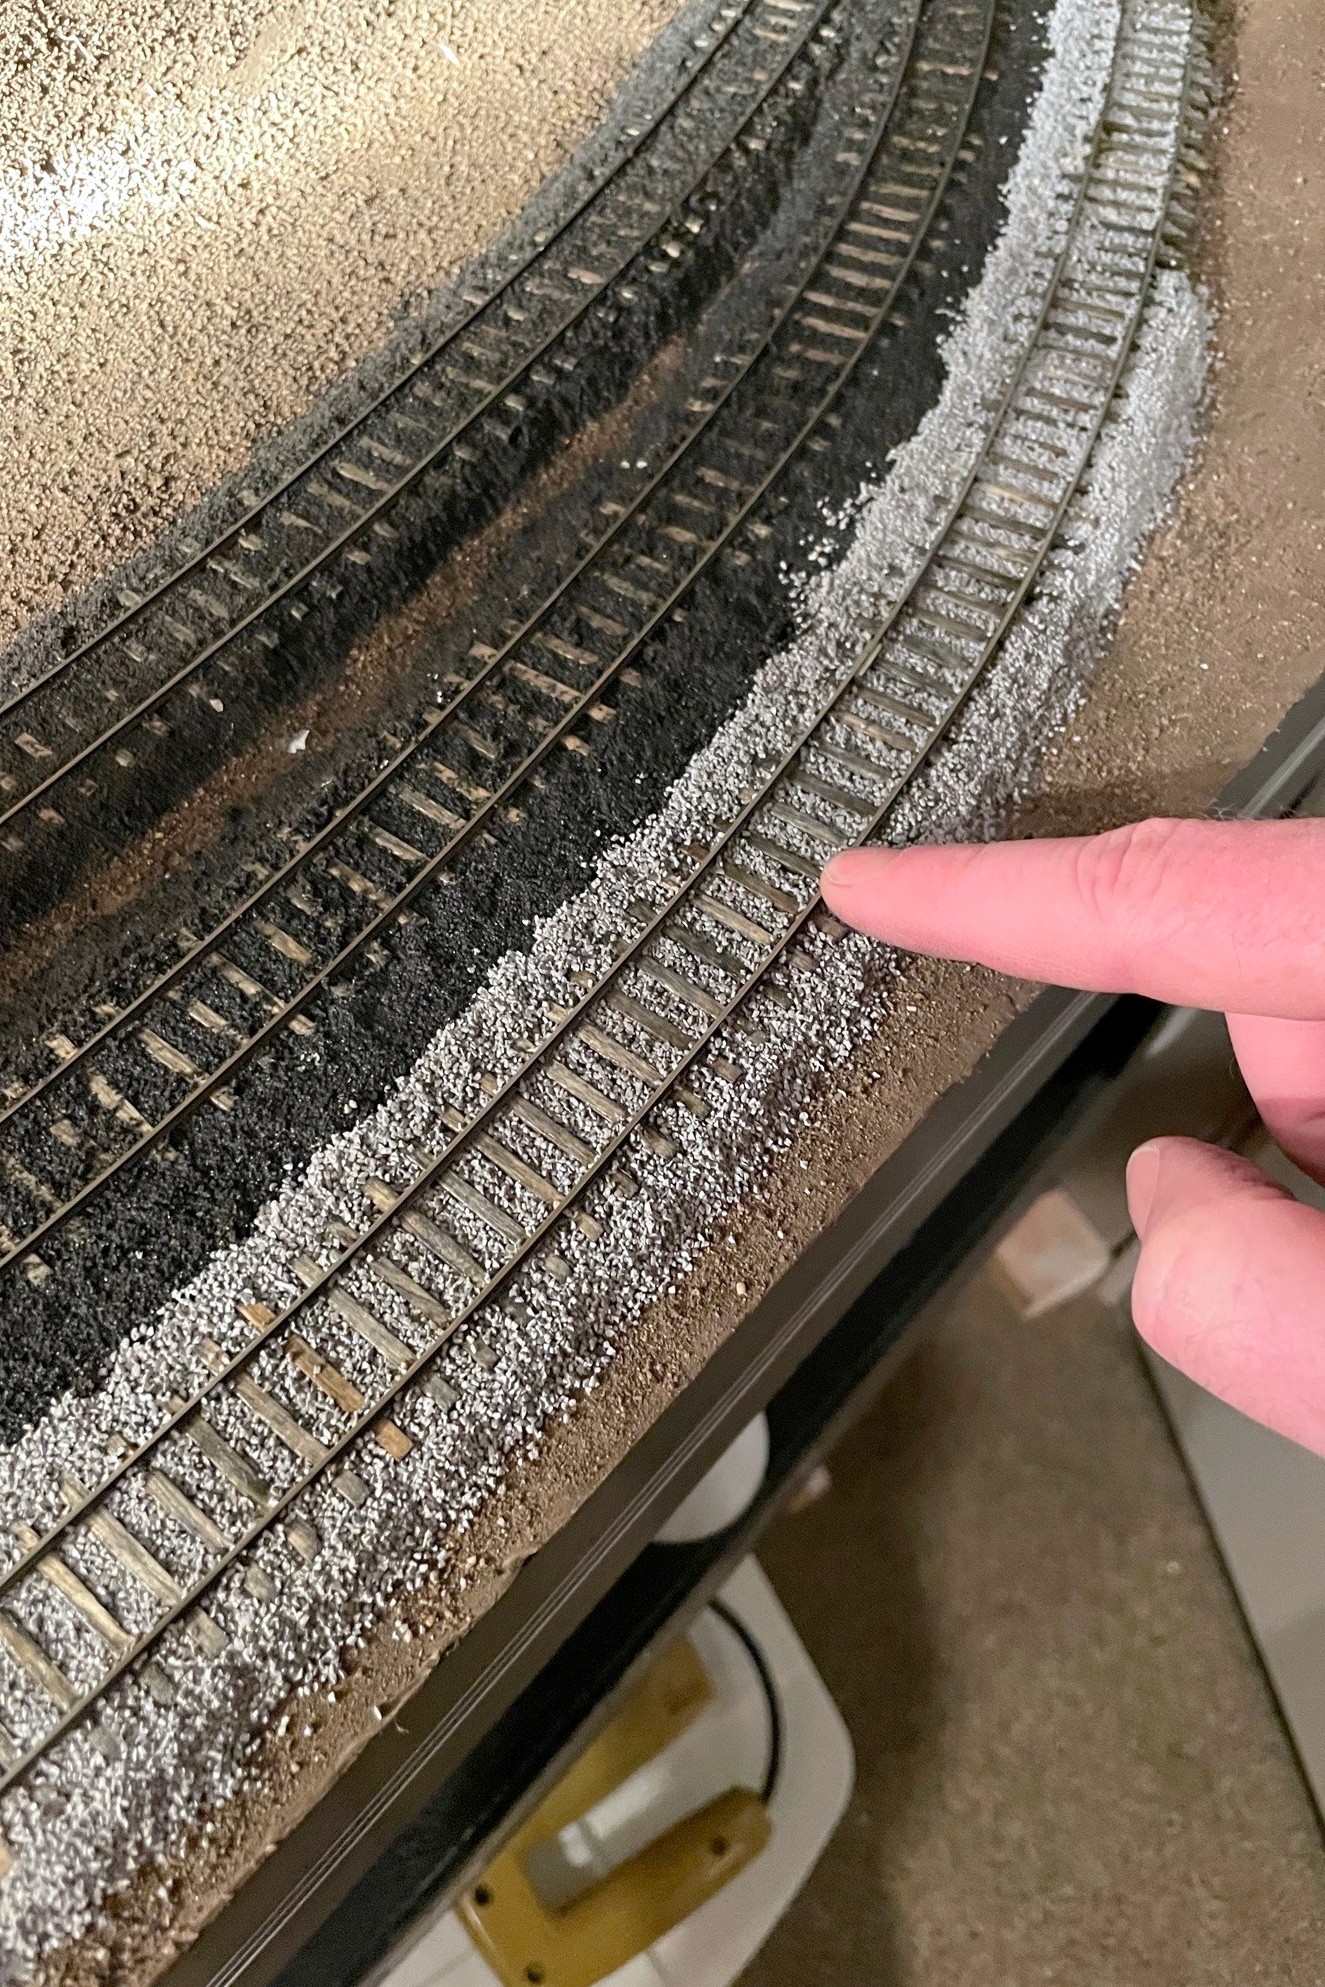
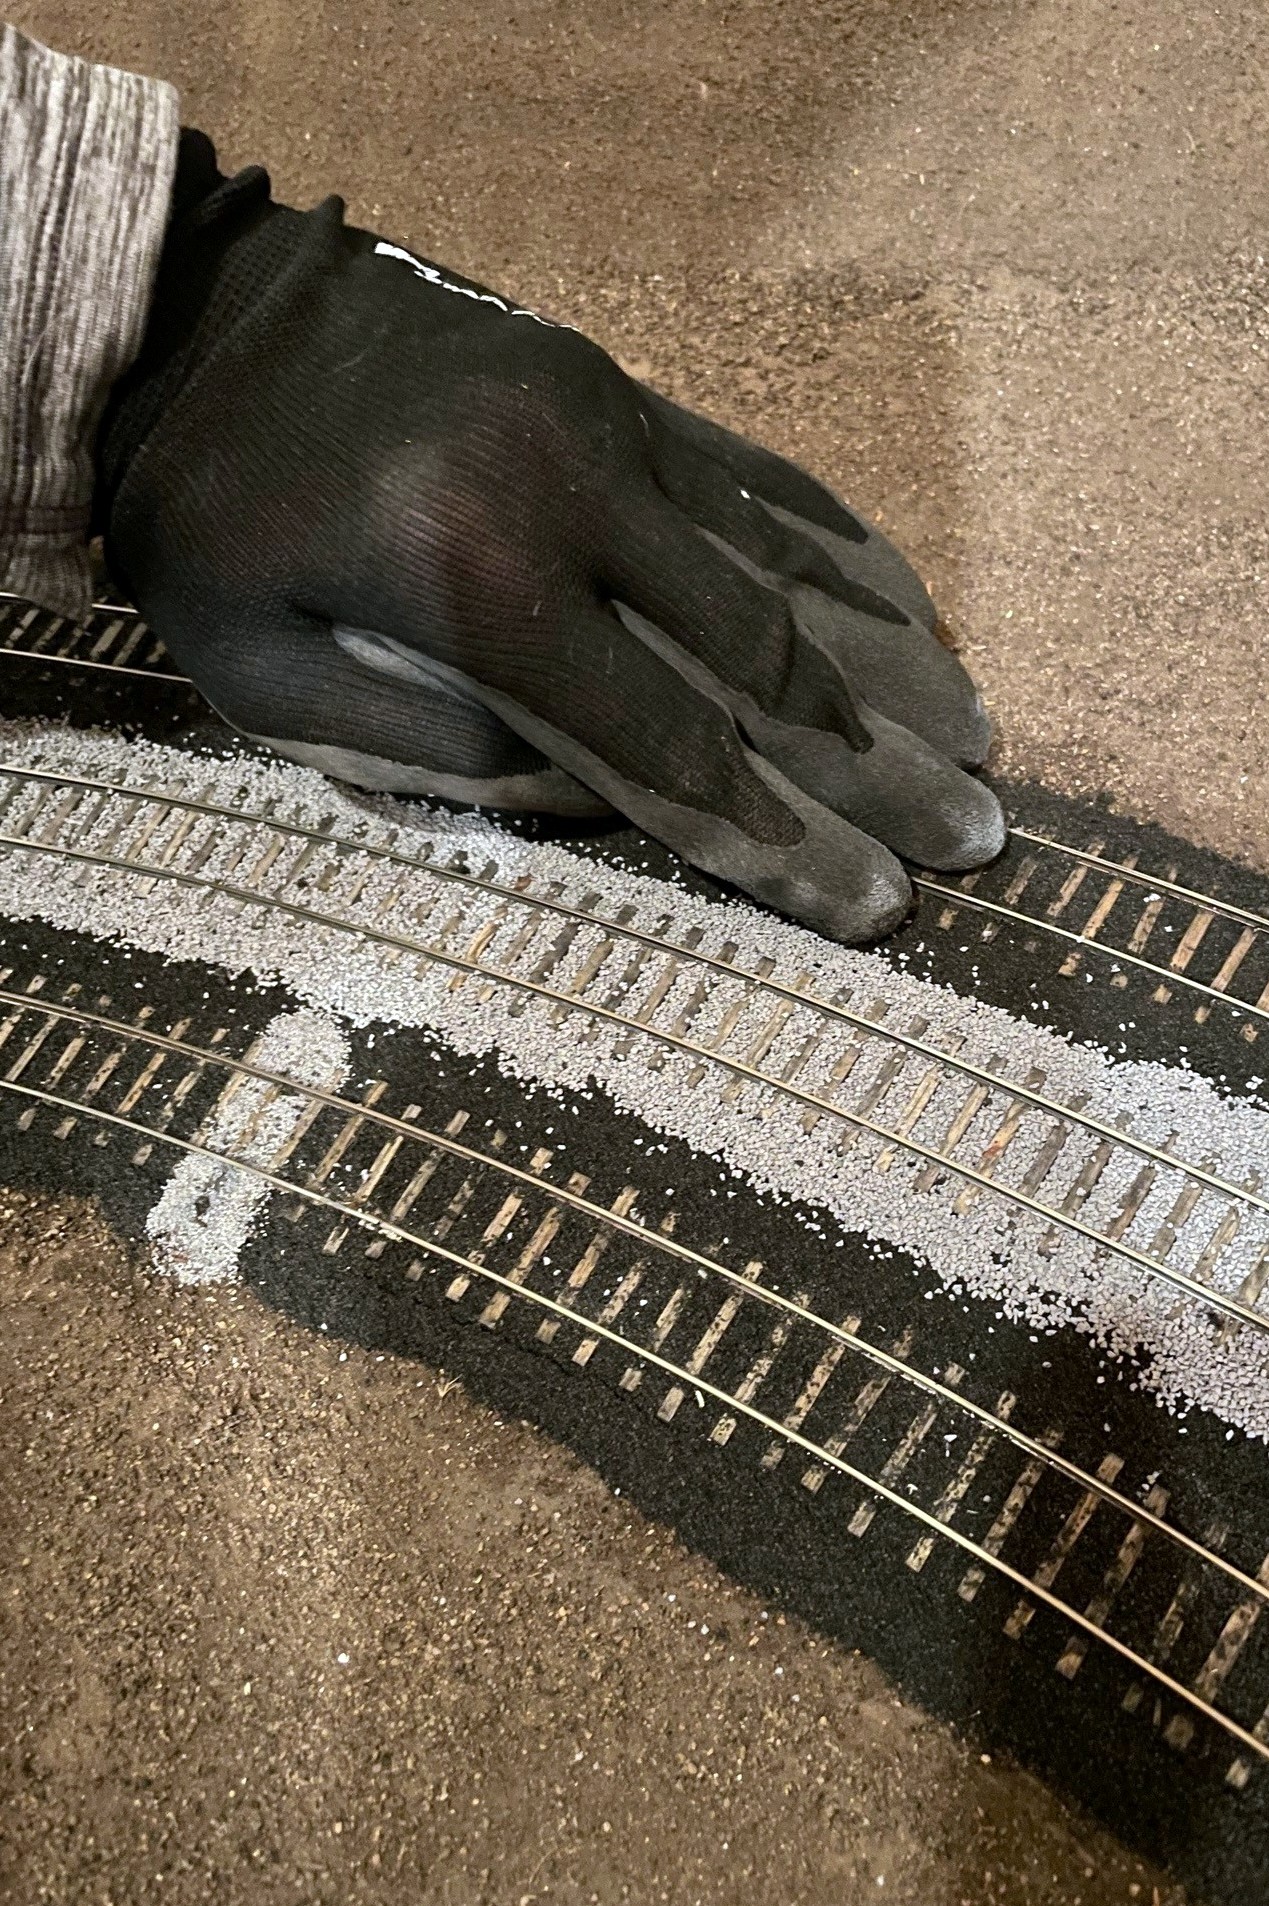
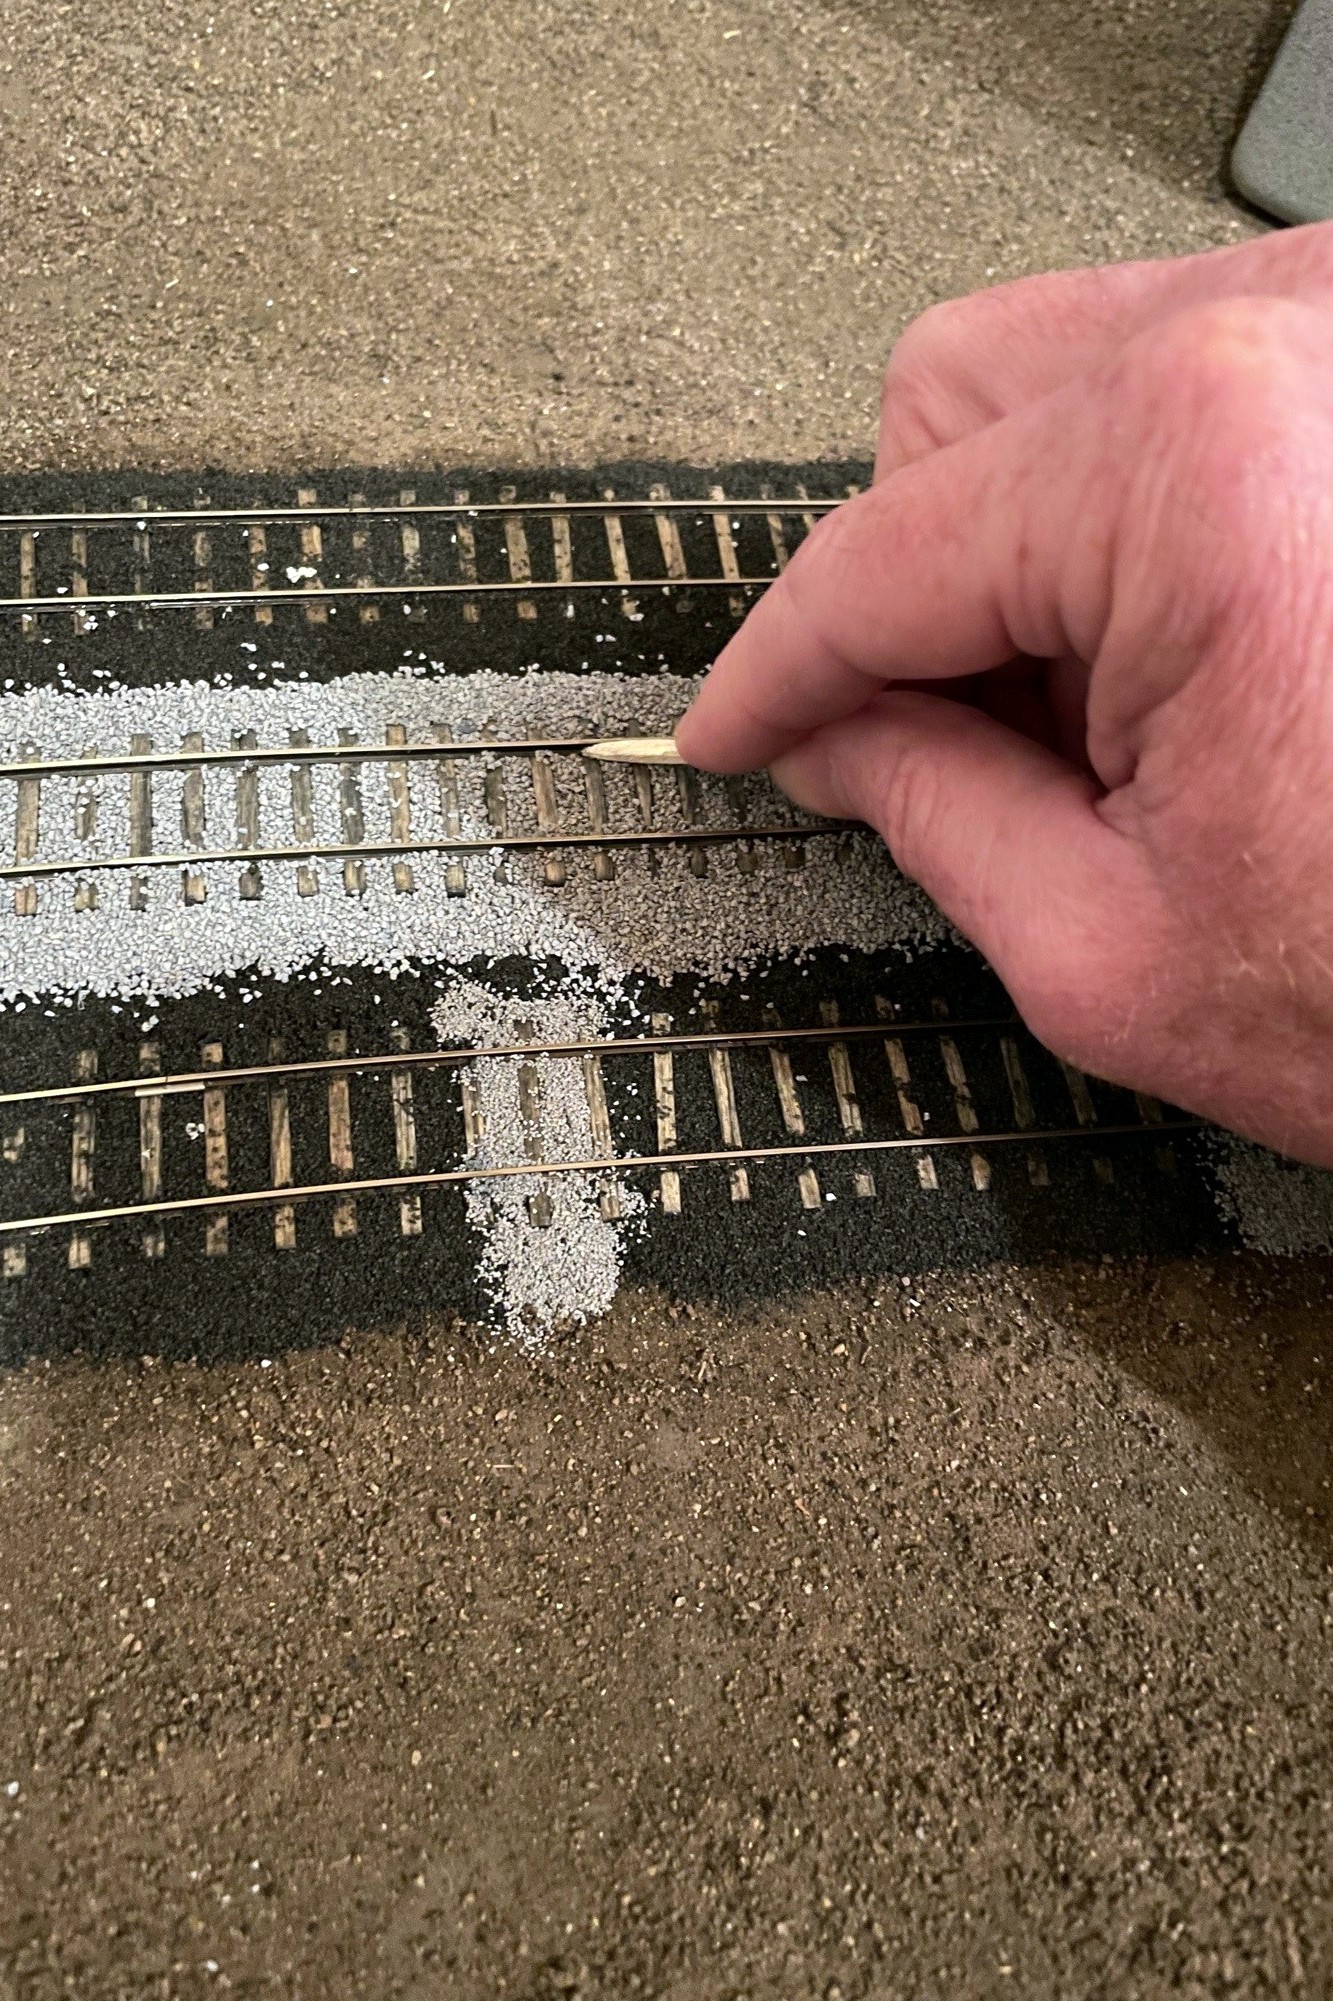
Step 6. Clean off any excess ballast–I use a work glove for thisStep 7. Clean any remaining ballast from the web of the rail–I use a combination of a matchstick and fingernails
After letting the glue dry overnight, I clean up any excess ballast. First, I use a work glove and rub it over the top of the ties and edges to knock off any obtrusive pieces. Next, I clean out the area in the web (sides) of the rail using a matchstick rubbed back-and-forth followed by a fingernail. I used a flathead screwdriver to clean out flangeways if necessary. I cleaned up any excess with a vacuum. You’ll inevitably find spots you missed with the glue, but it’s easy to just add more ballast, drop some alcohol, then drop some glue to repair.
Ballast is scenery, so I also wanted it to tell a story. Because track repairs would have been made with gravel instead of cinders in my era, I picked a few spots along the cinder-ballasted yard tracks to fill with gravel (in this case, Woodland Scenics fine gray ballast) to simulate a replaced tie. I like the look! I also picked a few spots in prominent areas to lay some cinders on the scenery to go underneath the ballast rocks to show that some tracks were once cinders but had now been ballasted with rock. I also laid a thin layer of cinders in areas where I know tracks used to be, even though I don’t model them in my era. Finally, I added extra cinders to areas under tipple chutes and where locomotives sit to represent spilled coal and grime. I’m pretty happy with how these “extras” turned out, but they won’t fully tell the story until more scenery is complete.
The St Charles yard where the main is clearly visible. The gray areas on top of cinders represent tie repairs after the age of cinders
Ok, the ballasting was the last step before adding the upper deck, but you’ve heard that before… We shall see.
Here’s the finished ballast at the Mayflower tipple–the road is made from fine ballast as well
Step 1. Lay down a pile of ballast in the gauge between the rails
Step 2. use a finger to spread the ballast between the ties, moving excess to the next section
Step 3. Add ballast to the edges of the track, use a finger to work it into the ties, then use a finger to clean it off the ties and shape the slope
Step 4. Using a dropper, soak the ballast with isopropyl alcohol
Step 5. Saturate the wet areas with wet glue
Step 6. Clean off any excess ballast–I use a work glove for this
Step 7. Clean any remaining ballast from the web of the rail–I use a combination of a matchstick and fingernails
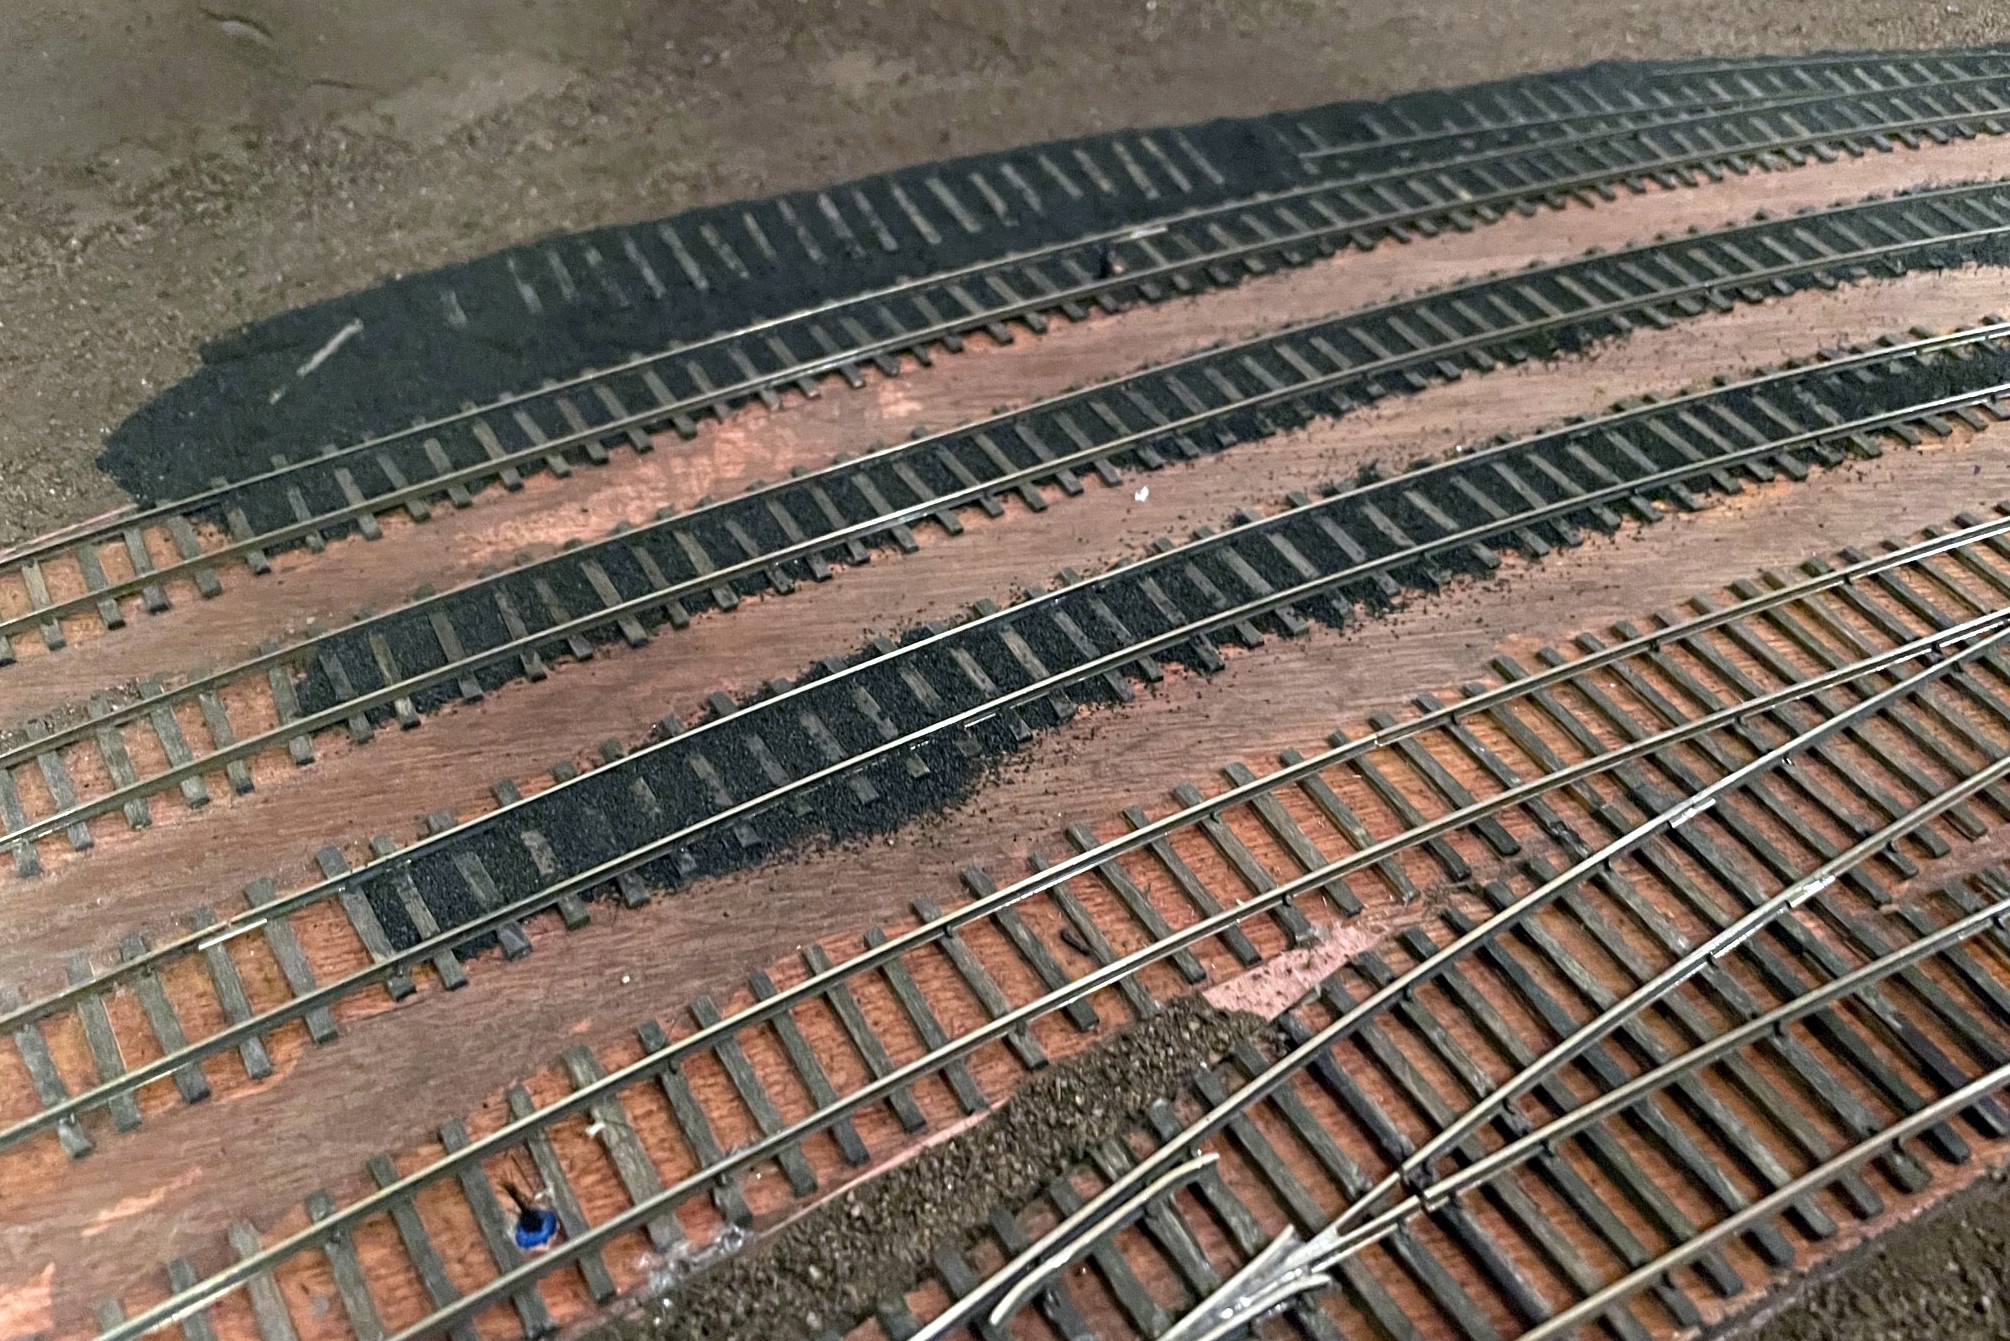
For yards, I did multiple tracks at a time, starting with the gauge, then filling in the areas between tracks
Even when working on multiple tracks at a time, I still wet and glued the gauge portion of all the tracks first
Here’s the finished ballast at the Mayflower tipple–the road is made from fine ballast as well
Transitioning from rock to cinders is done abruptly, but I sprinkle rocks to make a better transition
The St Charles yard where the main is clearly visible. The gray areas on top of cinders represent tie repairs after the age of cinders
Here’s the St Charles wye with ballast. Note the area of cinders where a track used to be
I piled more cinders on top of the rails where the engines sit to simulate grime build up
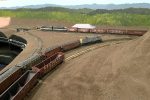
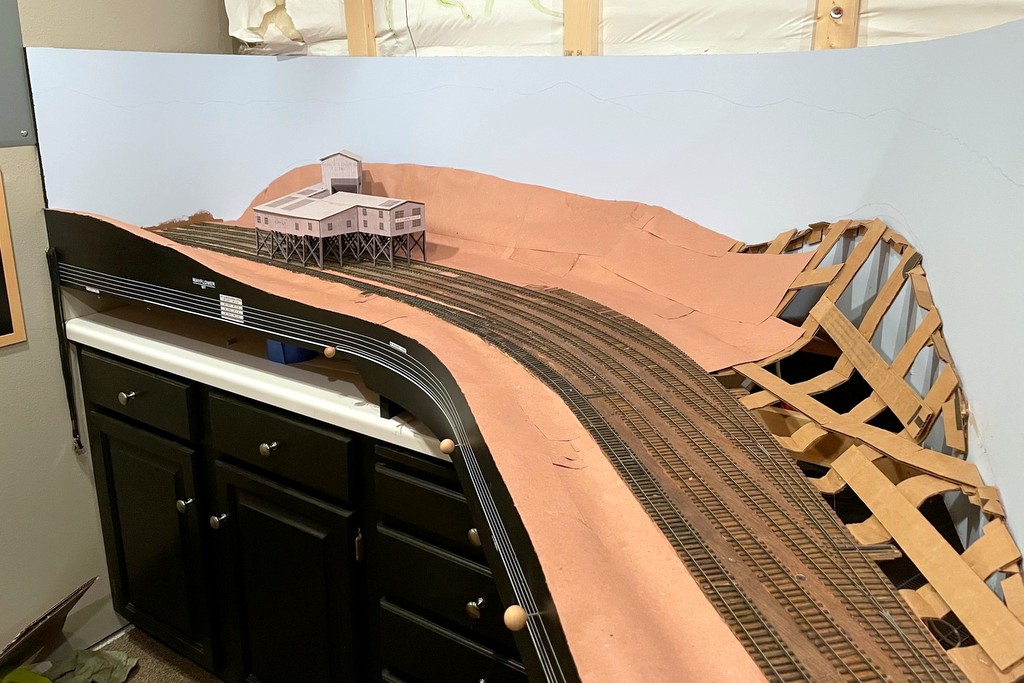
Here’s the finished base scenery layer in St Charles as the L&N CV Local waits for Southern train 61 to clear the wye
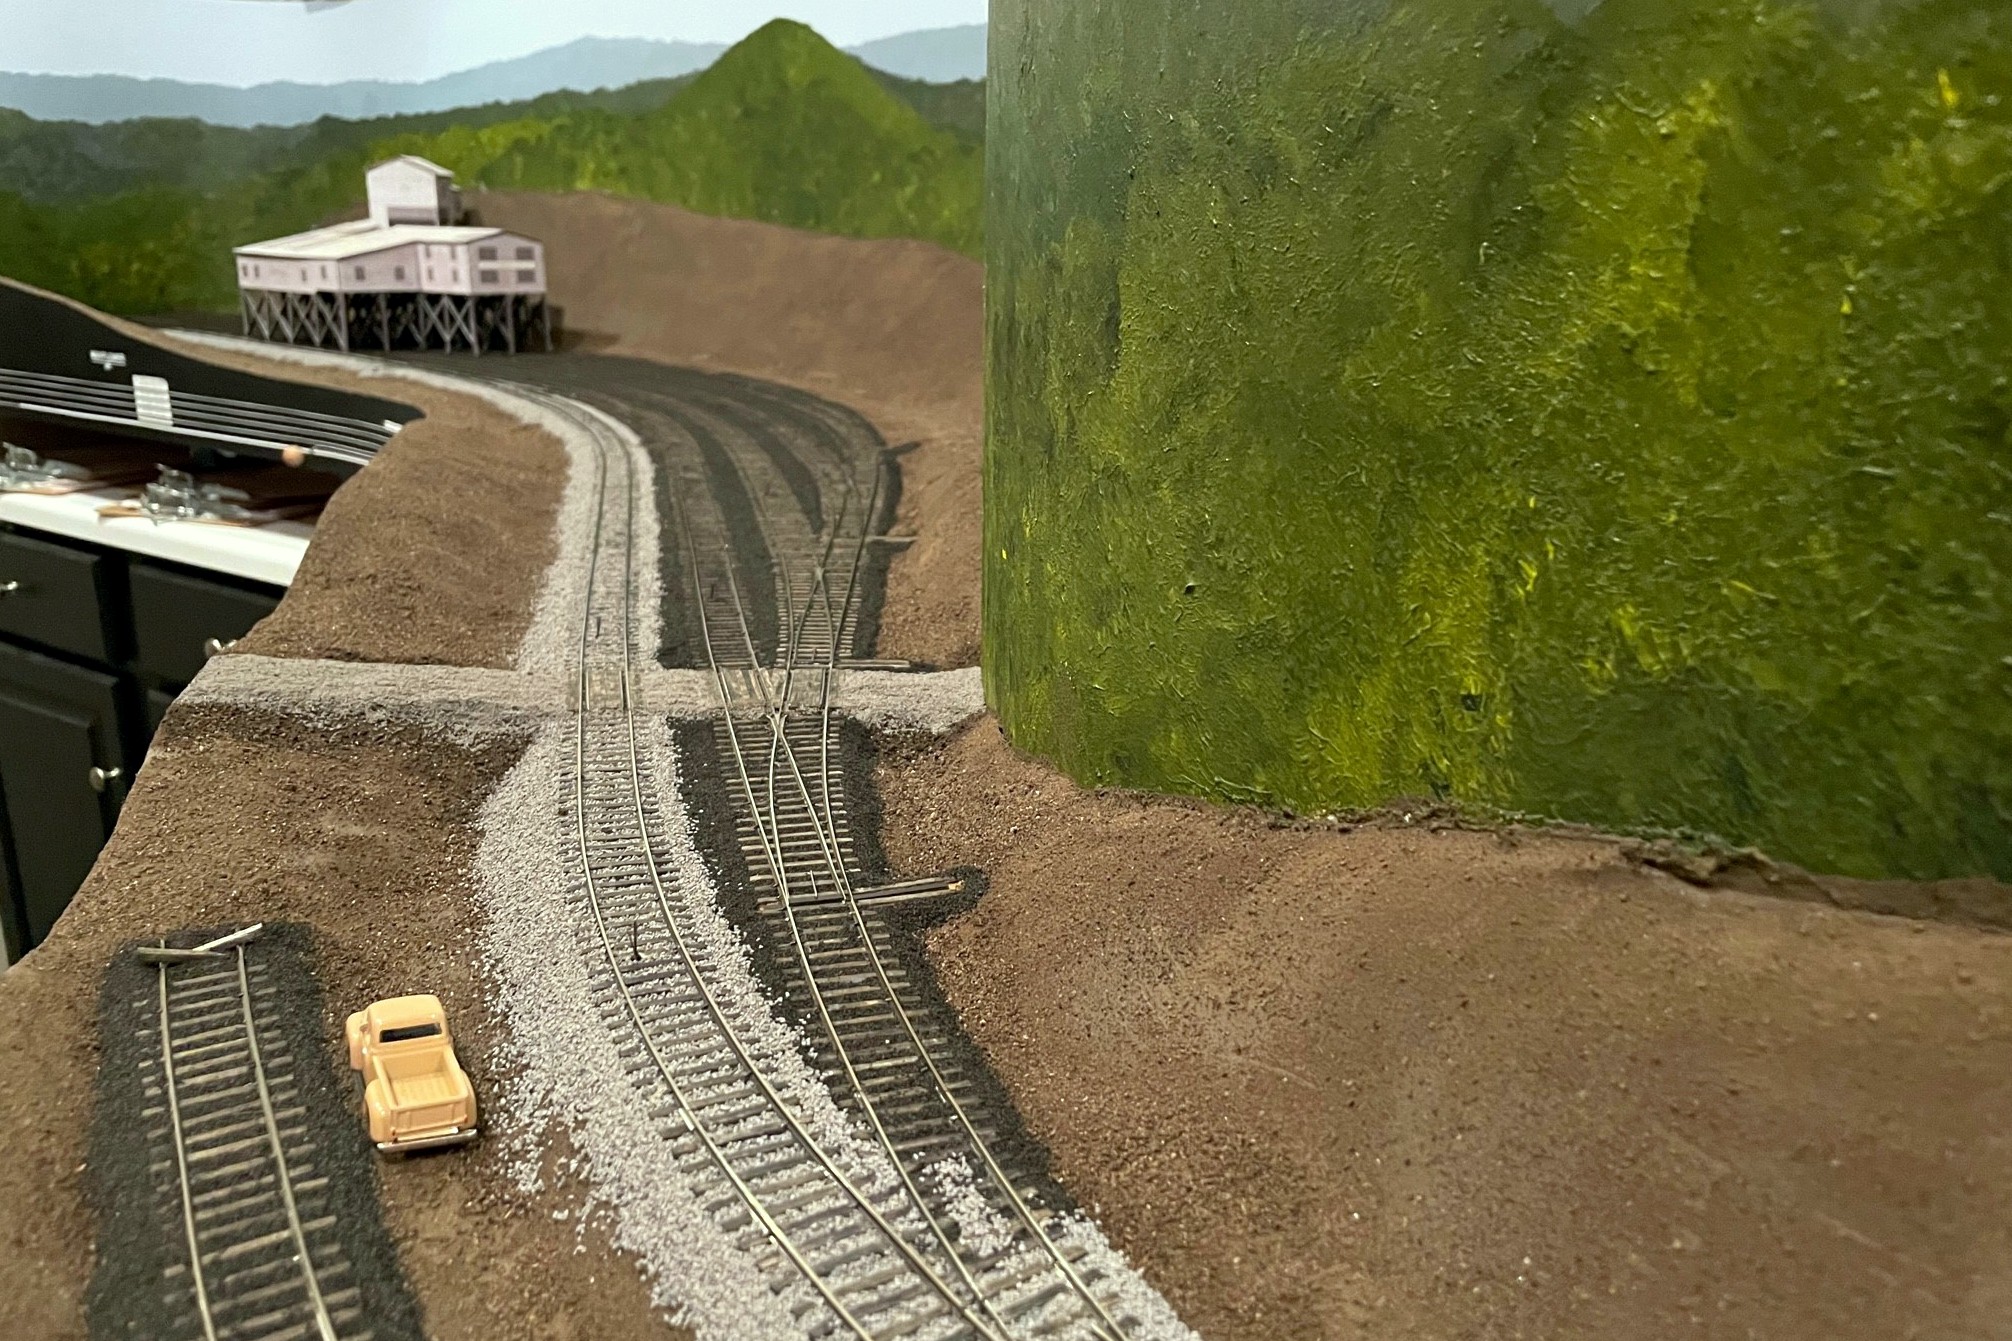
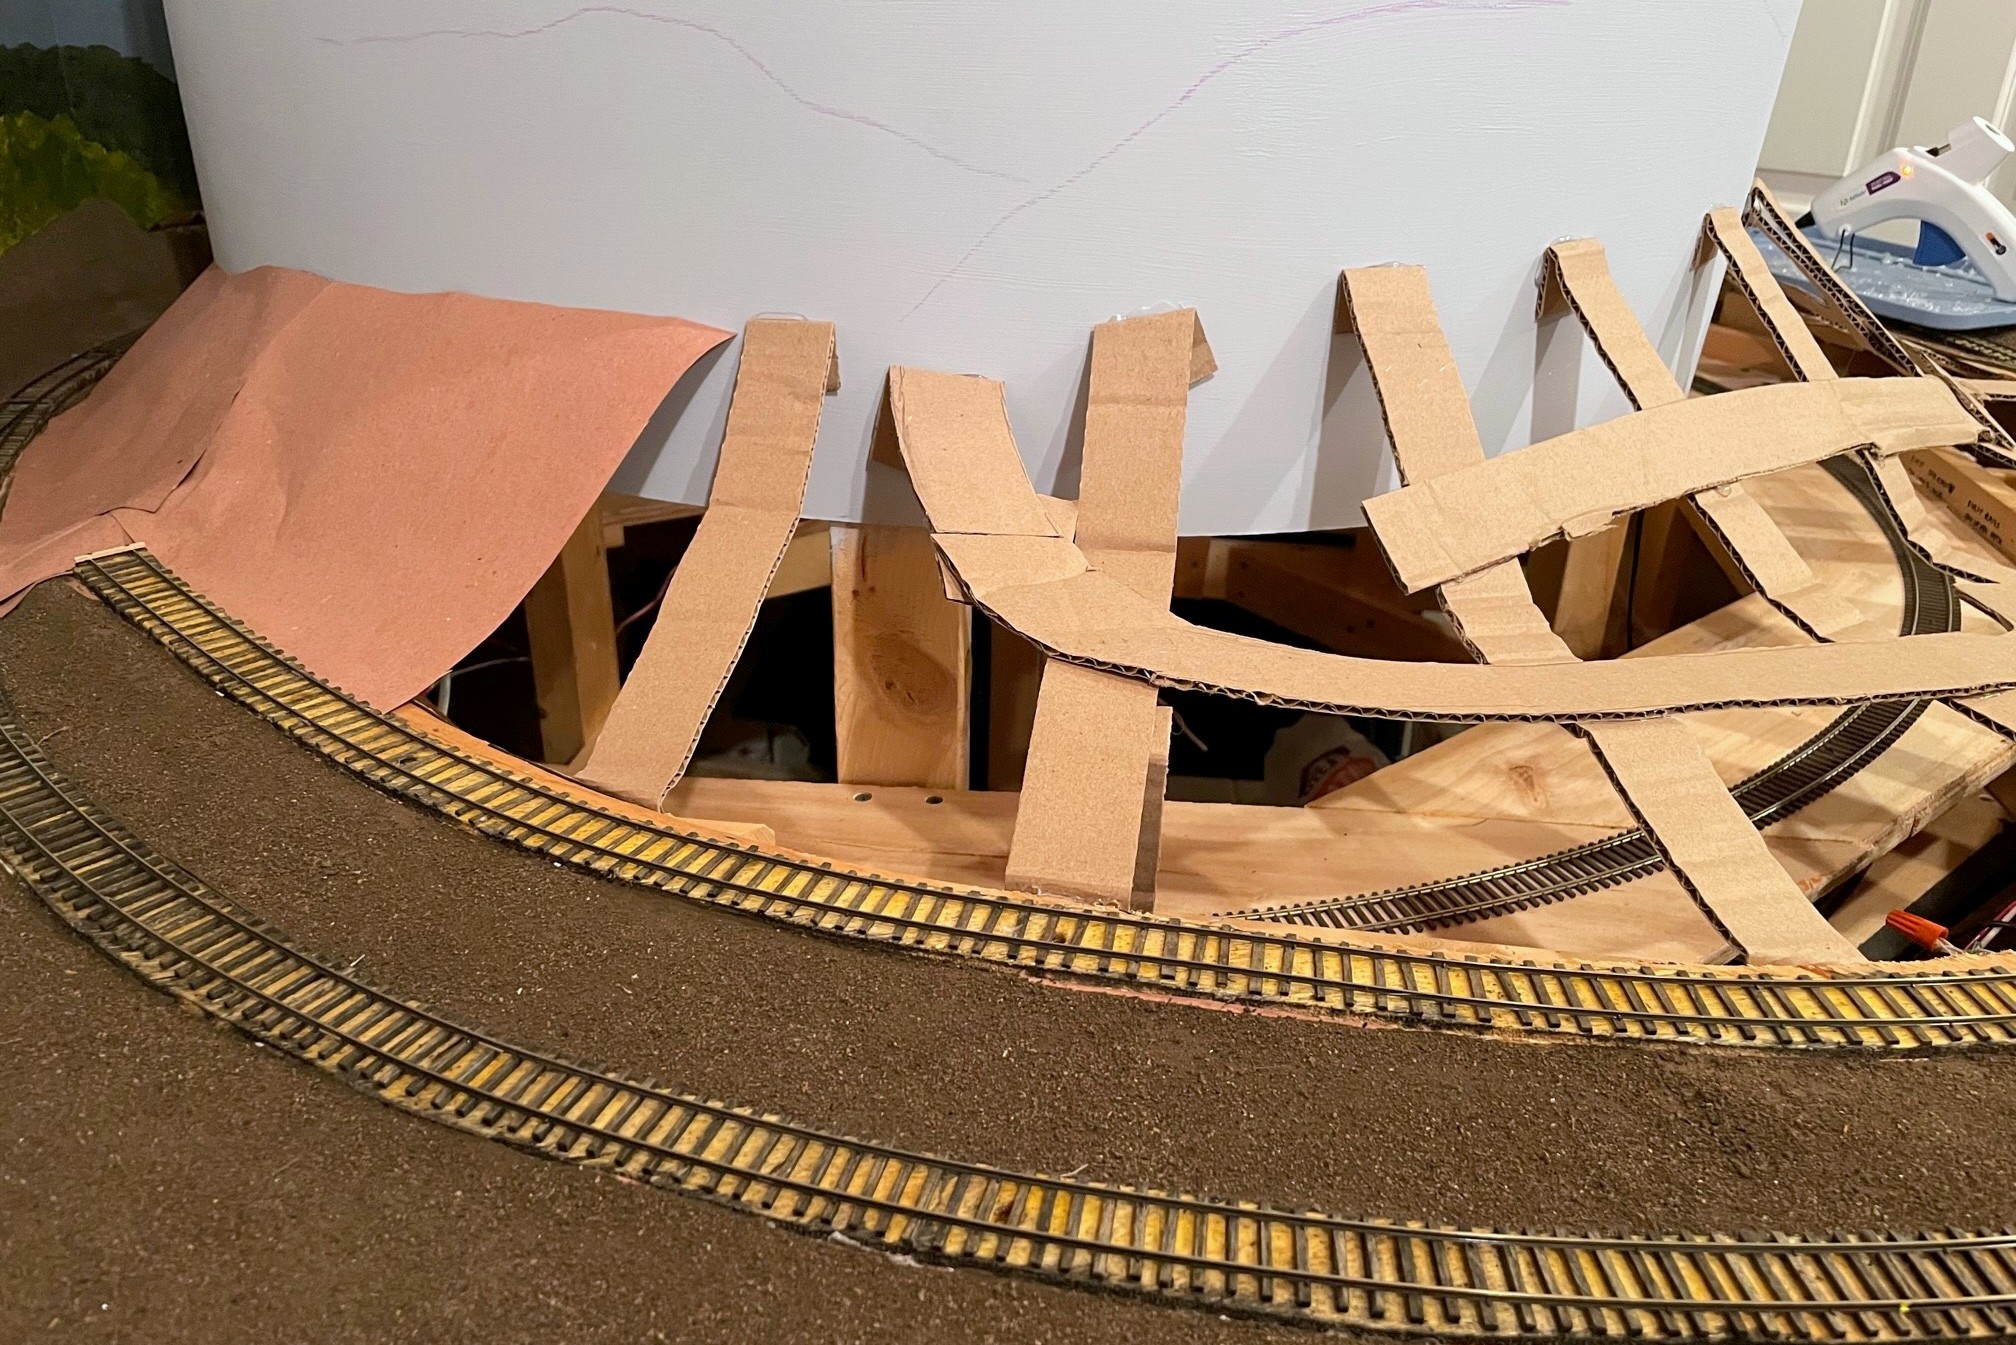
Nearly a year ago I posted the beginnings of building my scenery using Howard Zane’s “paper shell” method. The unfinished red rosin paper shell about halfway through his process served as my basic scenery base for a while–it’s far better than plywood! As I’m nearing the time to move on to the upper deck, I finally got around to finishing the scenery base.
This shot shows several steps in the scenery process including cardboard web, red rosin paper, and the finished base scenery with paint and dirt for texture
In the first post, I covered how to build the basic scenery form using cardboard strips, hot glue, and red rosin paper. Since that first attempt, I have changed my technique a little. I no longer glue a long strip to the backdrop (tedious) but instead just fold the cardboard strip to form a tab and glue the tab to the backdrop. Once the initial cardboard web and red-rosin-paper shell are in place, the next step is a layer of white glue. First, I put masking tape over the tracks and other features I needed to protect from the glue. I use straight Elmer’s white glue from a giant bottle I bought at a local office supply store. It helps to pour a little bit in a portable paint cup for easy access. I used a paint brush (approx. 1.5″ wide designed for house painting) to apply a thick layer of white glue over all the red rosin paper. If your paper layers aren’t tight, expect a little dripping, so be sure to clear out anything valuable from underneath first. When the glue is drying, it saturates the paper causing some unexpected wrinkles–I was worried at first, but most of these disappeared when the glue dried, and those that remained looked like pretty natural variations in the landscape. In places where the paper edges were warping up and away from the layer underneath, I brushed an extra layer of glue underneath and smoothed things back down with a finger.
After applying a layer of glue and letting it dry, I apply lightweight spackling compound to the paper seams to smooth out the edges
Once the glue dried completely, I added a step that Howard Zane does not: spackling the seams. I wasn’t happy with the edges of the paper as there were distinct lines that wouldn’t look natural with just paint. Additionally, there were a few areas that I needed to be completely flat, but they still had some undulations from the glue step. To fix this, I turned to one of my favorite materials: lightweight spackling compound that I picked up from the local hardware store. This is the same compound I use to cover screw holes and hide joints in masonite fascia and backdrops. It’s about the consistency of icing, and you just spread it on in batches using a plastic putty knife to smooth things out as best you can. Once it dried overnight, I used a wet washcloth to rub down the edges of the spackling compound and to taper it into the surrounding paper. This rewets the compound and allows you to get a smooth surface without sanding. Most of the seams were hidden after the first application, but a few areas required a second or third application to get the shape right.
Once the spackling compound dries, I use a wet washcloth to gently smooth the spackling compound to remove rough edges and blend it into the paper
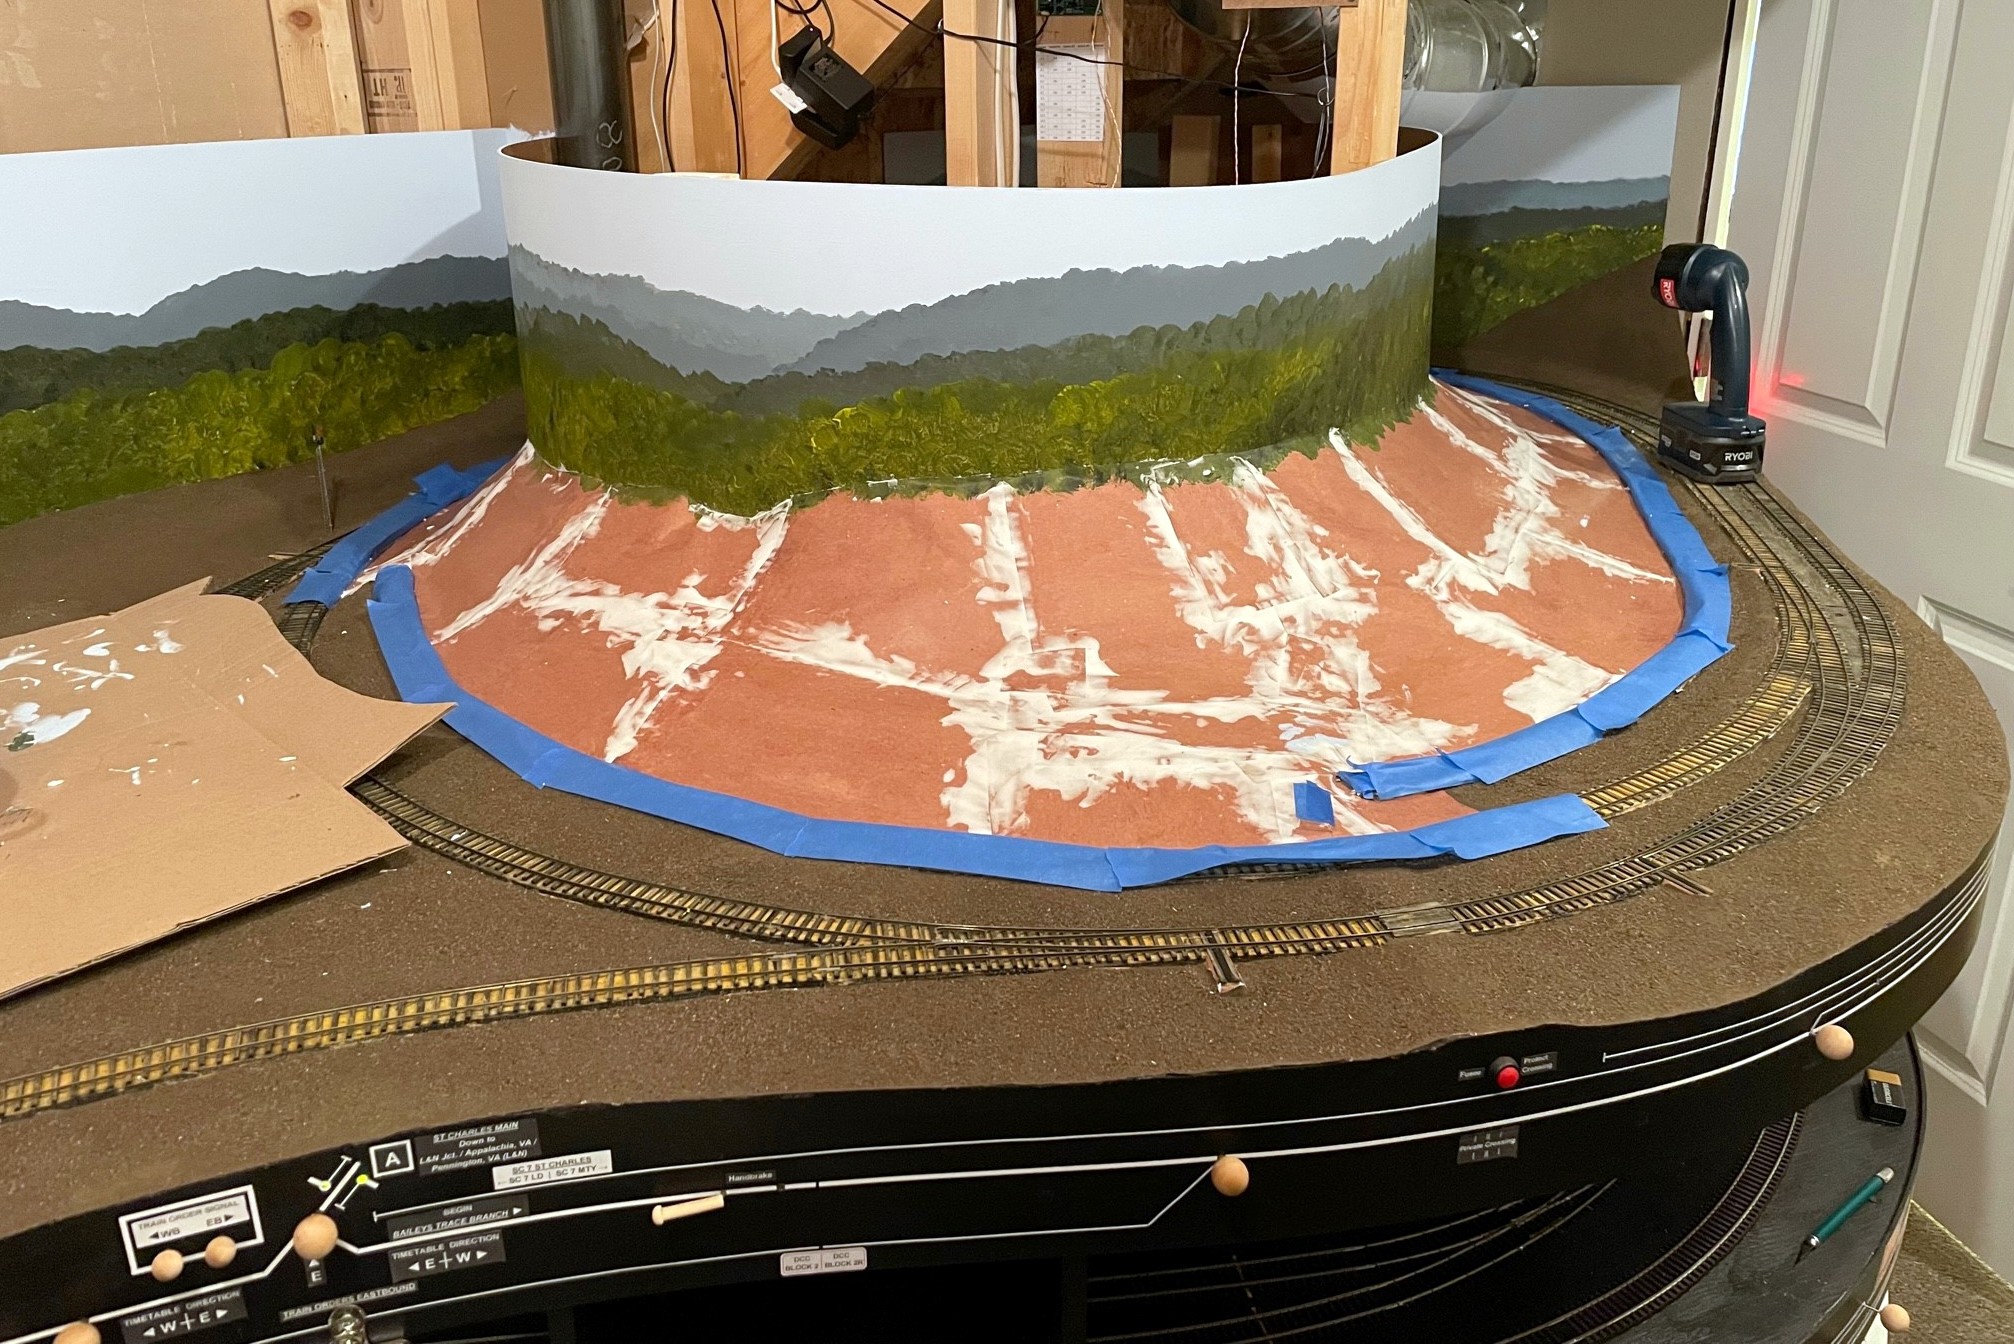
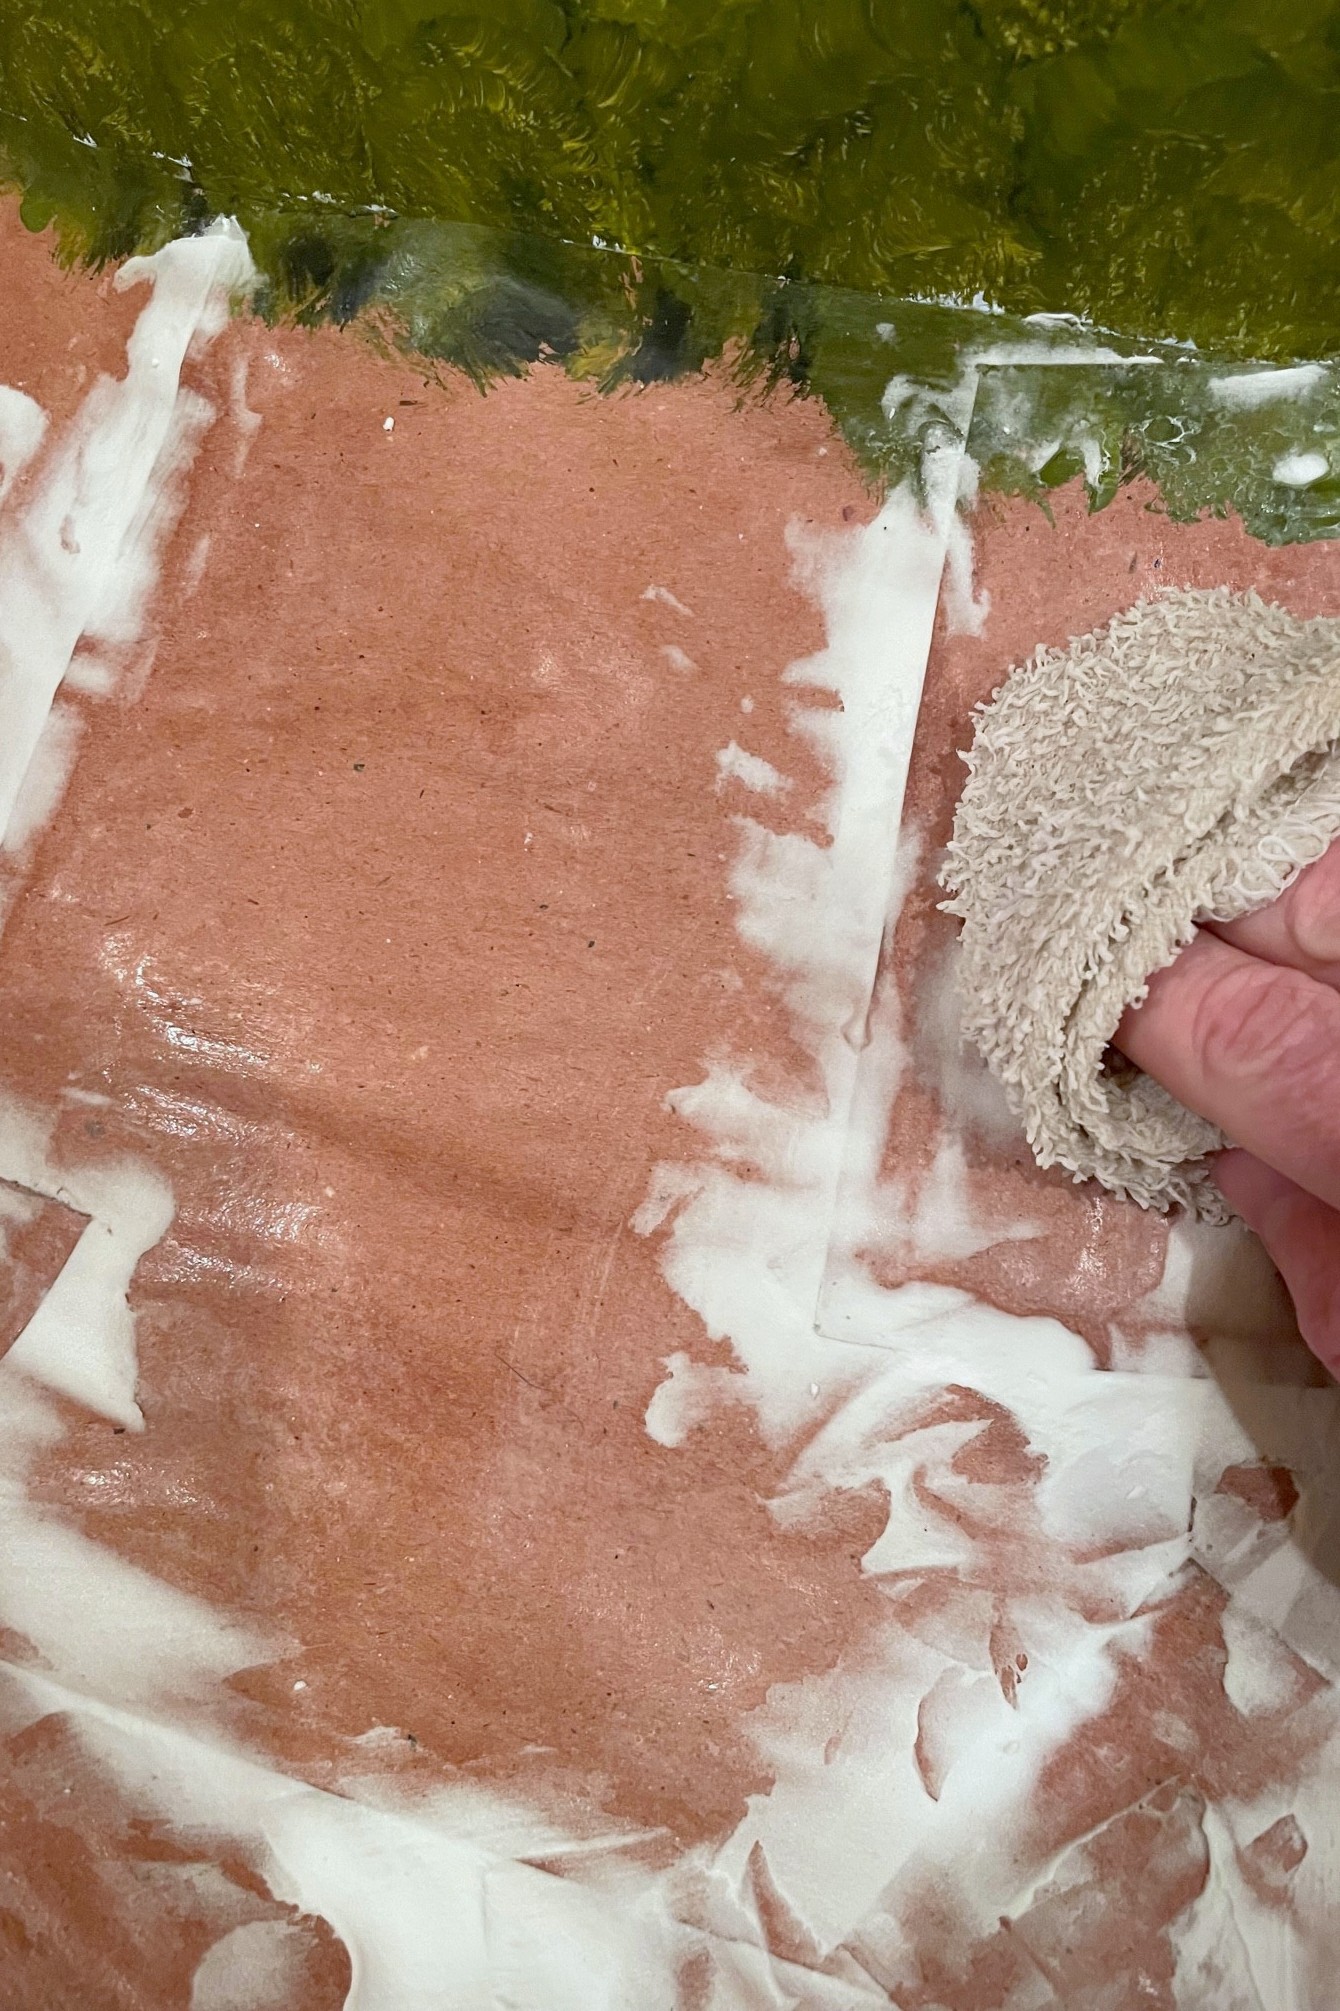
Now things were finally ready for some paint! A friend of mine graciously donated a fine bucket of dark Kentucky dirt to me a while ago (a kingly gift!). I went to the hardware store and found a paint color that matched the dirt color pretty closely and had a gallon made in flat/matte finish. Back on the layout, I applied some of this color thickly with a small brush to about a one square foot area. Using a spoon, I sprinkled some of the sifted dirt onto the paint to give the scenery a little base texture. I left about an inch of the paint uncovered to avoid getting dirt on the paintbrush. Quickly moving to the next section, I painted some more and added more dirt, starting with the seam between the areas as it was the closest to drying. Eventually, the whole surface was covered. Once the paint had dried a little, I gently sprayed a layer of wet glue (about 10 parts water, 1 part glue, with a little dish soap) on top of the dirt. In the few areas where it washed away the dirt, I simply added more to the soaked surface and sprayed again.
I spread thick paint on about one square foot of paper at a time, then I sprinkle with dirt while it’s still wet
Once everything dried. I removed the masking tape and touched up any areas as needed. While there’s still a lot more work to go before the scenery is complete, I’m really happy with this technique to get to a good scenery base that looks a whole lot better than either plywood or raw red rosin paper! I won’t finish the scenery until the upper deck is complete to avoid ruining anything with sawdust and scenery materials raining down, but this current layer is resilient enough (and able to be vacuumed) to withstand the construction of the upper deck.
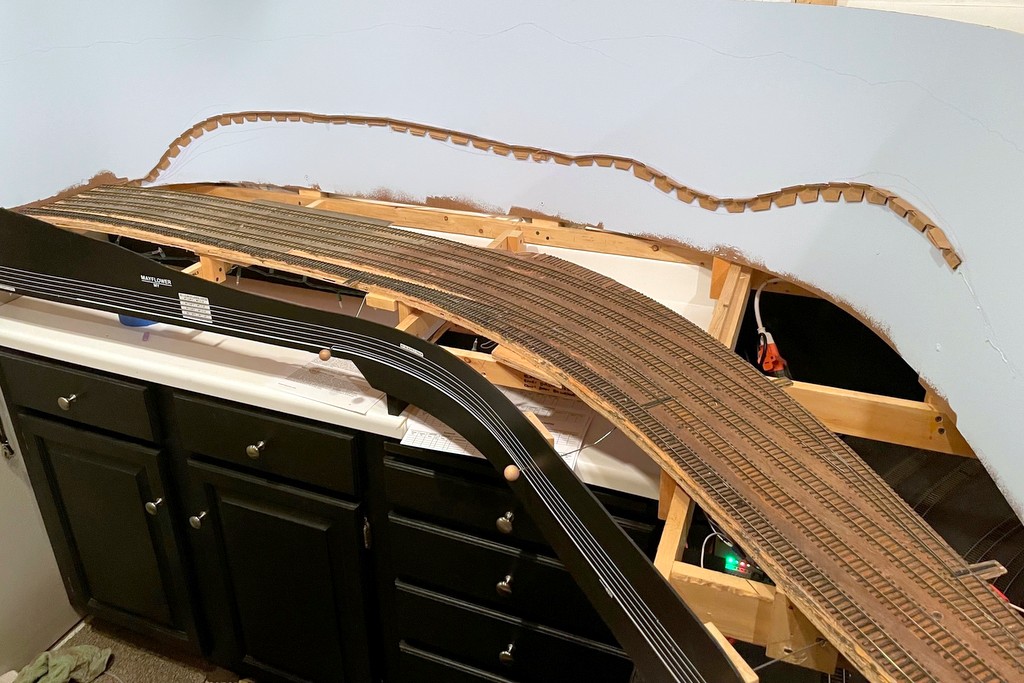
Another view of the base scenery in St Charles looking toward the gap where the tracks descend to Appalachia staging
This shot shows several steps in the scenery process including cardboard web, red rosin paper, and the finished base scenery with paint and dirt for texture
Here’s the finished layer of red rosin paper on the new scenery section
After applying a layer of glue and letting it dry, I apply lightweight spackling compound to the paper seams to smooth out the edges
Once the spackling compound dries, I use a wet washcloth to gently smooth the spackling compound to remove rough edges and blend it into the paper
Here’s the finished layer of paper with a layer of glue and a layer of spackling compound smoothed with a wet washcloth and ready for paint
While I would have preferred western Virginia dirt, a friend was gracious enough to bring me a bucket of Kentucky dirt to use on the layout which is far closer than our local Colorado dirt
I spread thick paint on about one square foot of paper at a time, then I sprinkle with dirt while it’s still wet
After the paint dries, I spray a wet glue mixture over the dirt to help secure it–I patch up any bald areas with more dirt
Applying glue to red rosin paper results in some warping of the paper that I find adds extra texture and interest to the scenery without any extra work
Paper shell scenery can be made into complex contours using many smaller pieces and a bit of patience
Here’s the finished base scenery layer in St Charles as the L&N CV Local waits for Southern train 61 to clear the wye
Another view of the base scenery in St Charles looking toward the gap where the tracks descend to Appalachia staging
Here’s a look at last Saturday’s progress including finishing most of the lower level scenery base and painting the rest of the backdrop
I had a happy aligning of the stars on Saturday where my wife was gone for the day, I didn’t have any big “chores” to do, and I had just learned how to paint backdrops! All that combined into a day spent furiously trying to finish up the lower-level scenery forms so I could paint the rest of the lower-level backdrop. It was a good day, and I’m pretty happy with the results. I learned that the painting is my favorite part, roughing in the scenery with cardboard strips is my second favorite, and papering over the cardboard with section after section of red rosin paper is a distant third. Round 2 of backdrop painting went a little smoother than round 1 as I think I had a better grasp of the techniques, and the paint brushes seemed to work better on their second use. I liked the results of round 2 so much I went back and redid some sections of round 1.
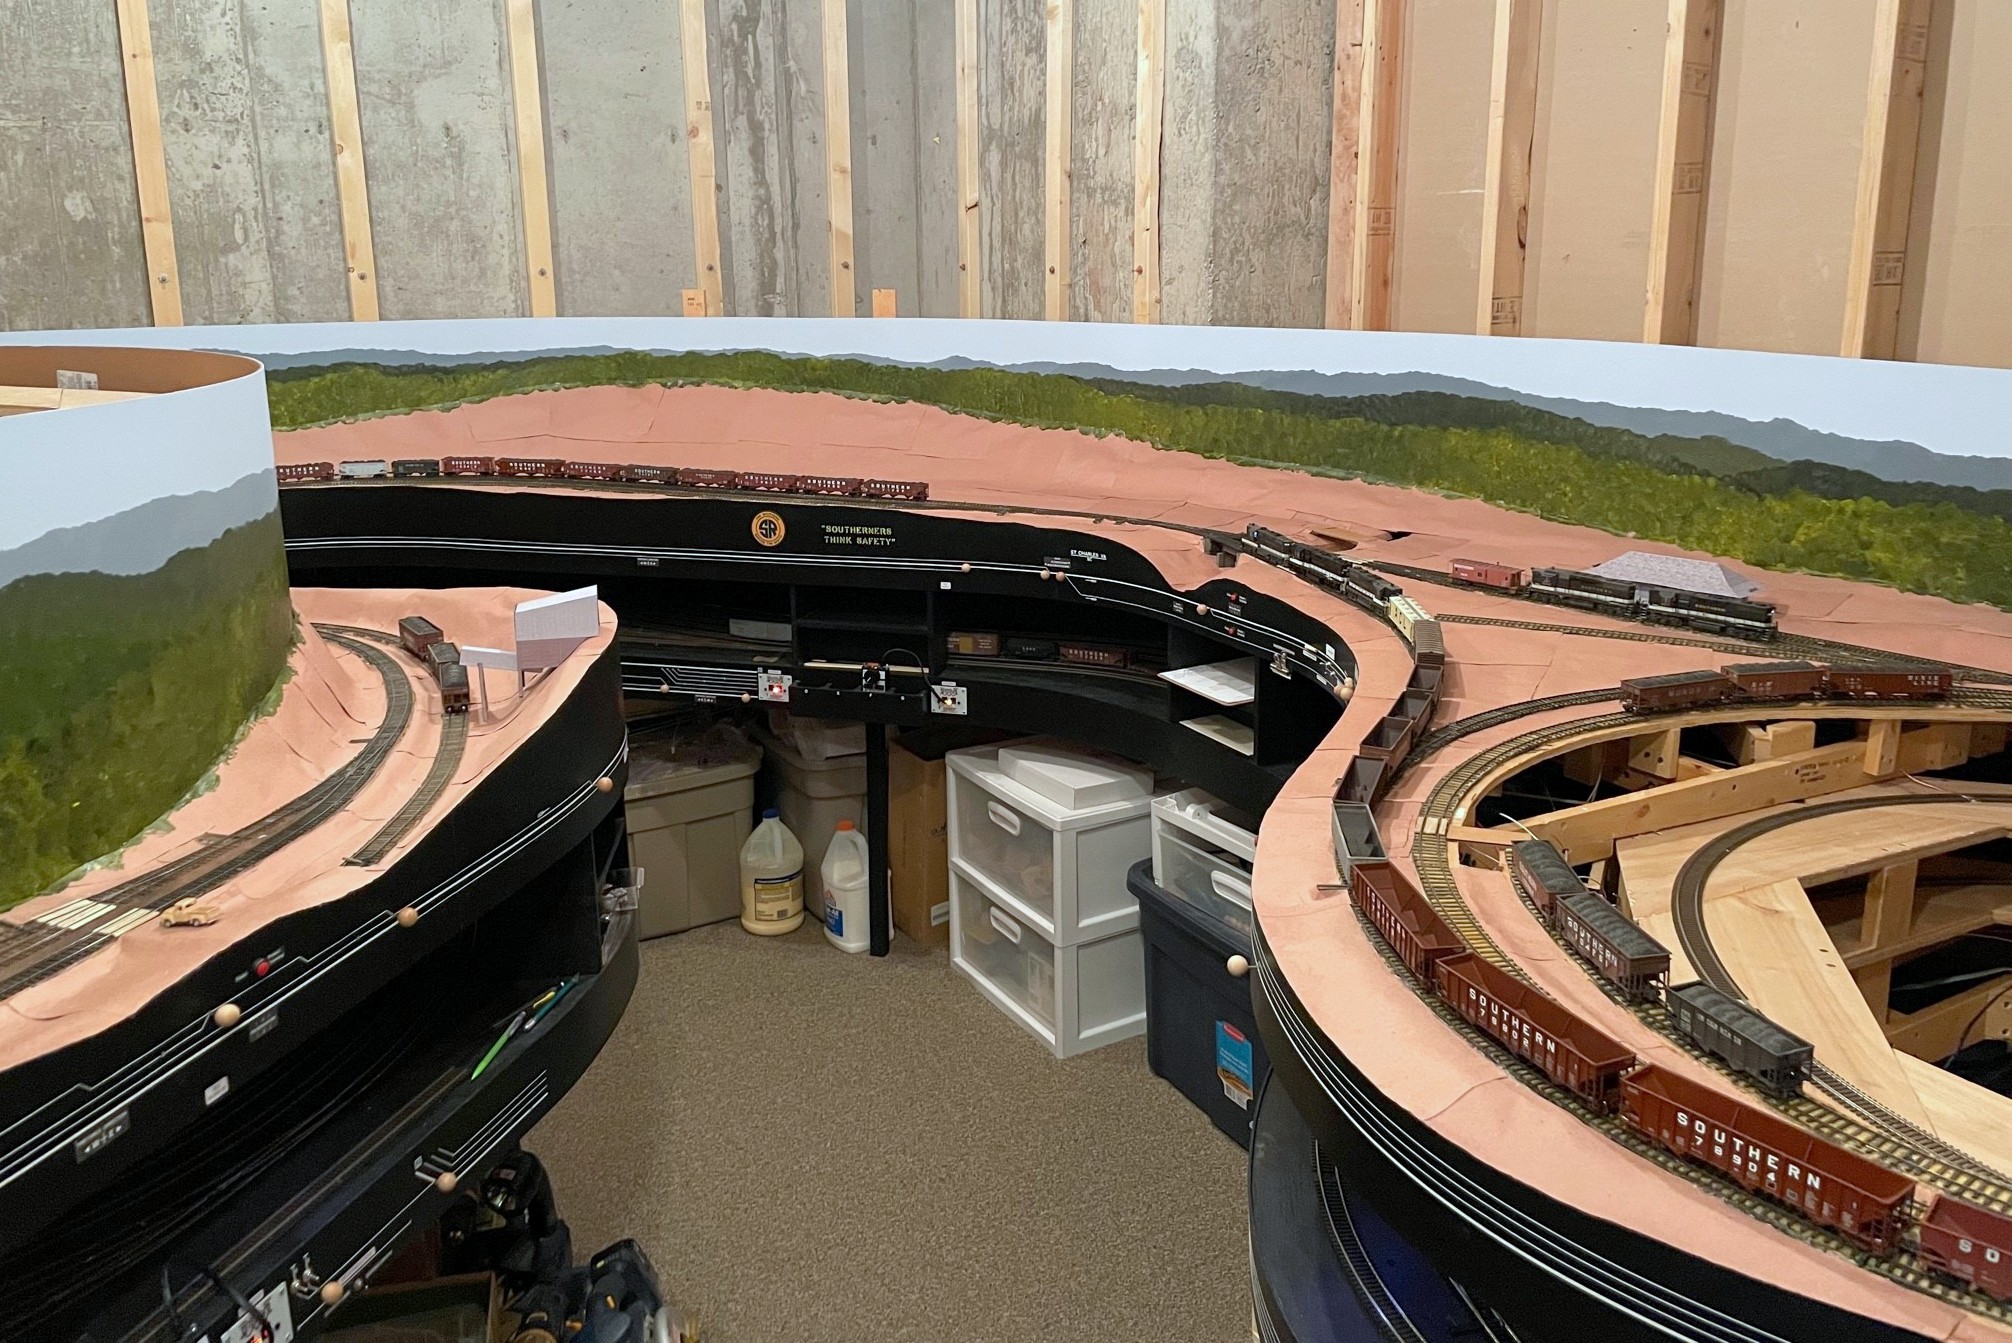
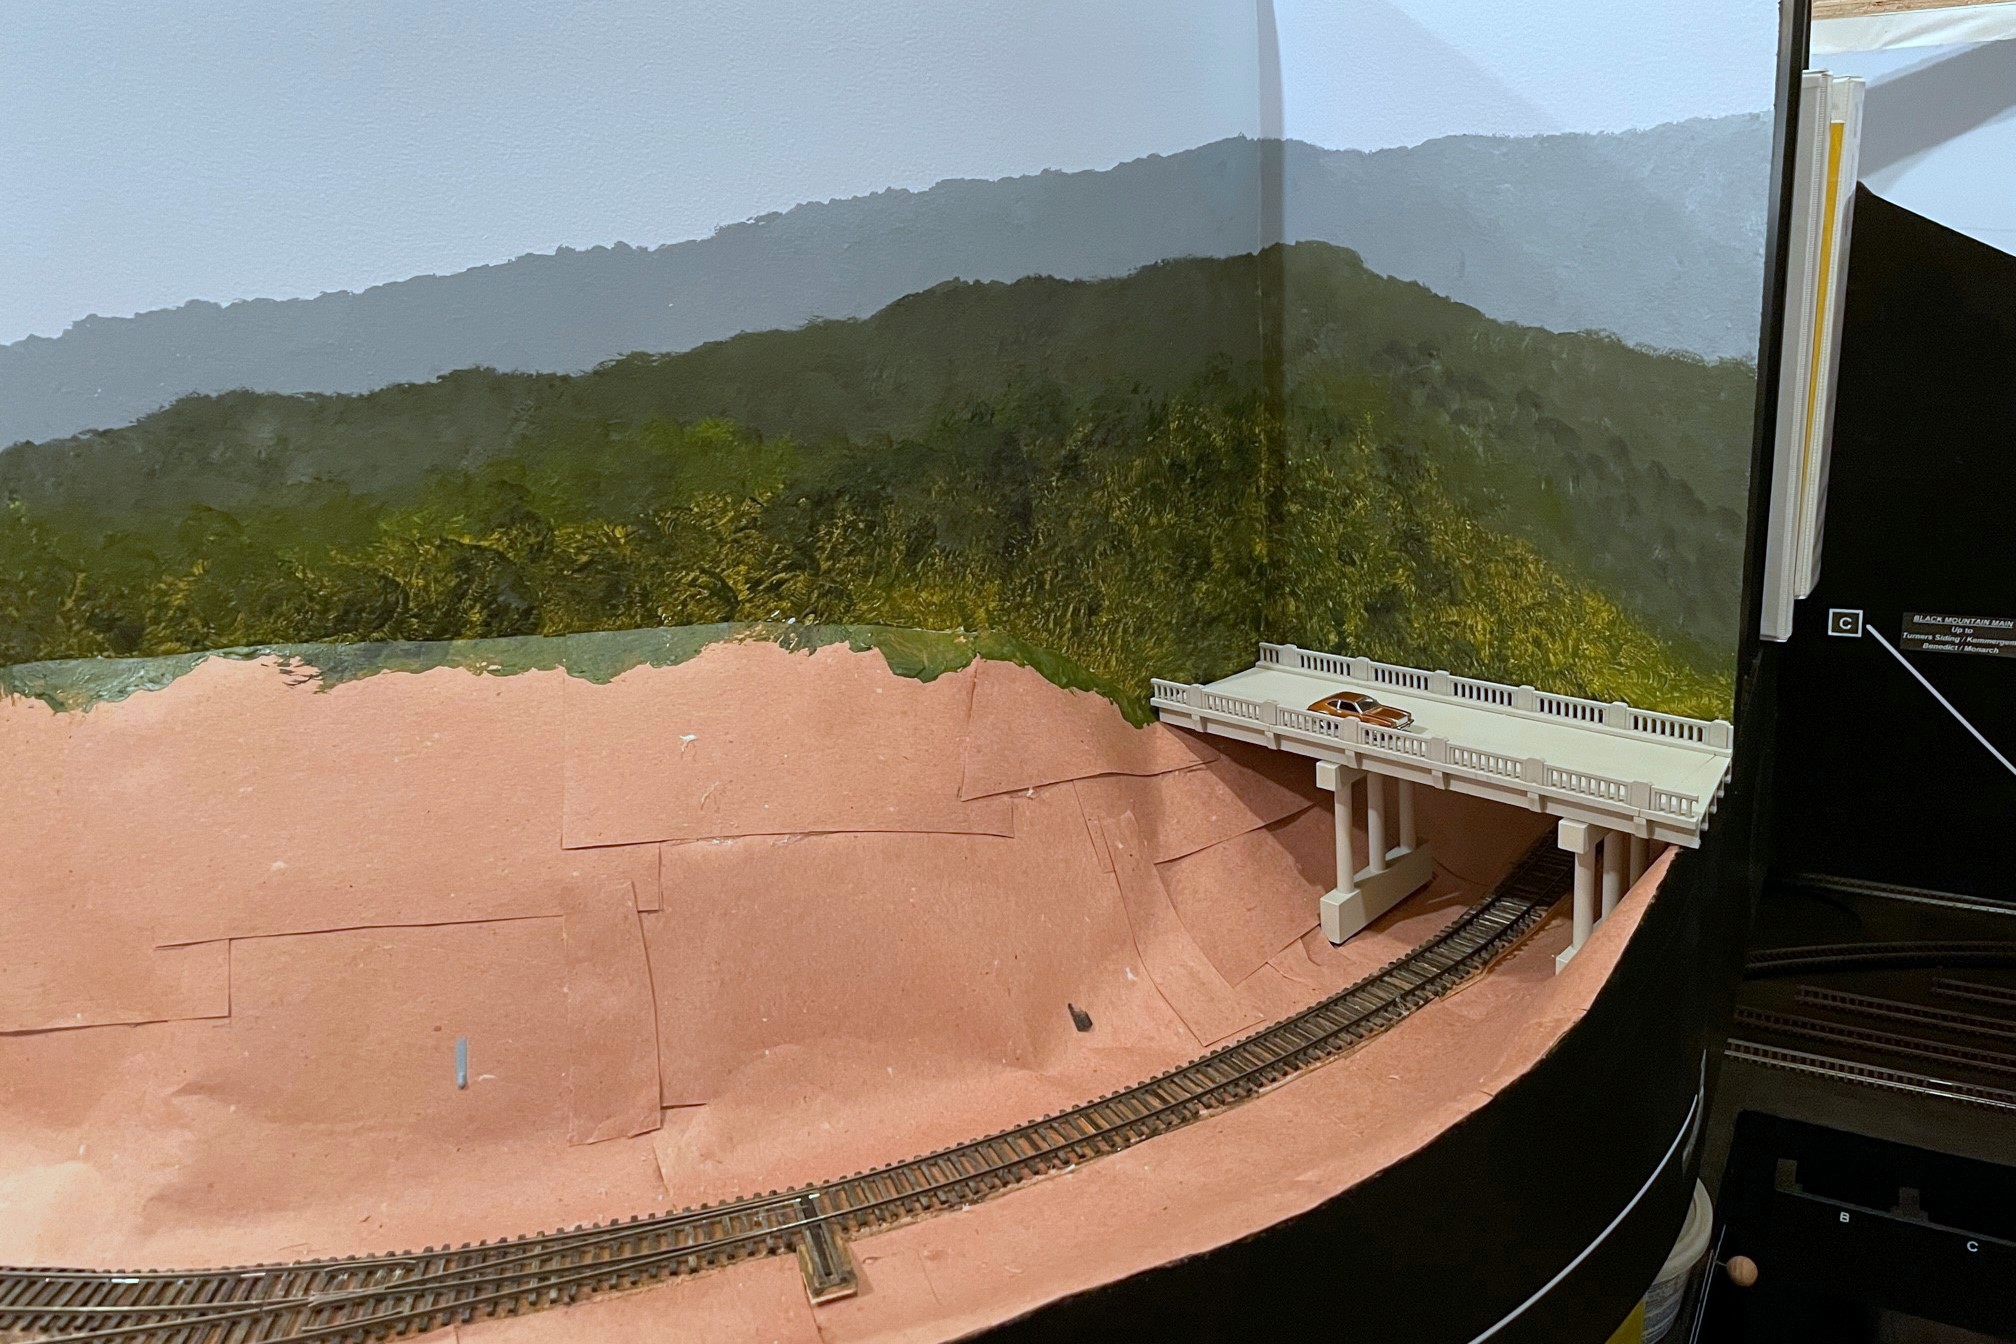
The St Charles Local traverses the wye with the newly painted backdrop. It will soon descend through the backdrop in the corner, a hole much tougher to spot now
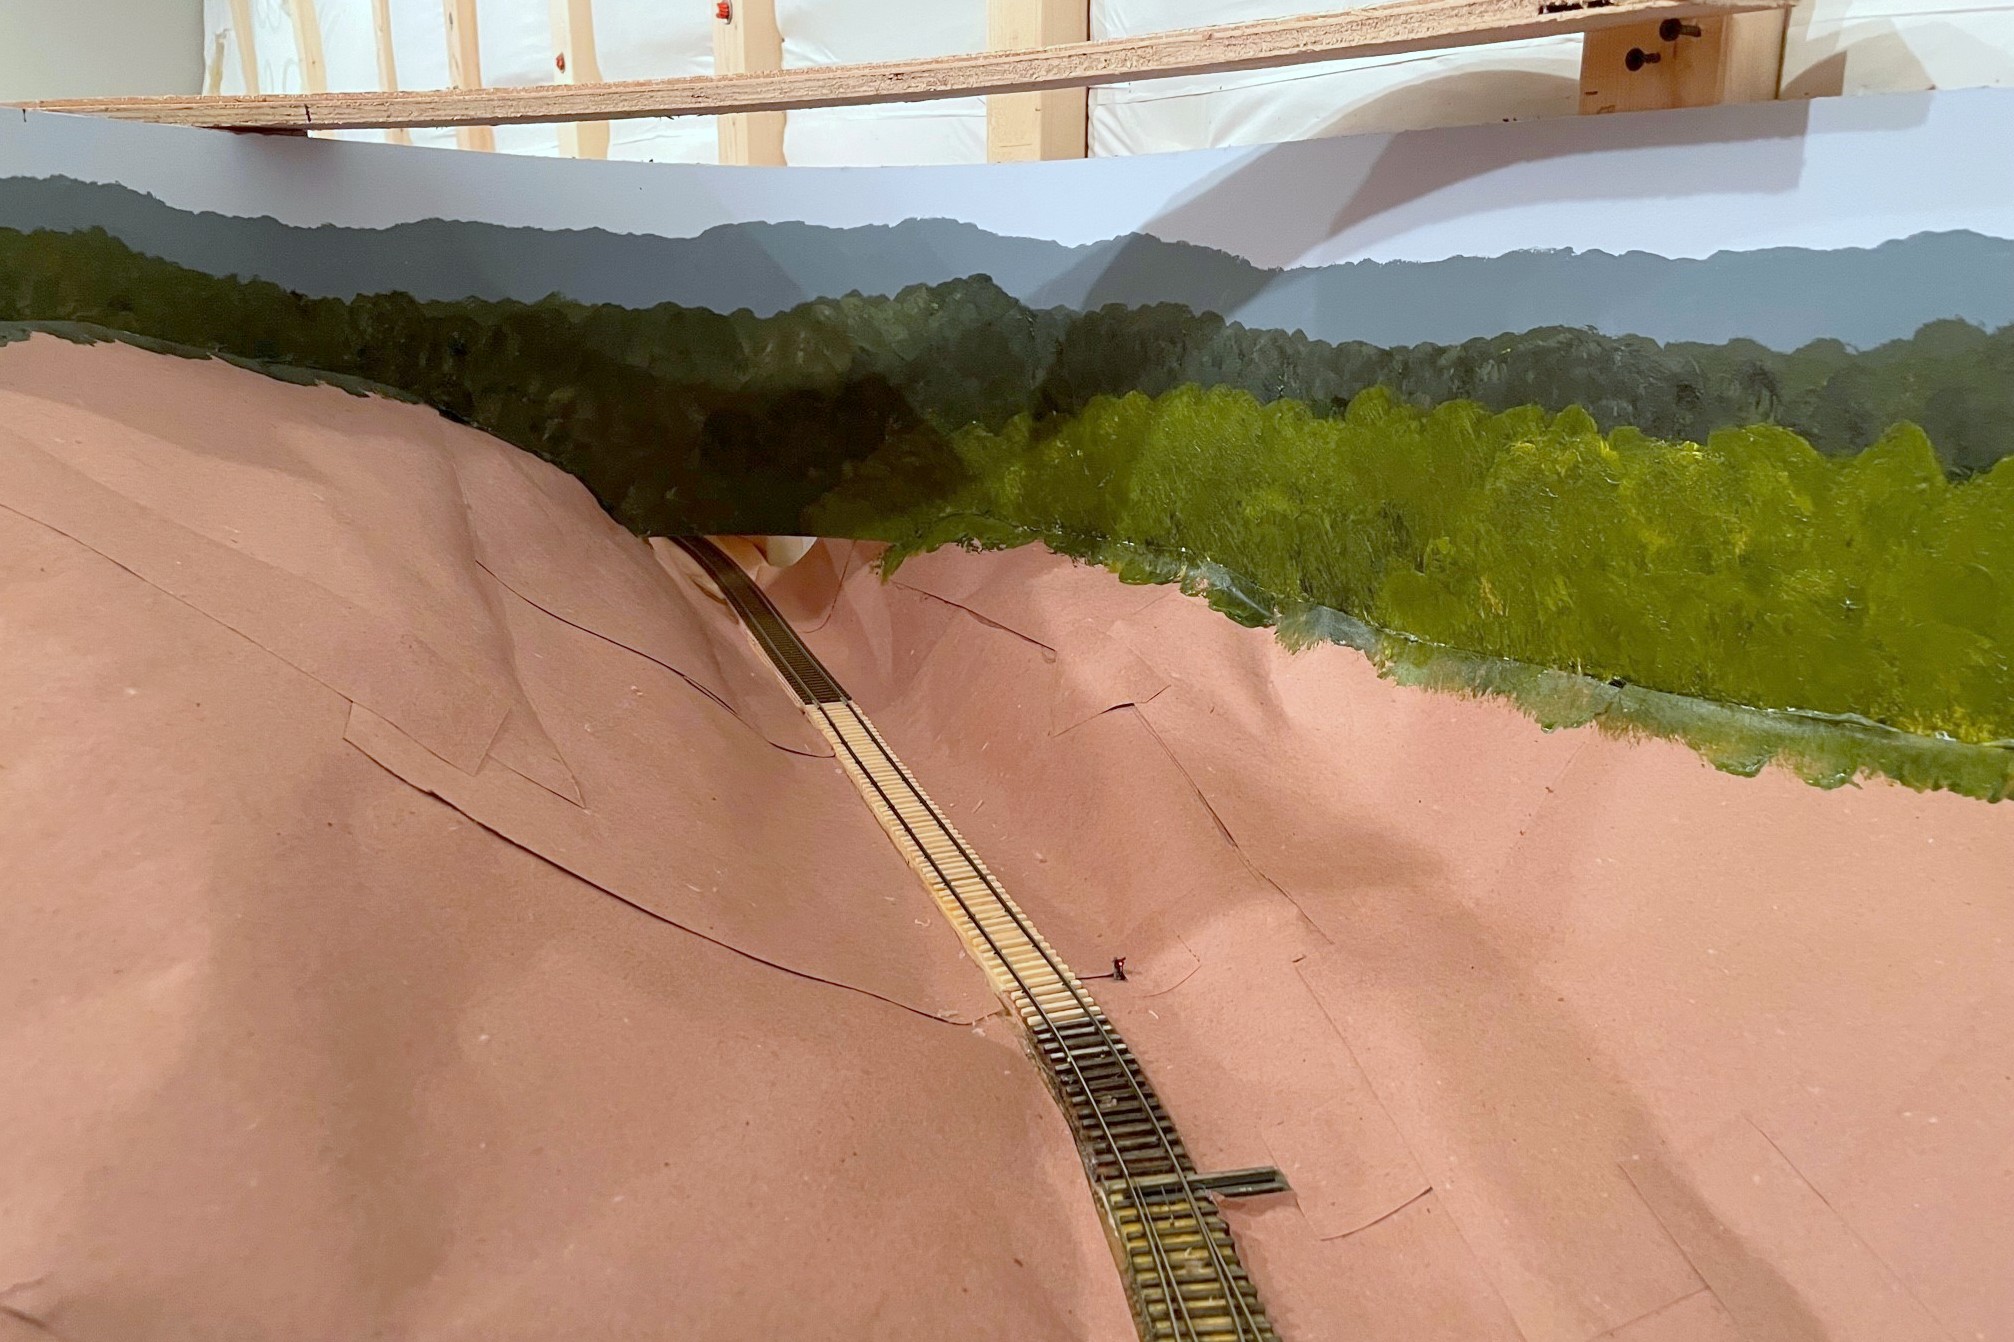
The scenery covers over the hidden track along the back wall that joins St Charles and the Mayflower section, so I decided to do a test run… I can now verify that I can indeed – by twisting at odd angles, reaching into small gaps, and fishing it out the last couple feet with a long string of hoppers – free a stuck train from the most remote part of my hidden track! Lesson learned–when you use hot glue for scenery, it tends to leave a lot of strings hanging down, and go figure, locomotives don’t pick up electricity so well when their wheels are covered in bits of glue string! A little wheel cleaning and some extra sweeps of the hand through the area (again at odd angles via small gaps), and trains now traverse this area nicely.
Where the two lower-level scenes transition–the backdrop on the right is lower than the left, hence less blue sky
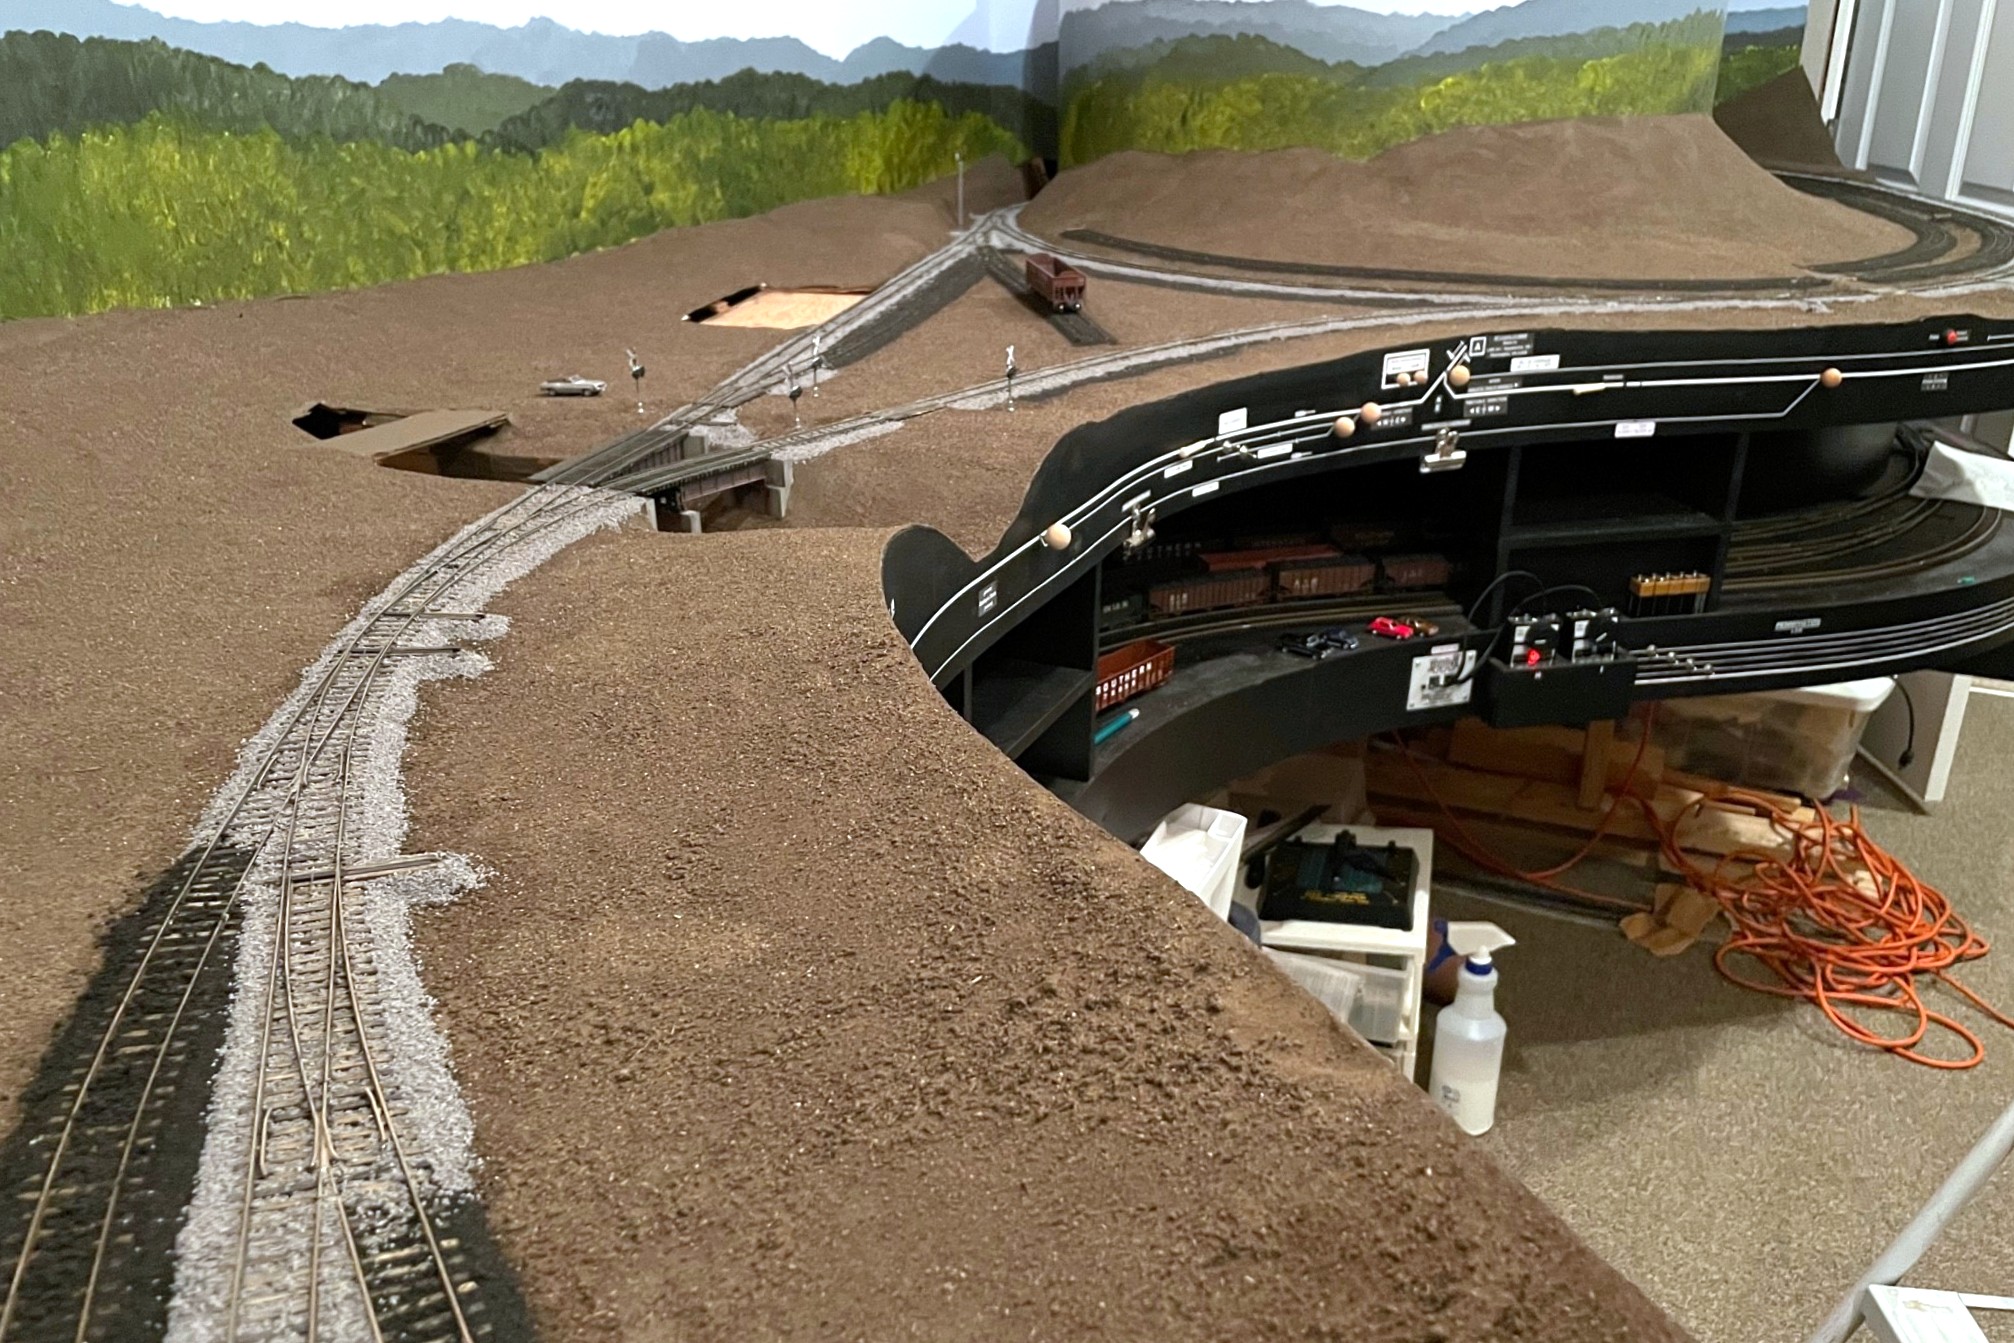
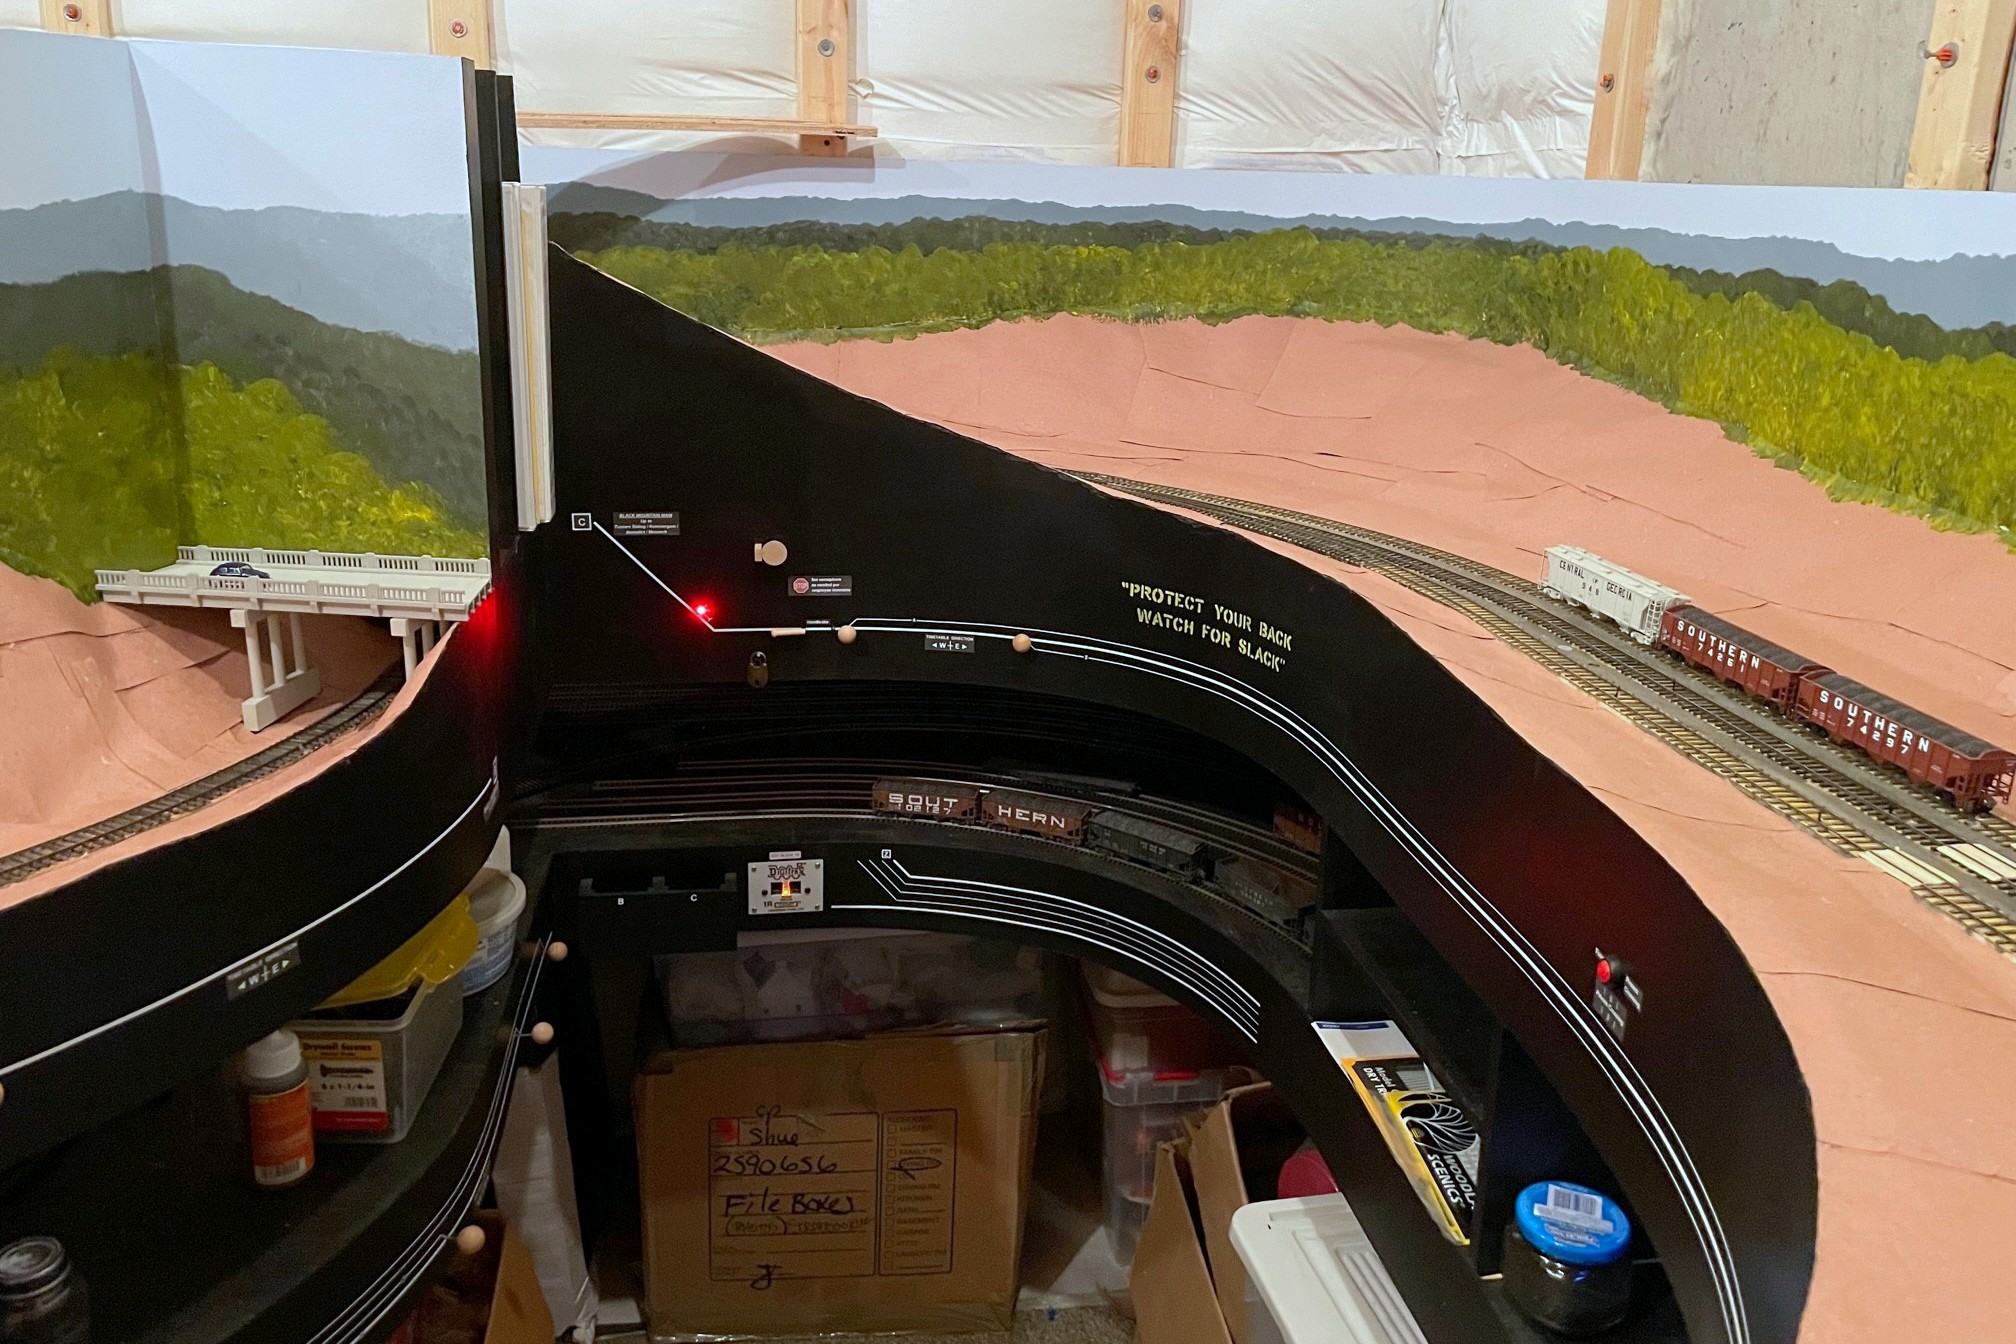
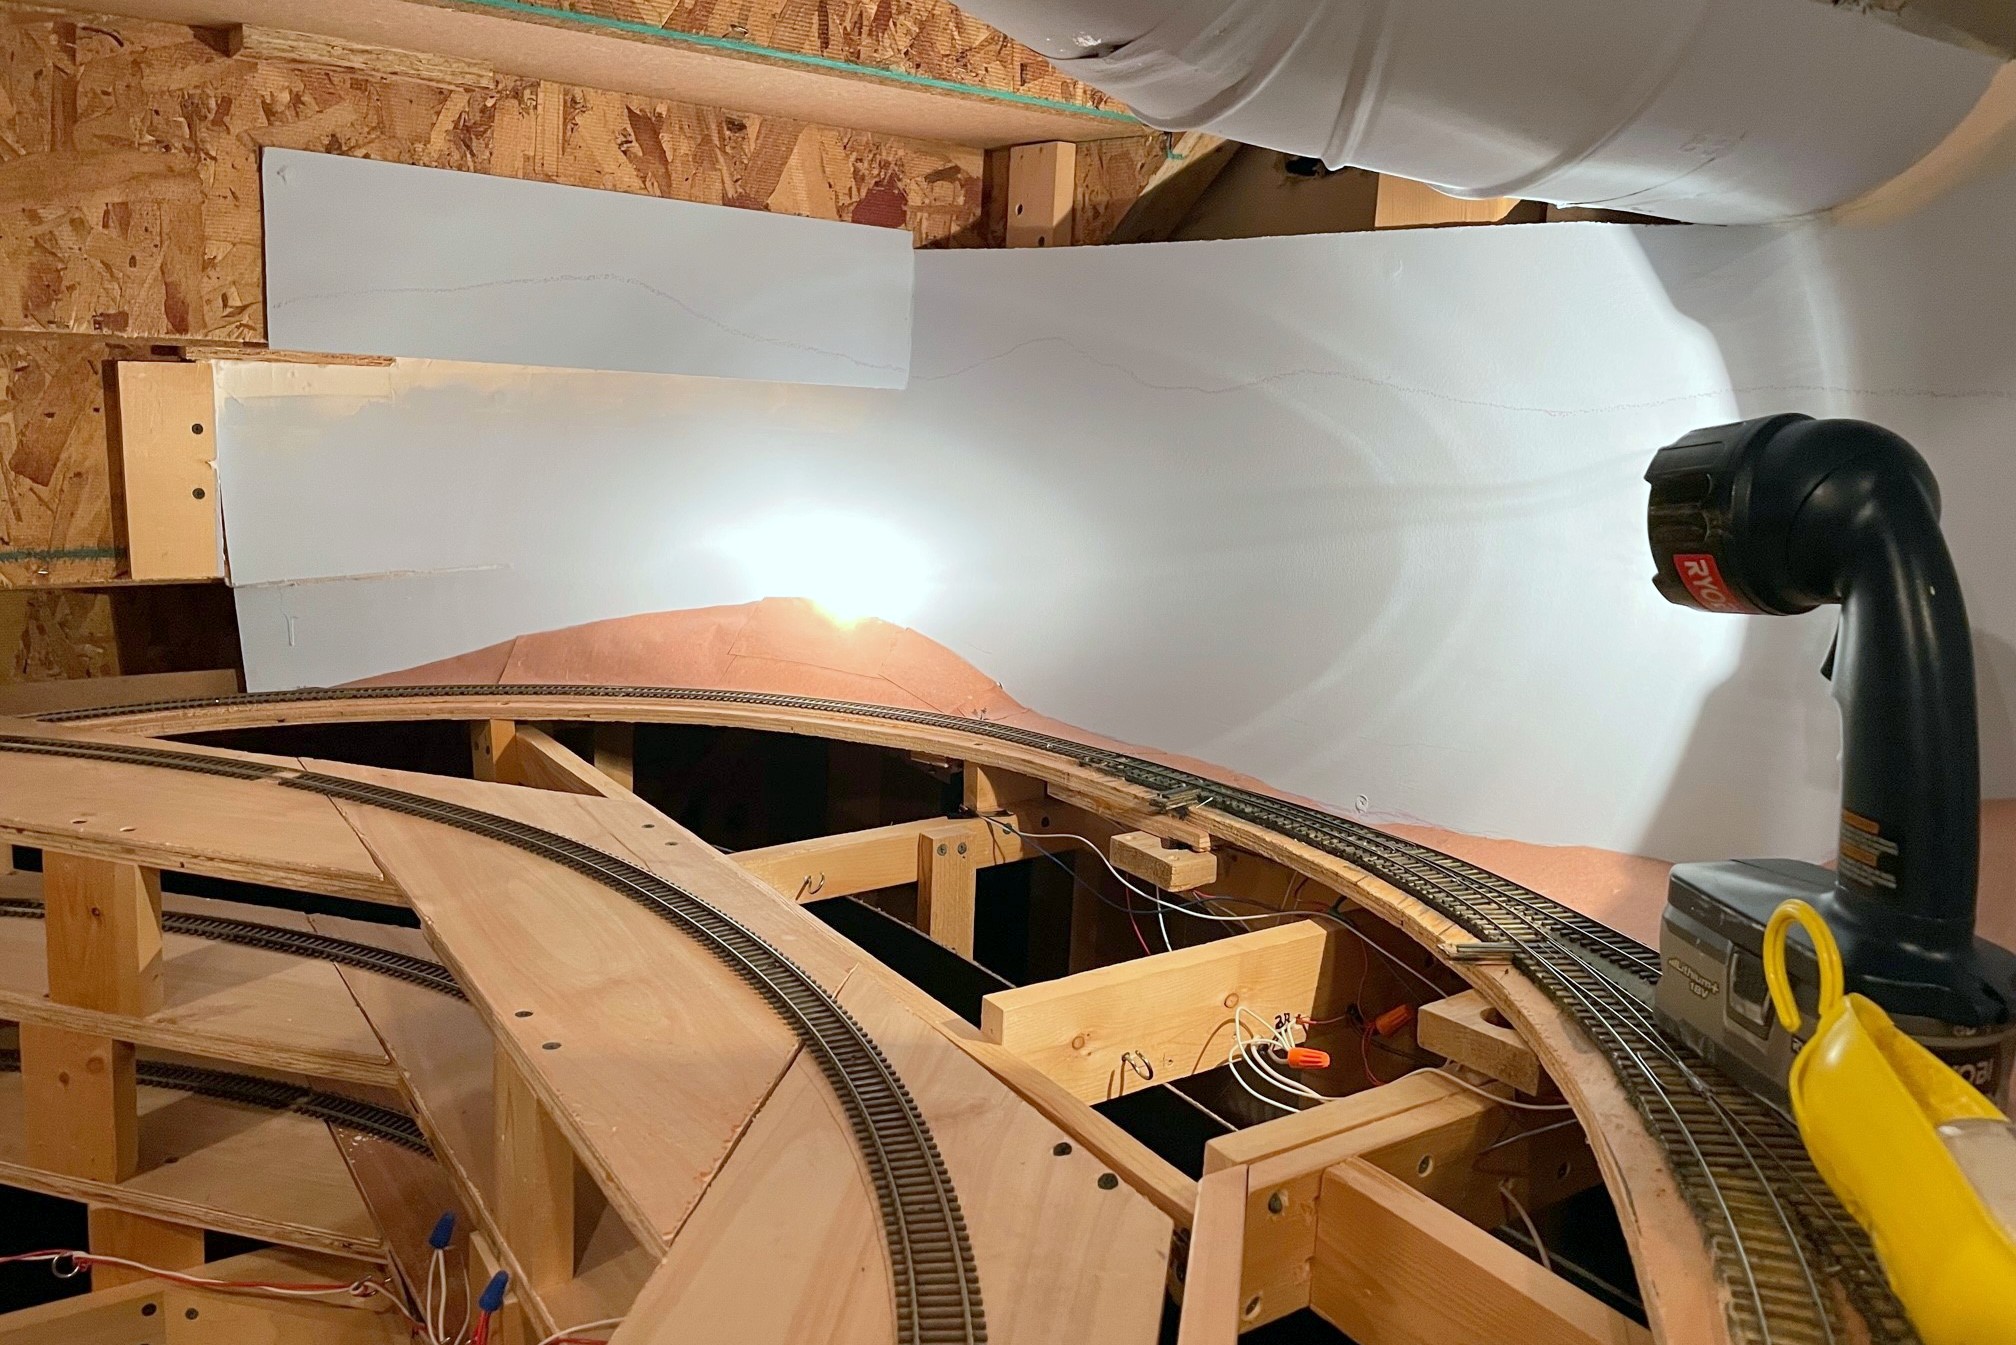
I’ve only got one section left that still needs a backdrop and scenery forms, over the helix from staging. Painting the backdrop in the corner was the big barrier to adding this, so that will likely be the next step, and the LAST step before building upper-level benchwork… it’s getting pretty real.
Here’s where trains will leave the lower level and enter the helix to the upper level–I think the backdrop painting along with a few trees will hide the transition well
The finished scene showing the brighter foreground trees painted with yellow and mars black mix–what a difference the painted backdrop makes for the scene!
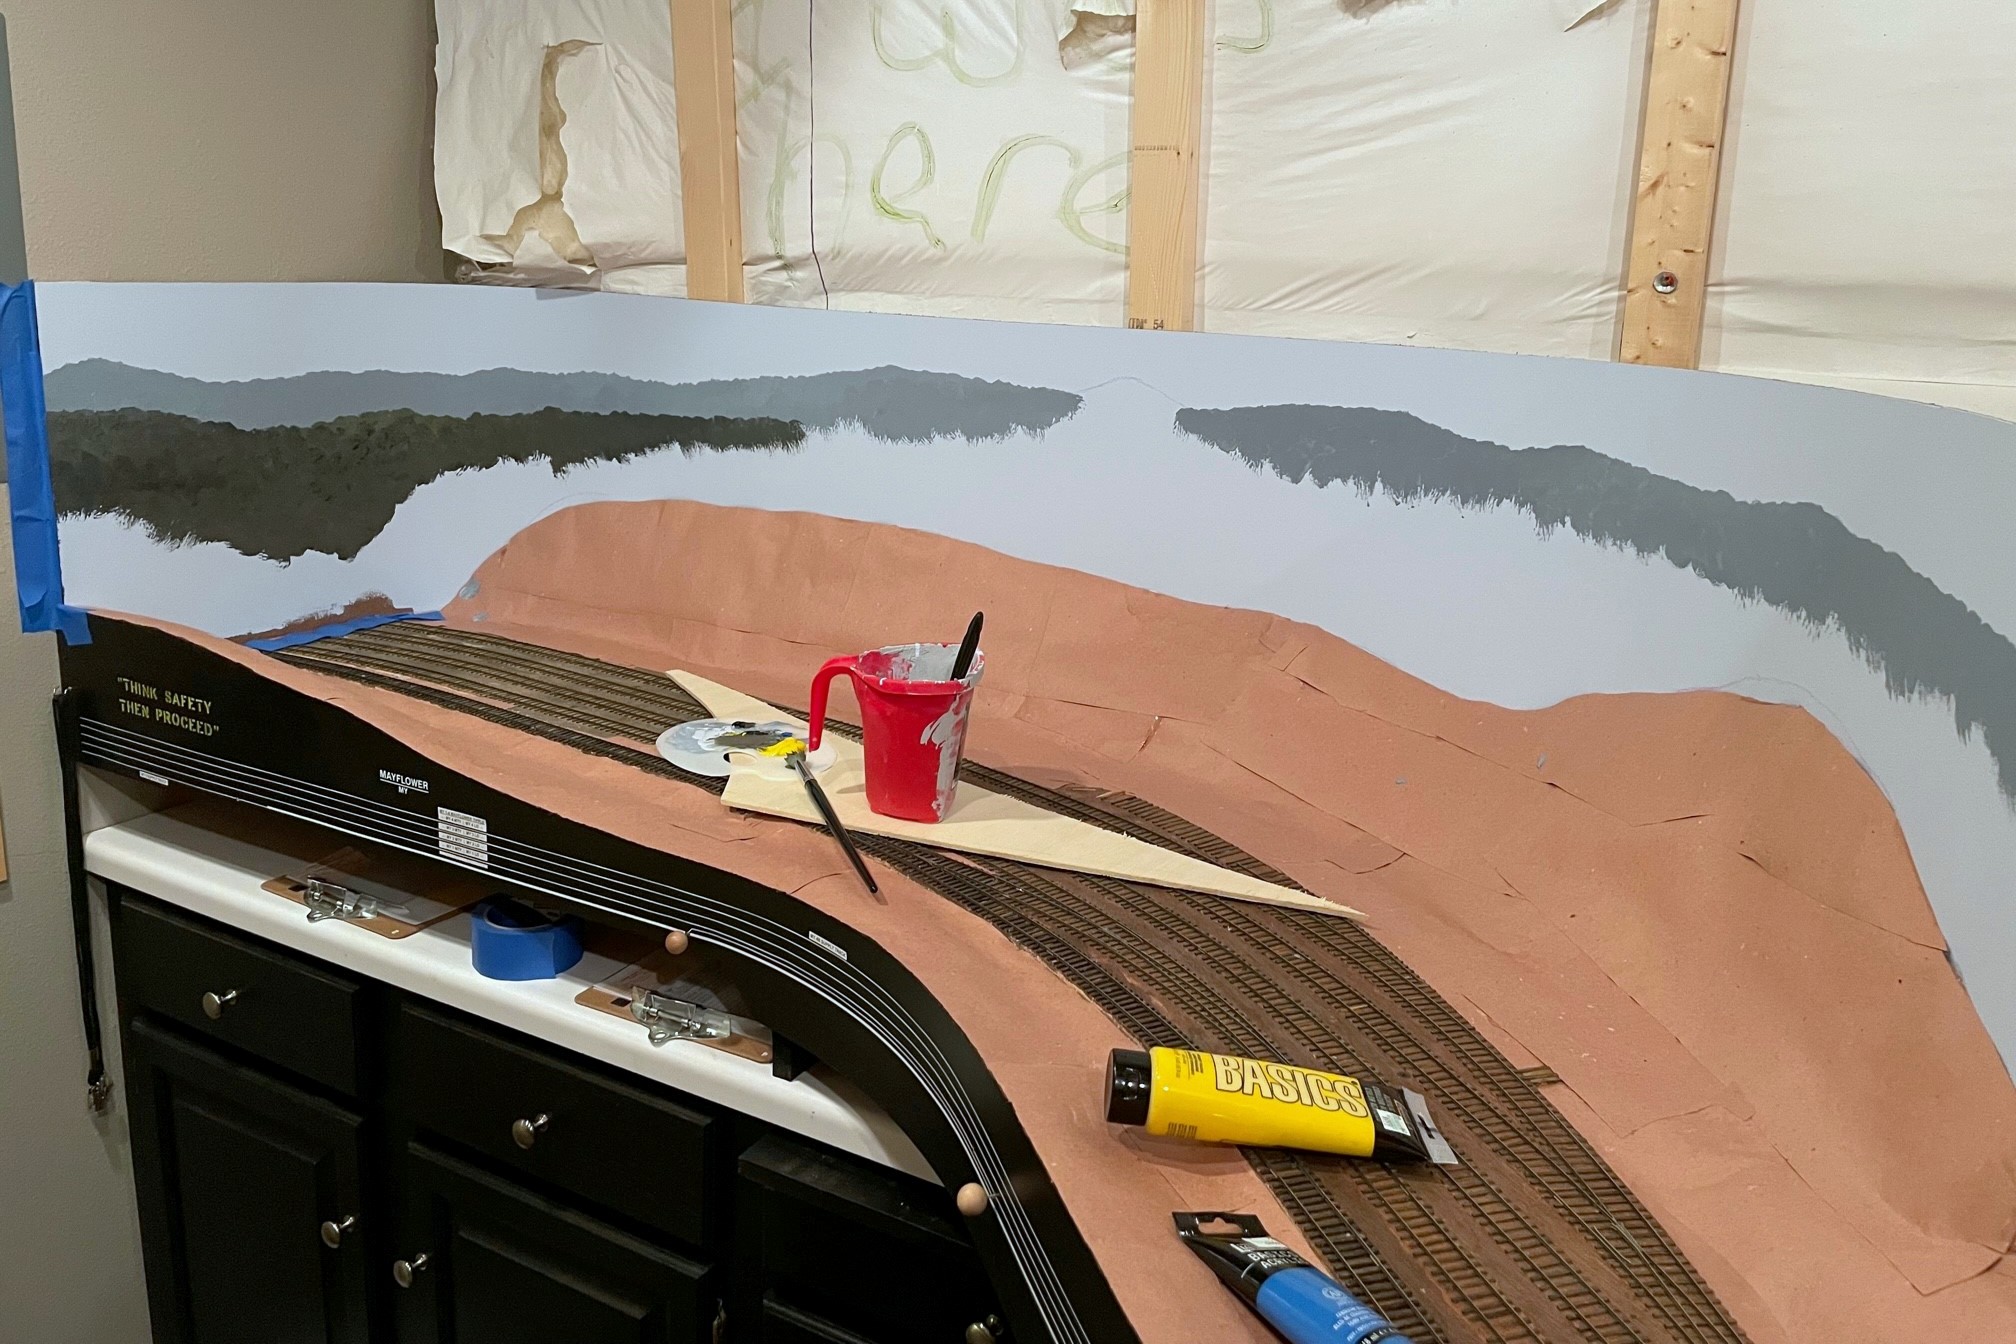
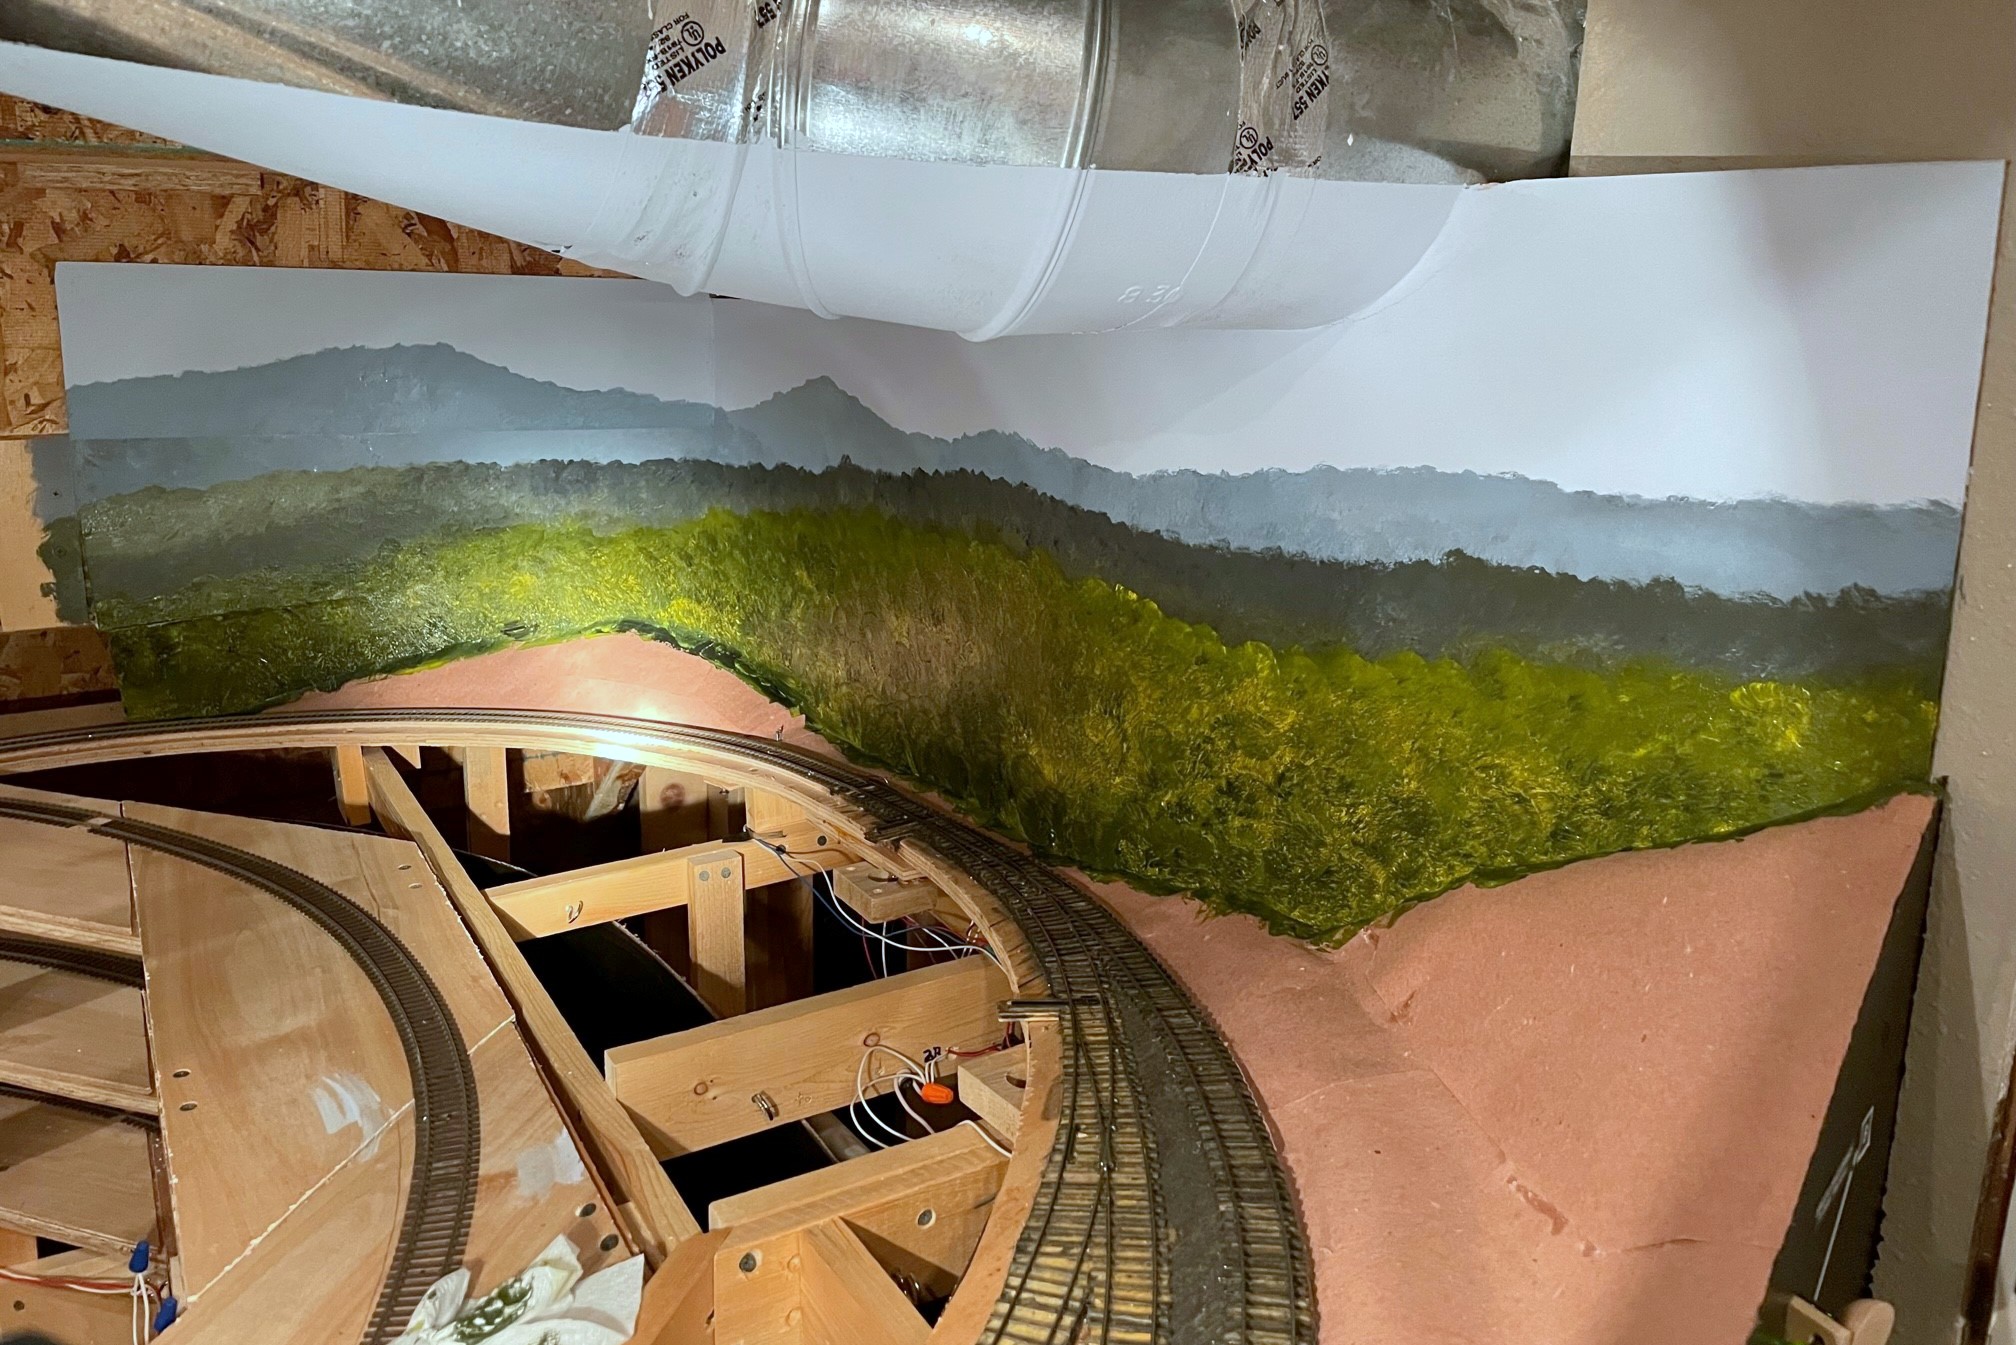
I collected art supplies to paint my backdrops many months ago, but like any project that intimidates me, they sat around in a drawer until I could get up the nerve to pull the trigger. I’ve done one painting my entire life about 30 years ago for an art class, so my experience level with this is just a hair above zero. I’d like to thank Jeff Kraker who sent me a link to a video series by Chris Lyon he followed on how to paint backdrops using a few basic acrylic colors and an impressionistic “blob” method. I learned a TON from this five-part series including the fact that you shouldn’t actually use green paint–how counter-intuitive is that? Having watched the series twice and armed with supplies, I finally jumped in! As you can see in the pictures, I’m no Michelangelo, but I’m happy with them for now, and I’m sure I’ll make some adjustments and touch-ups as I gain more experience.
Step 1 is to outline the distant ridges in chalk, and step 2 is to paint the distant ridges a bluish gray
My first step is to outline the top of the distant ridges. I actually used a low angle view from Google Earth to do this, so the basic contours are actually what you’d see standing in the actual scene. Kid’s sidewalk chalk is a good medium for this as it can be easily erased with a wet wash cloth. Next I painted my distant ridges–this was something the series didn’t cover as all their scenery was closer. One thing I wanted to do was to nail the color of distant hills. I live in the mountains, so every day I get to see that distant hills covered in trees are not green at all–they’re a shade of gray-blue, almost purple. To get a color close to this, I mixed some of my sky blue backdrop color with a little mars black, and a little cerulean blue which looks about right to me, though if anything, they’re not purple enough. I applied the paint using the techniques in the videos, just wet the brush (A No 10 round in this case) and dab, dab, dab, blob, blob, blob. I didn’t want distinct trees in the distance, so I mixed the paint pretty good, leaving just a little variation and shading.
Once the distant ridge is in, step 3 is to paint the next nearest ridge a little darker but still not bright green
Next, I added some primary yellow to the palette and started moving to the second ridgeline, still using a good bit of the sky blue but now adding more yellow which makes a nice Woodland Scenics-ish green when mixed with the mars black. Once the second ridge was in, I felt it didn’t have enough definition, so I dabbed the brush in some mars black and touched the base color without mixing it in and “blobbed” in some shadows. Finally I transitioned to the larger trees near the bottom. No sky blue, just a lot of yellow and a little mars black barely mixed and blob, blob, blob, again adding some areas of shadow with a little more black in the mix.
This is the one hard corner of backdrop on the layout–I think once I play with the lighting it will be a little less stark
The result is what you see here. It’s certainly no real art, and it doesn’t look nearly as nice as the backdrops in the video. Still, I think it gives a decent impression of a deciduous forest and Appalachian ridges that doesn’t distract from the foreground. I also think the color will blend pretty well with common light and medium green ground foam and foliage. I did about 15′ of linear backdrop in under 2 hours… not a bad return on time invested. I love what it does to the layout feel, as well. For the first time since I started building the layout, when you walk into the layout room it feels Appalachian. Looking forward to painting more and improving on my bare-bones techniques!
Part of the backdrop under the stairs involves a piece of the “sky” that sticks out
This is the first section I did. It’s amazing how much less noticeable the steps are with the mountains painted
Step 1 is to outline the distant ridges in chalk, and step 2 is to paint the distant ridges a bluish gray
Once the distant ridge is in, step 3 is to paint the next nearest ridge a little darker but still not bright green
The finished scene showing the brighter foreground trees painted with yellow and mars black mix–what a difference the painted backdrop makes for the scene!
This is the one hard corner of backdrop on the layout–I think once I play with the lighting it will be a little less stark
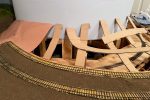
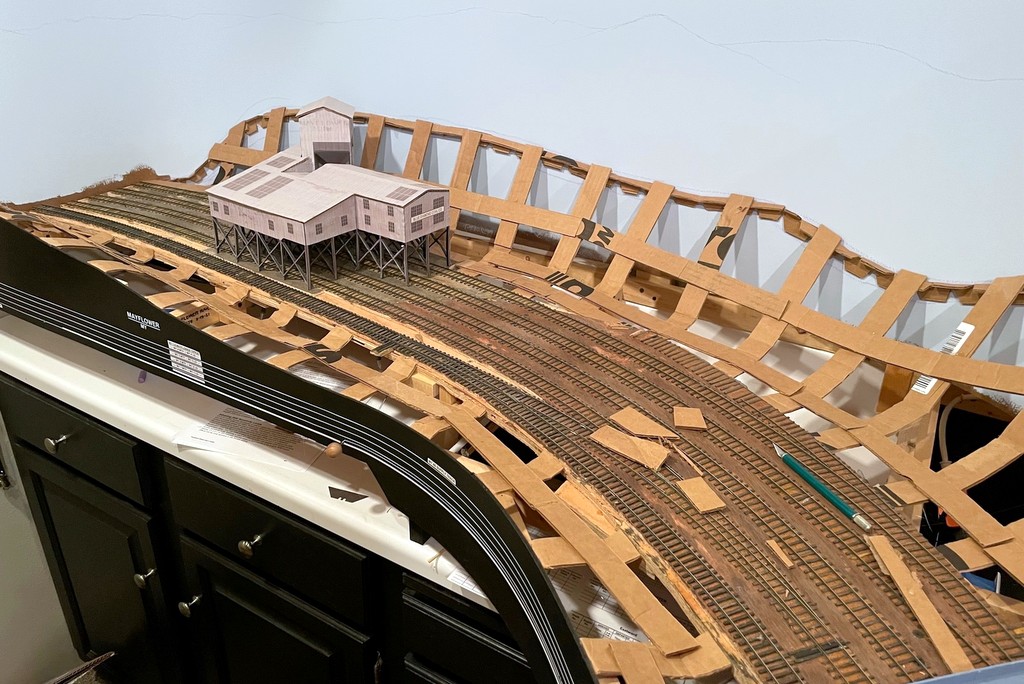
The basic scenery form is now almost done in St Charles–just some cardboard strips and red rosin paper… and lots of glueThe almost finished crossing after whittling, sanding, and scribing lines and bolts with an X-Acto blade and thumbtack
Just a quick progress update. After procrastinating and working on a semaphore, a station mock-up, and even safety signs, I’ve finally started work on the scenery again. Using the same “paper shell” method of cardboard strips, red rosin paper, and lots of hot glue, I’ve been able to get the wye in St Charles filled in with the basic land form. Of course, putting in the cardboard underlayment for the roads got me thinking about grade crossings, so I had to pause again and put in 6 grade crossings using rails and wood. Pretty simple and nothing profound, but I’m happy with the way they’re turning out. I didn’t worry about vertical height of the wood initially, only horizontal placement. I used a razor blade to whittle the wood down to rail-height level (a little tricky and scary, but effective), then used a little sandpaper and a “bright boy” track cleaner to ensure the wood doesn’t stick up and cause electrical contact issues.
That’s all for now.
The basic scenery form is now almost done in St Charles–just some cardboard strips and red rosin paper… and lots of glue
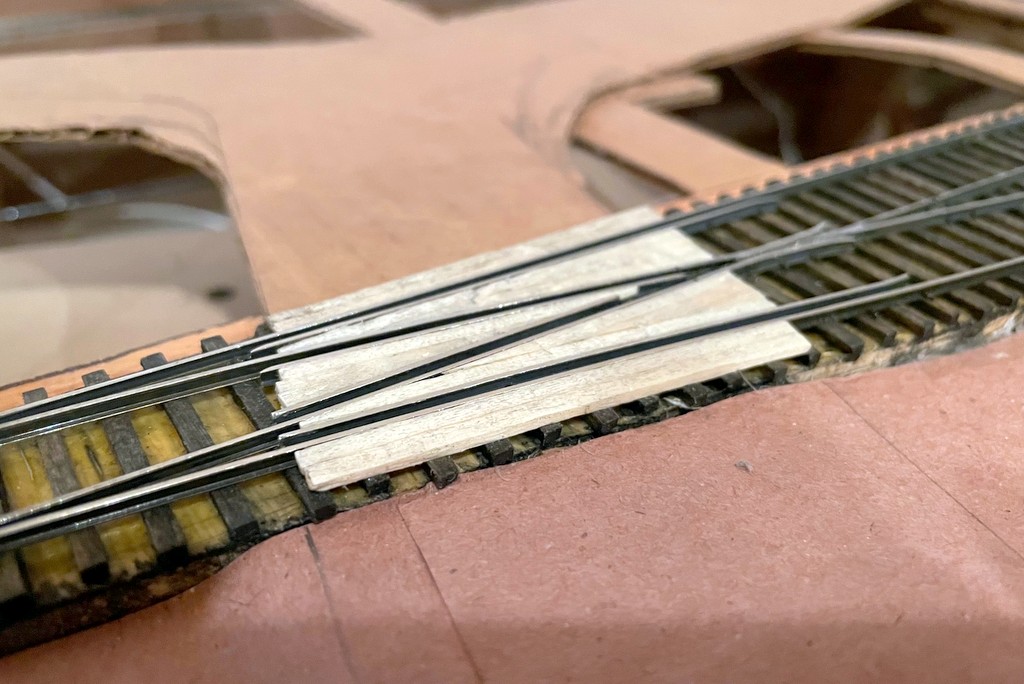
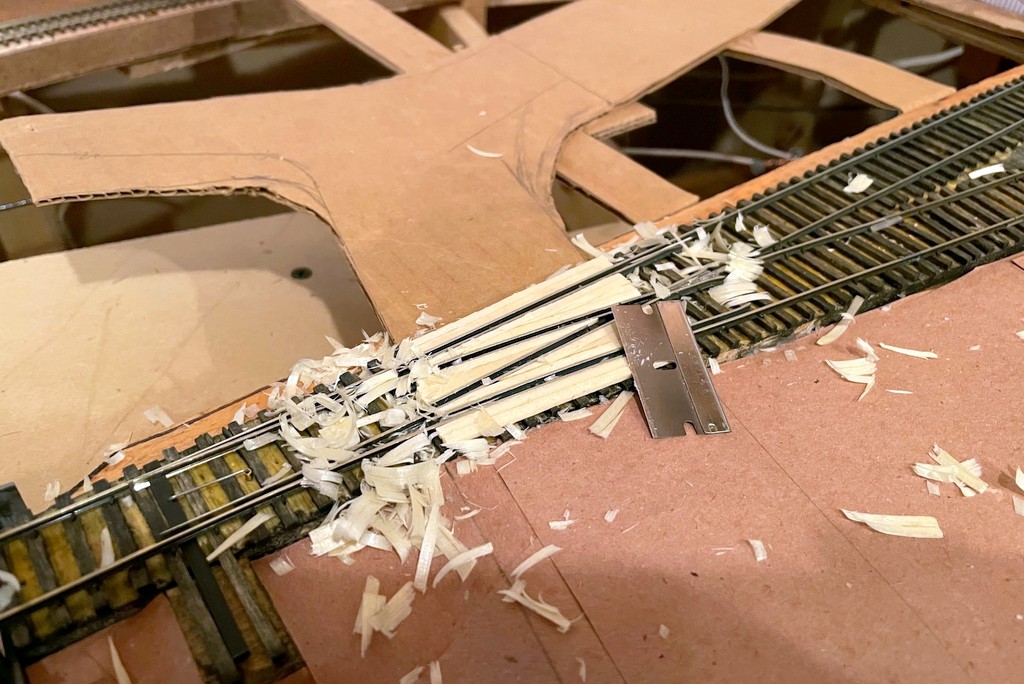
Step 1 of a complex grade crossing–adding the guard rails (extending the existing guard rails in this case)
I used full size ties and wood glue to fill in between the guard rails, then used a razor to whittle everything down to rail-height
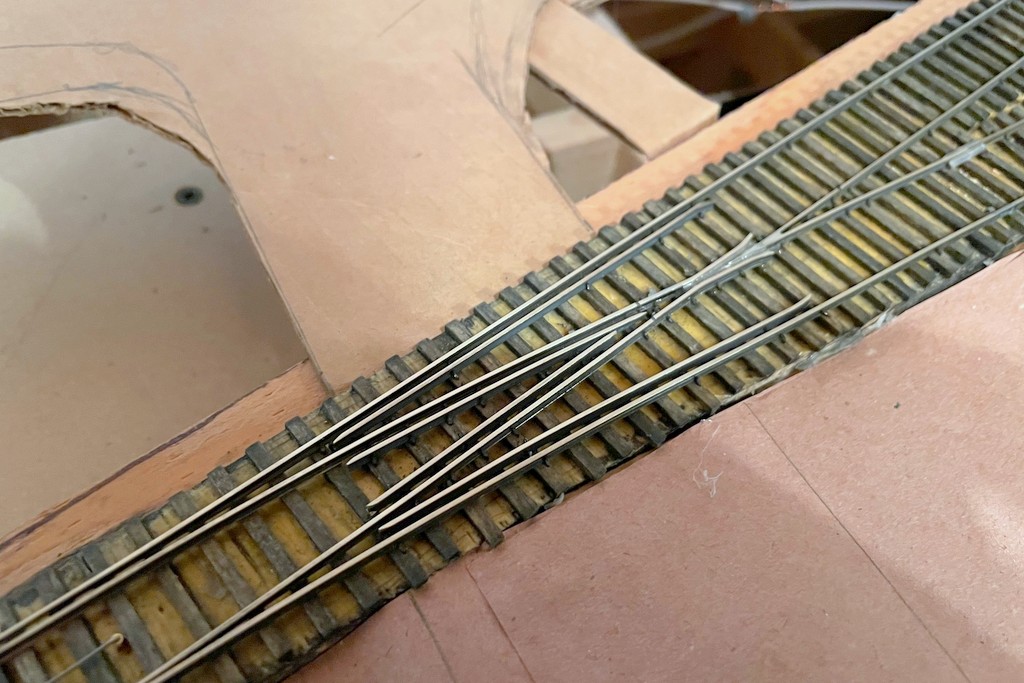
The almost finished crossing after whittling, sanding, and scribing lines and bolts with an X-Acto blade and thumbtack
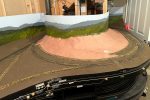
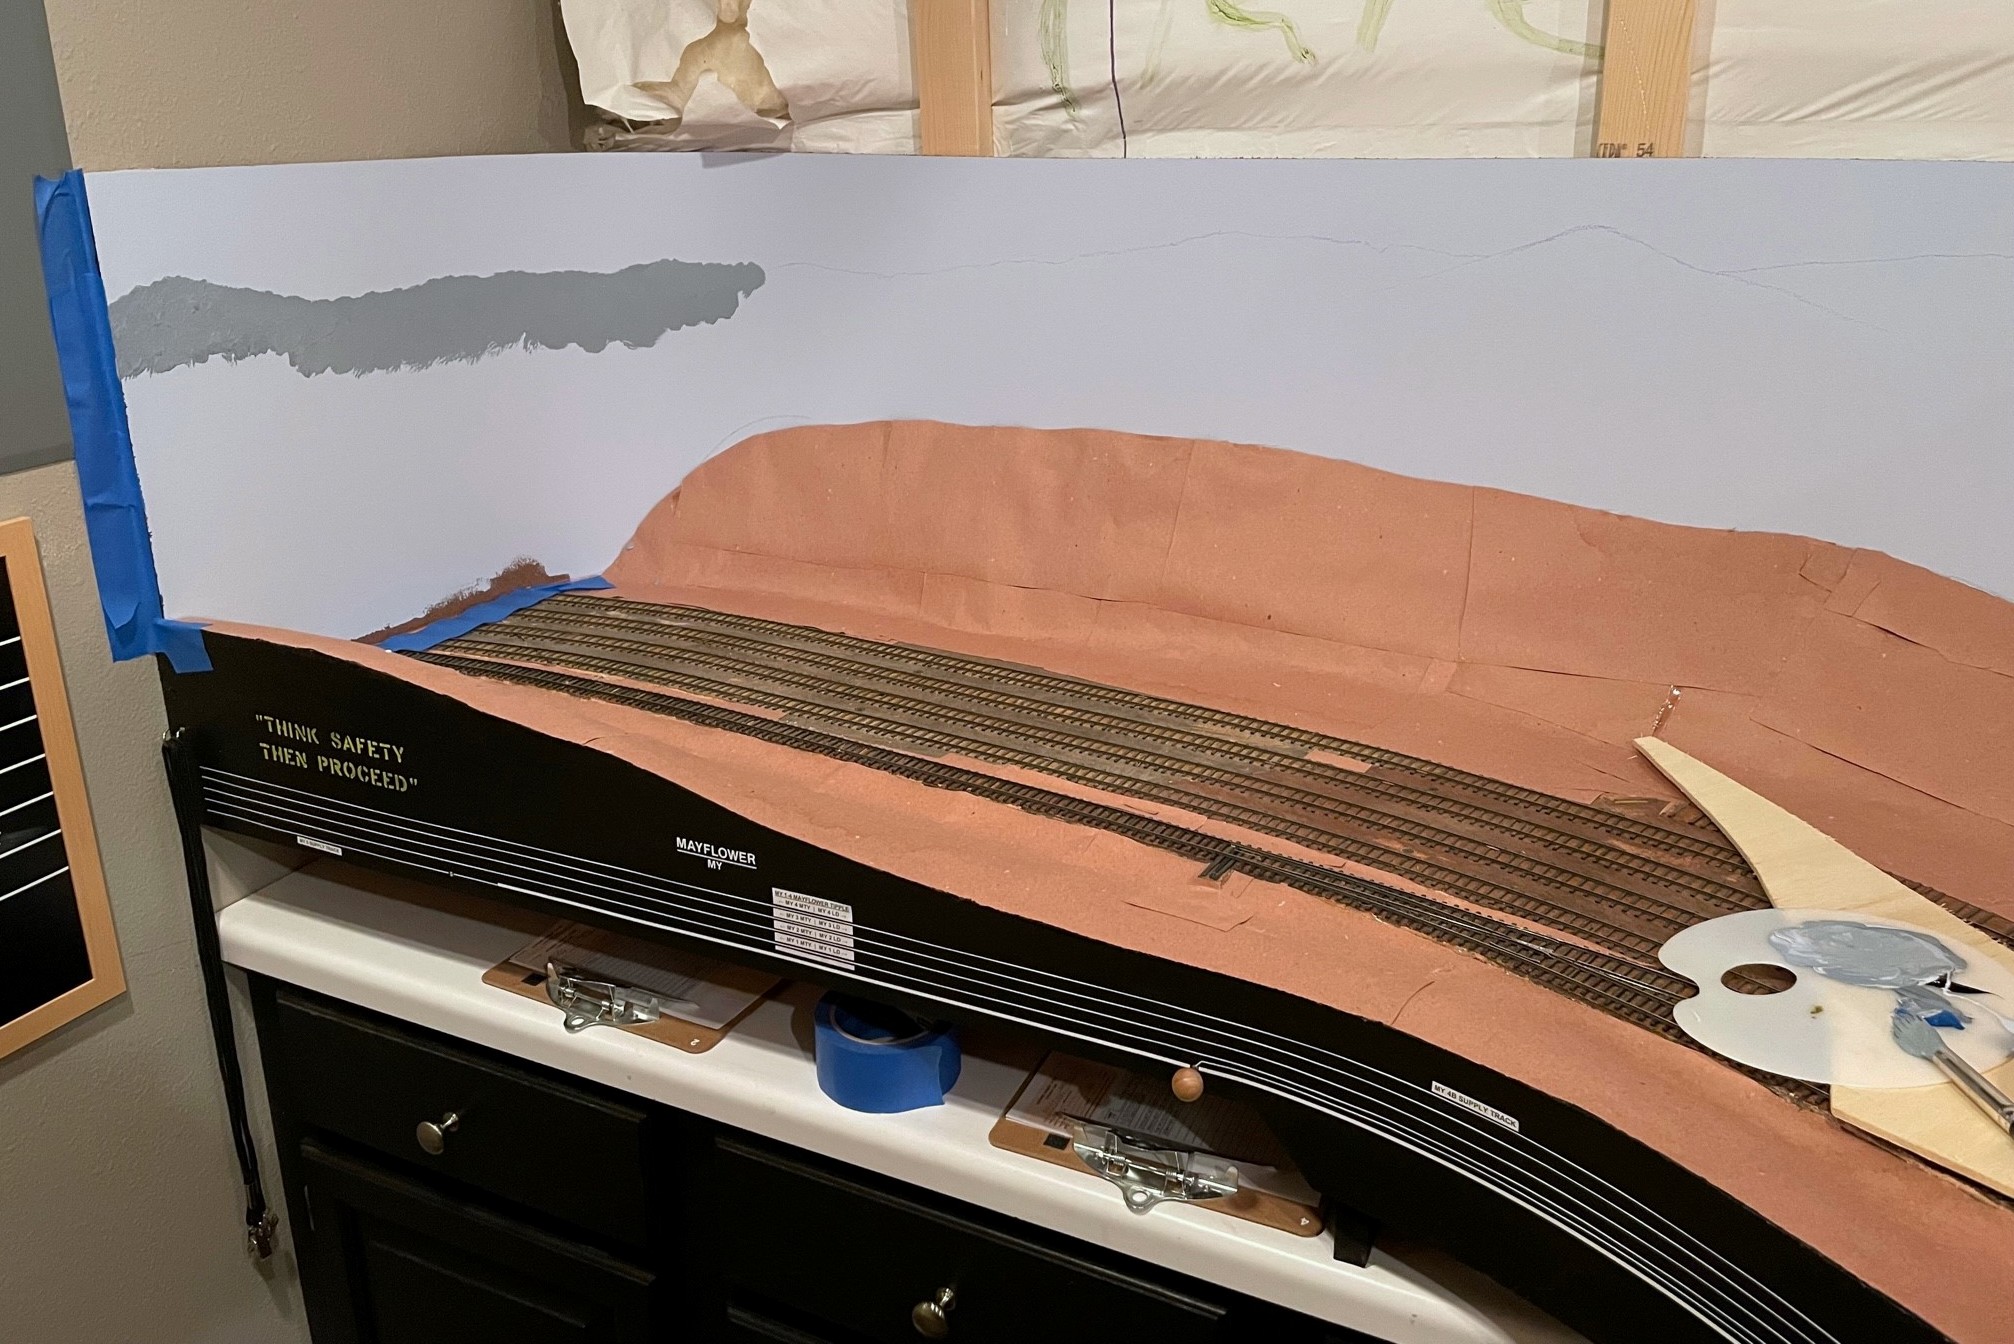
The first scenery forms are in place at Mayflower using Howard Zane’s paper shell method
So there are two reasons why I’ve been working on so many models lately. First, I enjoy building models. Secondly, I’ll admit that I’d hit a major mental block with the layout’s progress because I needed to work on the basic scenery for the lower deck before adding the benchwork for the upper deck. I could retrofit the scenery, but I figured it was worth it to add it now to save myself about 260 lumps on the head trying to install it under the upper-deck benchwork. This last week I finally got up enough gumption to jump into the deep end and start the scenery!
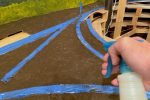
The first step is to draw out the line where the scenery meets the backdrop and glue a cardboard strip along the line
Ever since I read his article in the Jan 2007 Railroad Model Craftsman, I knew I wanted to use Howard Zane’s “paper shell” scenery technique. For mountainous ground that’s mostly going to be covered by trees and the occasional rock casting, this method is extremely simple and uses easy-to-find and cheap materials including cardboard, hot glue, red rosin paper (available for under $20 for a 3′ x 167′ roll at home improvement stores), and white glue. I won’t go into his whole technique, but you can see from the photos that it’s essentially outlining the hills on the backdrop with a cardboard strip, building a lattice of the basic landform from strips of cardboard, and covering the lattice with small patches of rosin paper. The next step (which I haven’t started yet) is to cover everything with a thick layer of white glue to smooth it out and give it stiffness.
Step 2 is to make a lattice of cardboard strips. I bent them and softened them before installing them with hot glue to get more natural bends
I’m starting with Mayflower and working around to St. Charles. Some would recommend a much steeper terrain so the majority of the background is hills and trees, but I’ve opted to go with a more natural angle between 30-50 degrees slope. This means my backdrops will need to be painted really well since the transition from scenery to backdrop will be very visible. If you look closely you can see where I’ve drawn in the ridge line near the top of the backdrop. I don’t know how to paint yet, so what could go wrong? We’ll see how that goes soon enough!
So far this has been a time-consuming but enjoyable project, and I’m very happy with the paper shell method. I’m learning little tricks as I go which will make it go faster as I gain more experience, but it’s great to start seeing things take a shape other than plywood and dimensional lumber!
Step 3 is to hot glue small sections of red rosin paper to the cardboard lattice