Welcome to the St. Charles Branch, part of the Southern Railway’s scenic Appalachia Division in the coal fields of southwestern Virginia! Here are a few things to help you survive your first day on the job.
About the St. Charles Branch
The St. Charles Branch existed for one reason: to haul coal from the hollers of Virginia along Little Black Mountain and the Kentucky border to feed the larger markets served by the Southern Railway and others. The branch extended west from Appalachia, Virginia to St. Charles where it divided into several branches, each dotted with multiple coal tipples of various sizes and configurations. The Southern usually stationed a mine crew (sometimes two) in St. Charles to work these branches which is the focus of the layout’s operations. These mine runs were called the “St Charles Switcher” or the “Black Mountain Local.” The Southern had a scheduled train known as the “St Charles Local” that shuttled coal hoppers between Appalachia and St. Charles, feeding empties into the small yard for the mine runs and picking up loads bound for points east. After 1965, coal originating on the branch was divided into two main categories, customer coal and transloader coal bound for the huge Westmoreland Coal mixing and transloading facility in Appalachia. Cars reflected these two categories with newer 70- and 100-ton hoppers, often called “reds,” handling customer coal and older 50 ton hoppers on their last legs, known as “blacks” or “yellow balls,” handling the transloader coal.
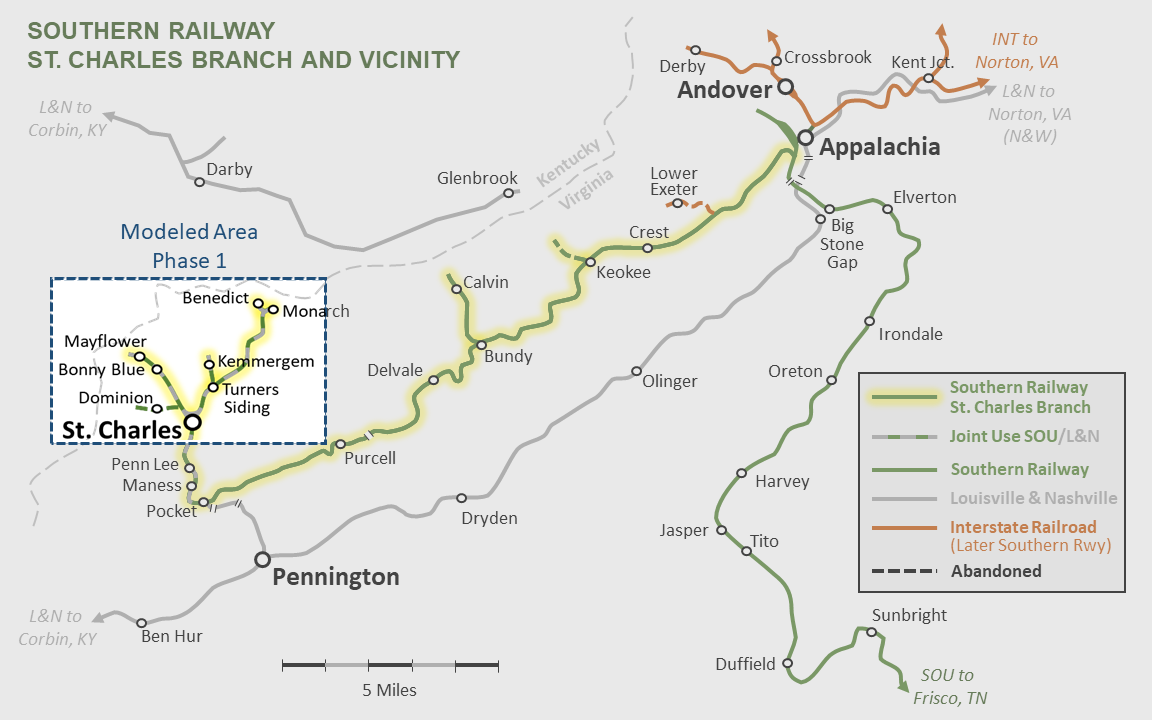
The Southern’s fierce competitor and neighbor, the Louisville and Nashville Railroad (L&N) had trackage rights over the entire modeled portion of the branch allowing it to serve the tipples in the area from the L&N mainline at Pennington, Virginia via a connection with the Southern at L&N Junction. L&N trains usually only worked the line three times a week and with a small train known as the “Cumberland Valley Local” (CV Local) after the L&N subdivision on which it originated.
Operations
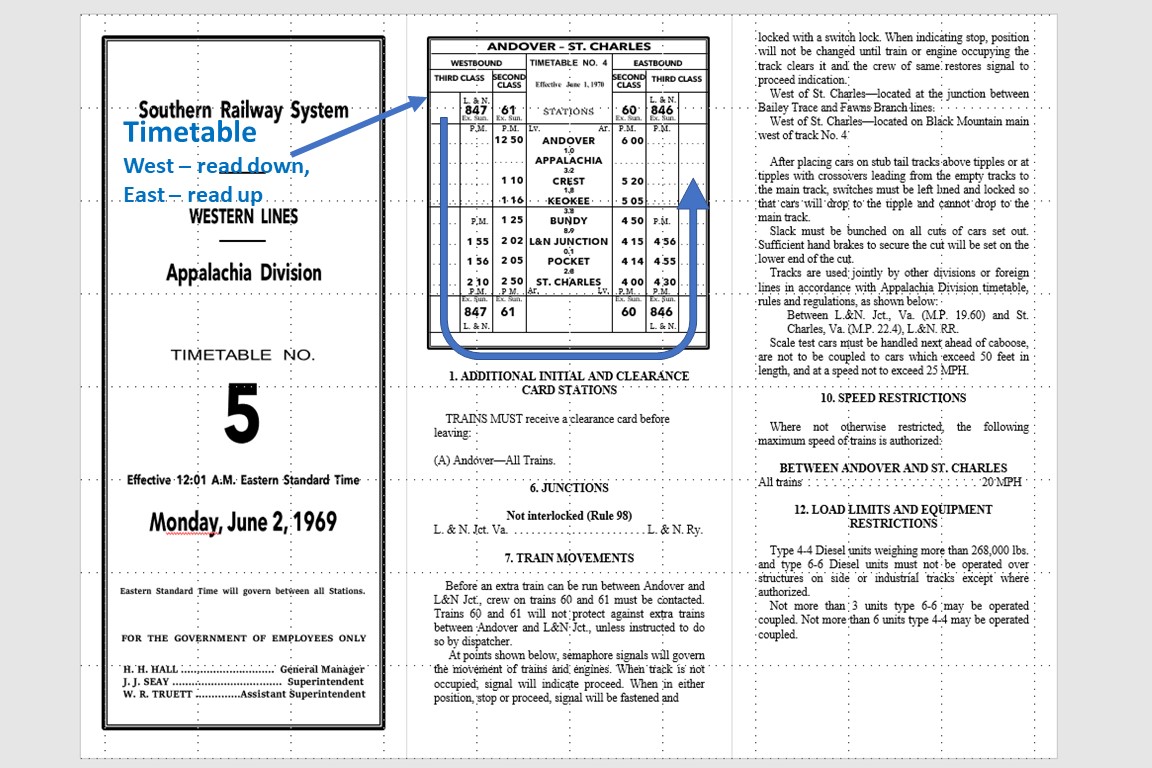
The St. Charles Branch was “dark” territory and was operated via Timetable and Train Orders (TTO). Only the St Charles Locals and L&N CV Locals were on the timetable–all other trains, including the mine runs, were run as “extras.” The St. Charles Depot served as a train order station, and a tall semaphore at the junction of the St. Charles Branch and Baileys Trace Branch near the depot serves to signal trains to proceed (green), slow down for orders (amber) or stop and sign for orders (red) at the depot. The small, three-track St. Charles Yard runs along both branches, and beyond the yard, each branch is protected by a dwarf semaphore which much be unlocked, set by the crew, and locked to protect trains heading up the branch. Crews should not proceed into the hidden trackage beyond these semaphores if they are set to red.
Crew Positions
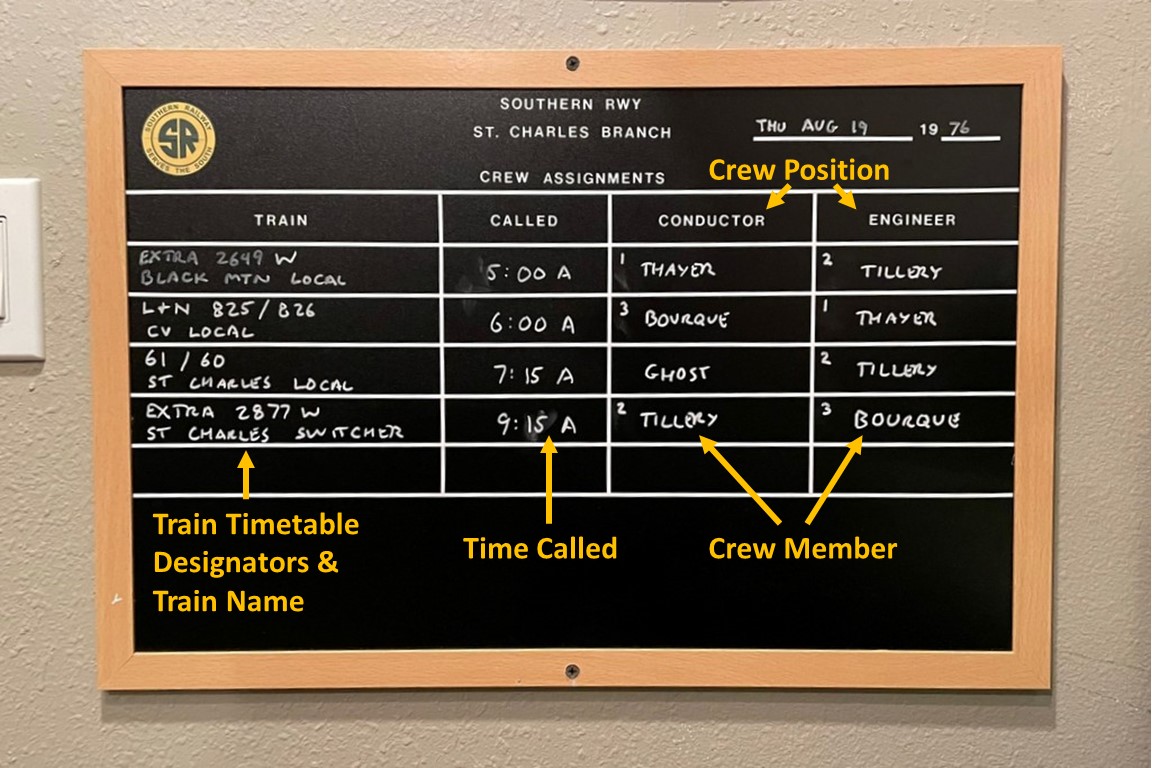
Most trains operate with two-person crews, a conductor and engineer, and you can expect to perform both duties in a normal operating session. The “Crew Assignment” board indicates the conductor and engineer (or the combined conductor/engineer) for each train and the time the train is called. There’s a fast clock above the board and another outside the layout room in the large room. There is no live dispatcher, but clearance cards and orders simulate the dispatcher’s role in keeping trains separated and performing their assigned work.
Conductor – you direct the movements of the train and the handling of cars. Once the time your train is called arrives (you won’t actually get a call), you’ll need to pick up the clipboard for your train from the desk near the door. Each clipboard contains a copy of your clearance card and train orders, instructions for the train, a master switch list, a blank switch list, and an Employee Time Table on the back. Start with the instructions–they tell you about the train, tell you which locomotives are assigned to your train, and which throttle address to use. They also give you a run-down of what the train needs to do, to include blocking instructions for cars–if you pick up a train in staging, it will already be blocked, but for everything else, it’s part of YOUR job to make sure the cars are blocked properly, especially when it comes to placing all loads ahead of all empties to keep trains safe on the curves and steep grades. If you don’t have a feel for the layout of the towns on the line, there’s a track diagram at the bottom of the instructions. Of note, not all tracks will be “active” for every session (tracks and loaders came and went over the years)
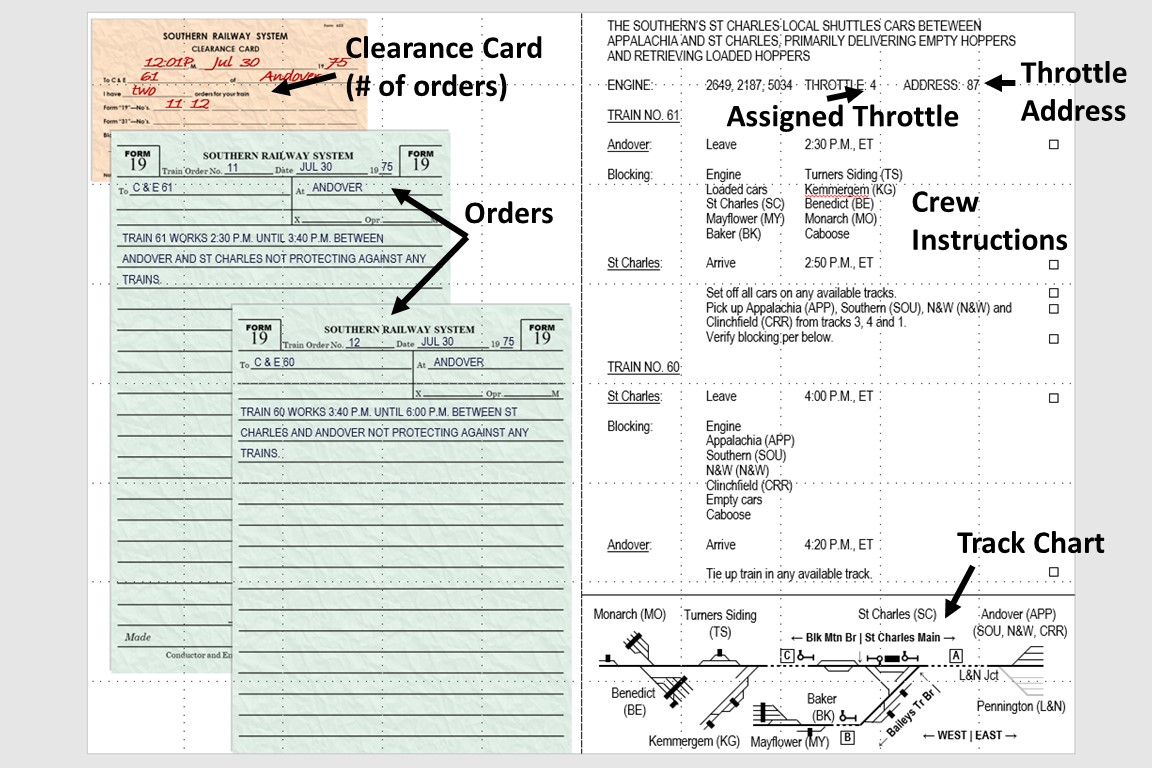
Next is your orders–these are your clearance from the Appalachia Division dispatcher to occupy certain lines and branches at certain times. Look through them to make sure you understand where you are authorized to operate, what times you’re authorized to operate, and any special instructions for the day. This is also a good opportunity to look at the ETT to make sure you know when trains are scheduled to arrive and depart Appalachia/Andover, Pennington, L&N Junction, and St. Charles. The next important piece of paperwork is the master switch list generated by one of them newfangled computer things. This master switch list has the reporting marks of every car on the layout along with its destination. You can either use the list as-is, or you transcribe the reporting marks for just the cars in your train onto the blank switch list provided.
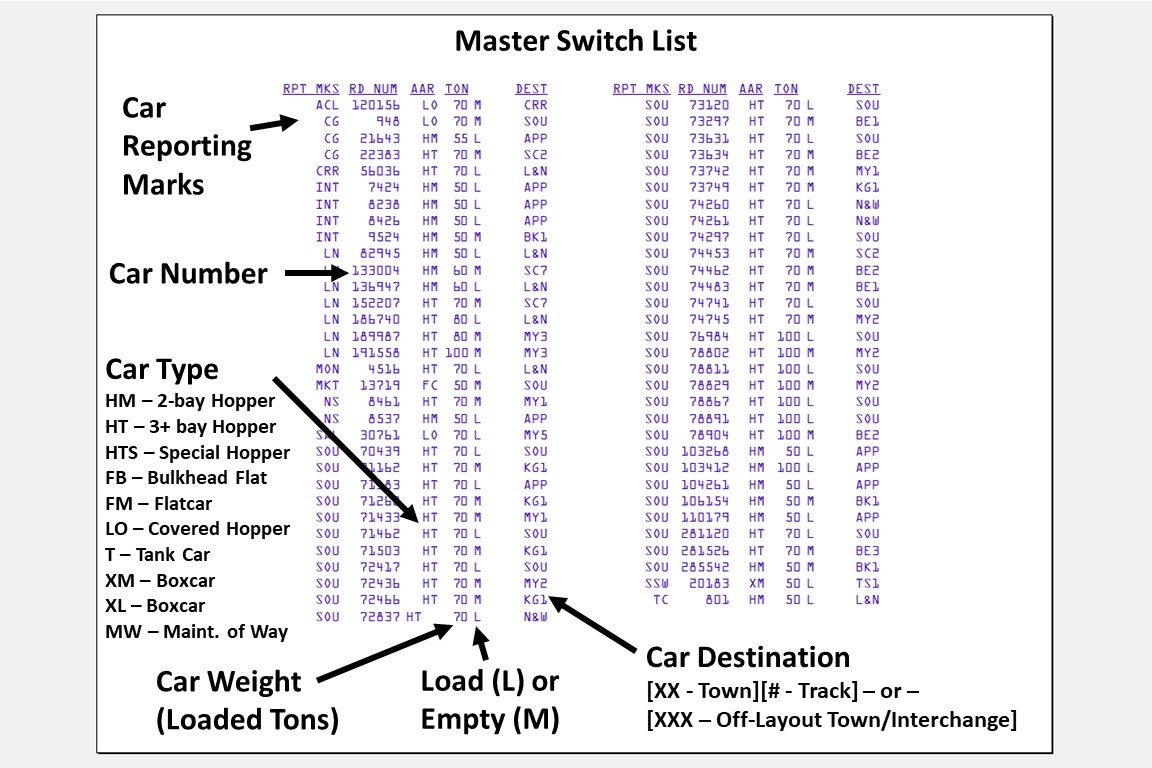
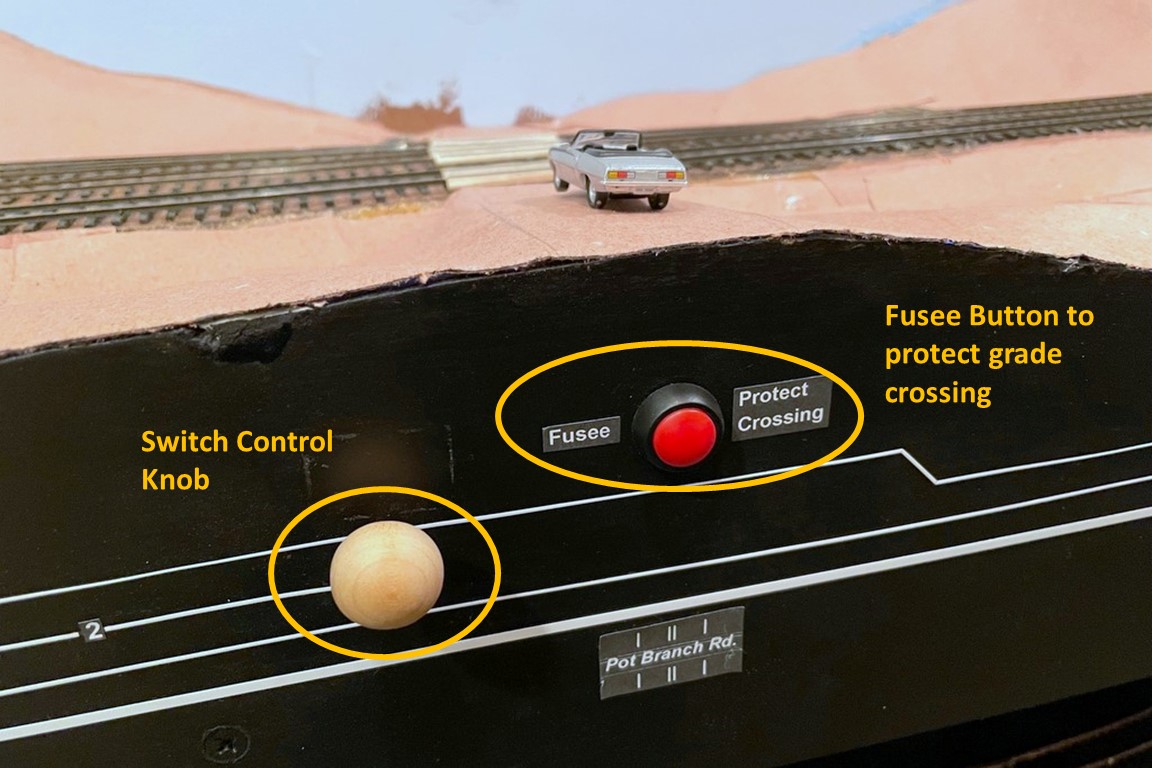
As the conductor, it’s your job to tell the engineer where to go, when to go, and where to set out and pick up cars to get them to the destinations in the switch list. At each town, you check to see which cars in your train need to be set out at local tracks using the two-letter designation code for each town and numerical designator for each track. Three-letter designation codes are for cars heading to staging. For tipples, there is a “load side” (LD) and and “empty side” (MTY) based on gravity, so you’ll need to set off empty hoppers “above” the tipple and pick up loads “below.” For most mine runs, the standard methodology is to set out empties as you move up a branch line and pick up loads on the way back, but some track arrangements will necessitate dragging loads with you up the line or setting out empties on the way back. Also, you ride in the caboose, so it’s also your job to serve as the brakeman, lining switches and calling out instructions and distances to the engineer for set-outs and couplings (e.g., “bring it back 100 feet to a couple… 2 cars… 1 car… that’ll do”). You’ll also need to protect grade crossings for reverse moves across roads using “fusees” (fyoo-ZEES) where there are no blinking crossing signals (pushing the button at the grade crossings lights the fusees for 10 fast-clock minutes).
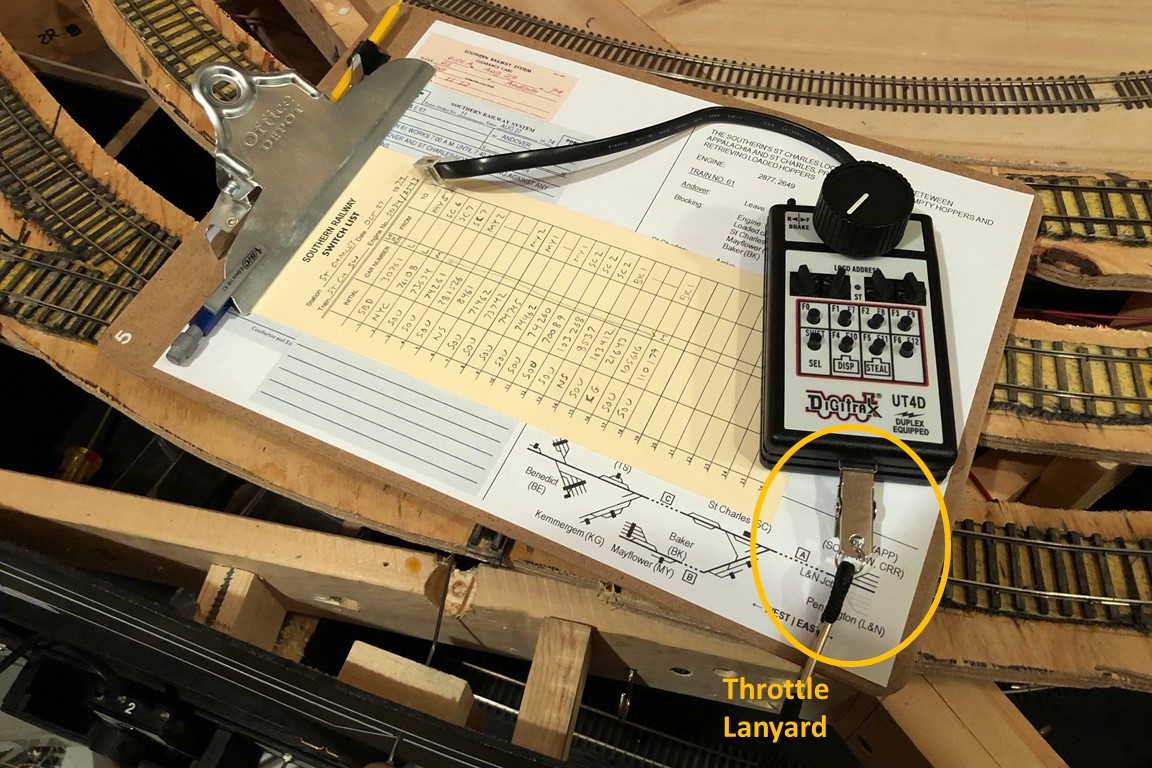
Engineer – you drive the train, following the train orders and instructions of the conductor. When the time your train is called arrives, you’ll need to meet up with your conductor to review your paperwork (or you’ll pick up your paperwork if you’re acting as both). The instructions will tell you which throttle to use, or at a minimum, which address and locomotives to use. You’re welcome to use your own throttle if desired. If using a layout throttle, the controls are simple. The dials control the address, the “sel” button acquires the address, the top switch controls direction, and the knob controls your speed. Each locomotive/consist is set up with a good bit of momentum, so you’ll have to plan your starts and stops carefully. You’ll also want to familiarize yourself with the brake–it’s the “F6” button on the lower right. If your train won’t move, check F6 to make sure your brakes have been released–you’ll need to do this every time after applying the brakes. Note, a few locomotives DON’T have the braking feature, so be careful!
Once the conductor gives you the go ahead, you’ll move the train as needed, holding to the speed limits in the ETT (back of the clipboard) and staying within the authorization of the orders. You’ll need to watch for grade crossings which are marked by whistle posts on the fascia and give the “two long, one short, one long” on the horn (F2 for long and F3 for short on most locomotives along with F1 for the bell). You’ll also act as the fireman, handling switching movements and couplings/un-couplings on the front end of the train and protecting grade crossings for forward movements across roads using “fusees” where there are no blinking crossing signals (pushing the button at the grade crossings lights the fusees for 10 fast-clock minutes).
Controls and Labels
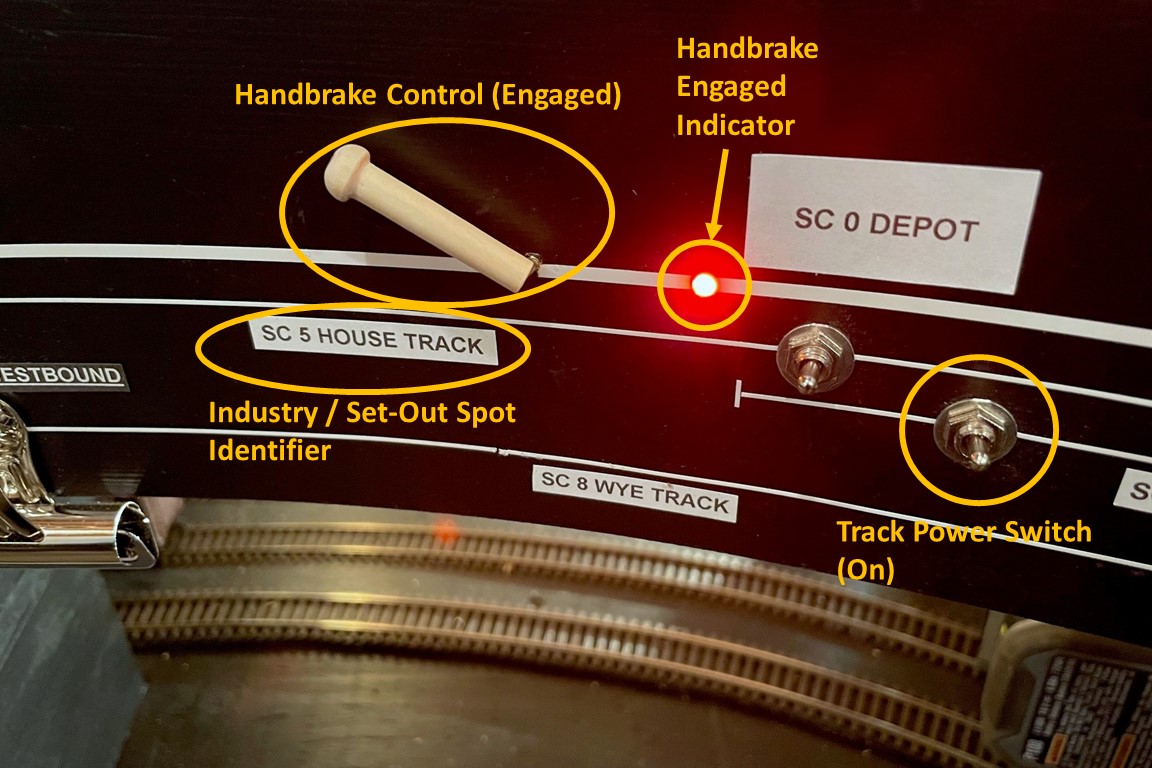
Beyond your paperwork and throttle, everything you need to operate your train can be found on the fascia. The white lines are a track chart that correspond to the tracks on the layout–the thick line is the main, and the thin lines are sidings or secondary tracks. The name of each town and its two- or three-letter destination designator are prominently displayed on the fascia, and each track has both a number across the track line and a label for any industry set-out points on the track that correspond to a destination in the master switch list. At the junction of two tracks is a round knob that controls the switch. The convention is to press the knob in to route the train away from you and pull the knob to route the train closer to you. The direction of the track lines at each knob indicates which route is “normal” (straight line) and which route is “diverging” (angled line). When leaving a town, all switches should be set to the “normal” position.
Some tracks have a small silver toggle switch on them. This indicates a track where the power can be cut and is usually associated with staging tracks and other tracks where locomotives are kept. This switch helps keep the sound from “non-player” locomotives silent when not in use, so you’ll need to flip the switch up/on to move your train out of staging and flip it down/off to kill the sound of your locomotive when you’re “tied up” in staging and done with your train.
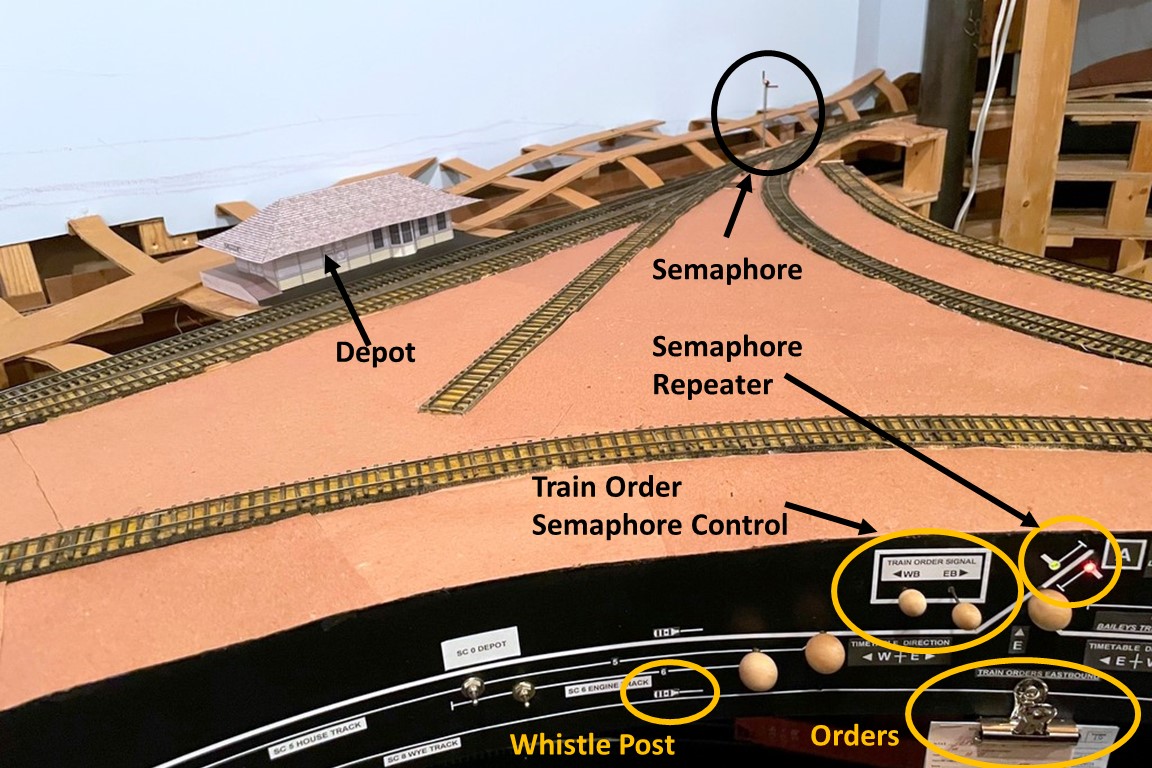
At a few places, a semaphore diagram (staff with a light and a flag) indicates the presence of a signal on the layout. The fascia has a repeater light (green, amber, red) for the semaphore which matches the position of the semaphore on the layout. Green means “clear/proceed,” amber means “slow for orders” and red means “stop.” The semaphores at the St. Charles Depot are controlled by the depot operator and indicate the presence or absence of new orders. If amber or red FOR THE DIRECTION YOUR TRAIN IS TRAVELING, you should look for your orders hanging from clips near the depot. Since the depot operator is a simulated position, if your orders are the only set, use the controls in the block adjacent to the semaphore diagram to set the semaphore back to green. Trains working the branches will need to set the dwarf semaphores to “red” while working the branch to keep other trains from encroaching. These controls must be unlocked, set, and locked (the key is under the lock) before proceeding. Don’t forget to set the semaphore back to “green” when you’re clear of the branch. The dwarf semaphores also conveniently control the two main areas of hidden track – between St. Charles and Baker on the lower deck, and between the lower and upper decks. If you’re confused about where your hidden train will emerge, you can locate the corresponding letters inside a square on the fascia that indicate the connected ends of hidden track.

Gravity is an important part of mountain railroading, and handbrakes on individual cars are used to hold them on hills when they’re set out. As model cars don’t have handbrakes, there are “handbrakes” in strategic locations around the layout where cars need to be left temporarily without a locomotive to hold them in place. These “handbrakes” are a piece of steel wire between the rails to hold the axles of a car. They’re controlled by a lever on the fascia that engages (angled position) and disengages (straight position) the brake. Running over a brake with a locomotive is not good, so an amber light is a secondary indicator for crews that the brake is extended/engaged. A line of yellow paint on the rail marks the spot where the brake extends–try to get it in front of an axle rather than catching a piece of the car’s body. These brakes will hold 20 cars each without a problem. Of note, there are other more basic “brakes” between the rails (fishing line and brushes) to help hold (or slow down) cars in a few usual set-out spots.
Additional Tools and Tips
There are not uncoupling magnets (or coupler trip pins for that matter) on the layout. Crews will need to grab a bamboo skewer to help with coupling/uncoupling. To uncouple, insert the tip of the skewer between the couplers and twist clockwise–it takes some getting used to, but it works. Also, because many couplings occur on curves, you may need to use the skewer to help guide the couplers together. When working under a tipple, it’s often useful to “delay” the couplers (set them so they push on each other but don’t actually couple) when shoving cars into the empty tracks.
Please don’t set things on the layout. The clipboard is your “space” for writing, and there are cubbies for your clipboards all around the layout when you want to go “hands free.” Additionally, the throttles all have clips that can be attached to neck lanyards if you want to keep them on you while using two hands for other things.
If you discover a problem, please point it out to me. This can include cars causing problems (derails more than once), switches/track causing problems (derails more than once), locomotives causing problems (stalls more than once), dirty track, controls not working, etc. No one likes problems, and I can’t fix what I don’t know about.
If you’re overwhelmed by all this, don’t worry. Start with the basics and work up from there:
- Basic: obey your train order times/places, set out your trains cars where they need to go, pick up the cars you’re supposed to pick up
- Intermediate: block cars per instructions, operate semaphores
- Advanced: protect grade crossings (fusees and horns), use horn signals for train movements when switching, place loads up front / empties in back for all train movements
If you’re not having fun, you’re taking this too seriously–relax and enjoy the laid-back pace of railroading on an Appalachian branch line!