Tag Archives: Digitrax

Configuring DCC Consists for Directional Horns

As I’ve stated in previous posts, sound decoders have drastically changed my approach to DCC consisting. In an ideal world, I want all movement controls (forward, reverse, braking, dynamics) within a consist to be controlled by a single throttle, and I want only the lights, horns and bell of the lead unit to respond when an operator selects these functions. Digitrax’s “universal consisting,” unfortunately, doesn’t allow function-controlled movements like braking to go to the entire consist. Also, if you reverse the direction of the consist, you have to rebuild the consist to control both movement, lights and sound with the new lead unit. This is not a big deal for trains that only run in one direction, but every single one of my trains is an “out and back” where the lead unit of a consist switches, sometimes several times in a session. Asking operators to rebuild the consist every time they switch the train’s direction is not ideal.

Moving to “advanced consisting” (decoder-aided consisting) solved many of these problems but not all. Using the “consist” tab in JMRI, I was able to use the directional lighting features built into my Soundtraxx Tsunami 2 decoders to set the lights on the end units in a consist to “respond to consist address” but only in forward or reverse, thus solving the challenge of only getting the end lights in a consist to illuminate. The horns and bell, however, cannot be set to only operate directionally using the consist controls, so I was stuck with picking one loco in the consist to respond to all the horn and bell commands… this works, especially if all units use the same horn type, but it bothered me a bit to hear a Nathan M5 from the trailing GP35 instead of the Nathan P3 from the leading GP38. When I posed this question to a group of Digitrax experts, one of them pointed me to this video from Soundtraxx where someone had figured out how to use “alternate sound levels” function in the Tsunami 2 decoders to get directional horns, so I had to give it a try. The video left a few steps out, perhaps because they were using “simple consisting” (same address), so I had to experiment a bit to figure out how to make it work with advanced consisting, but in the end, I was able to get the consist to perform [almost] exactly as I had hoped using the following method.

The Gist

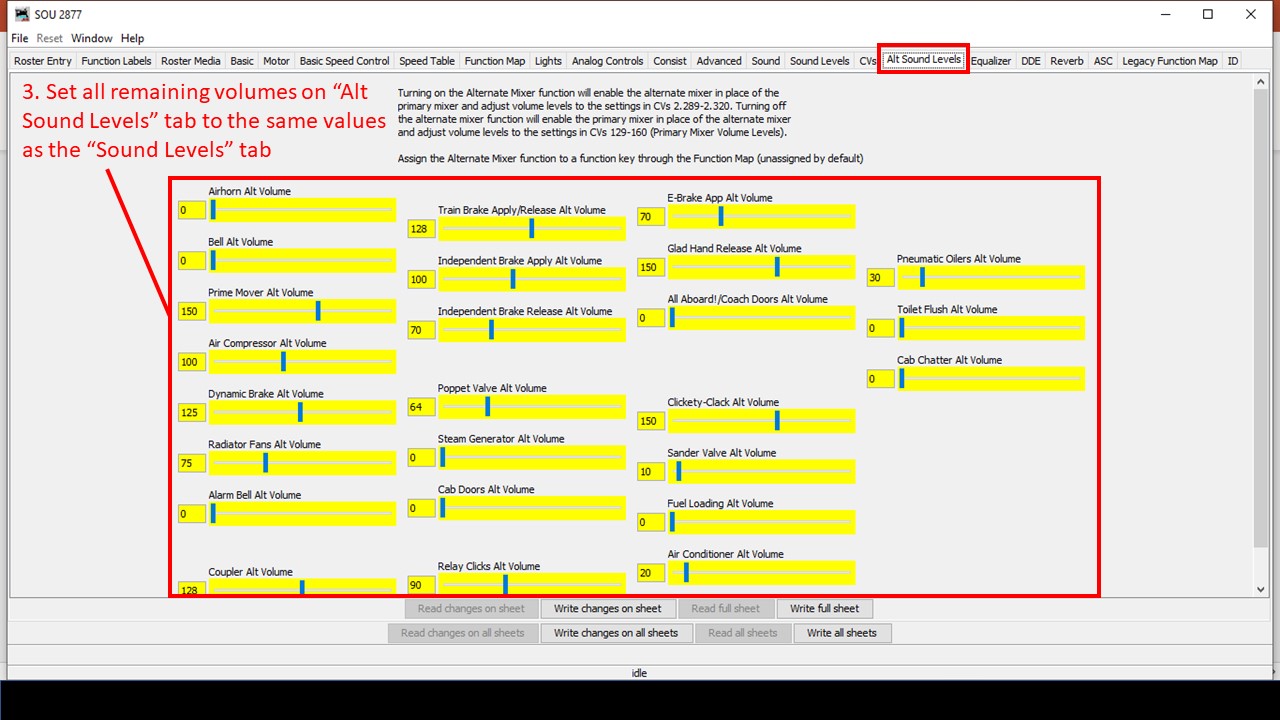
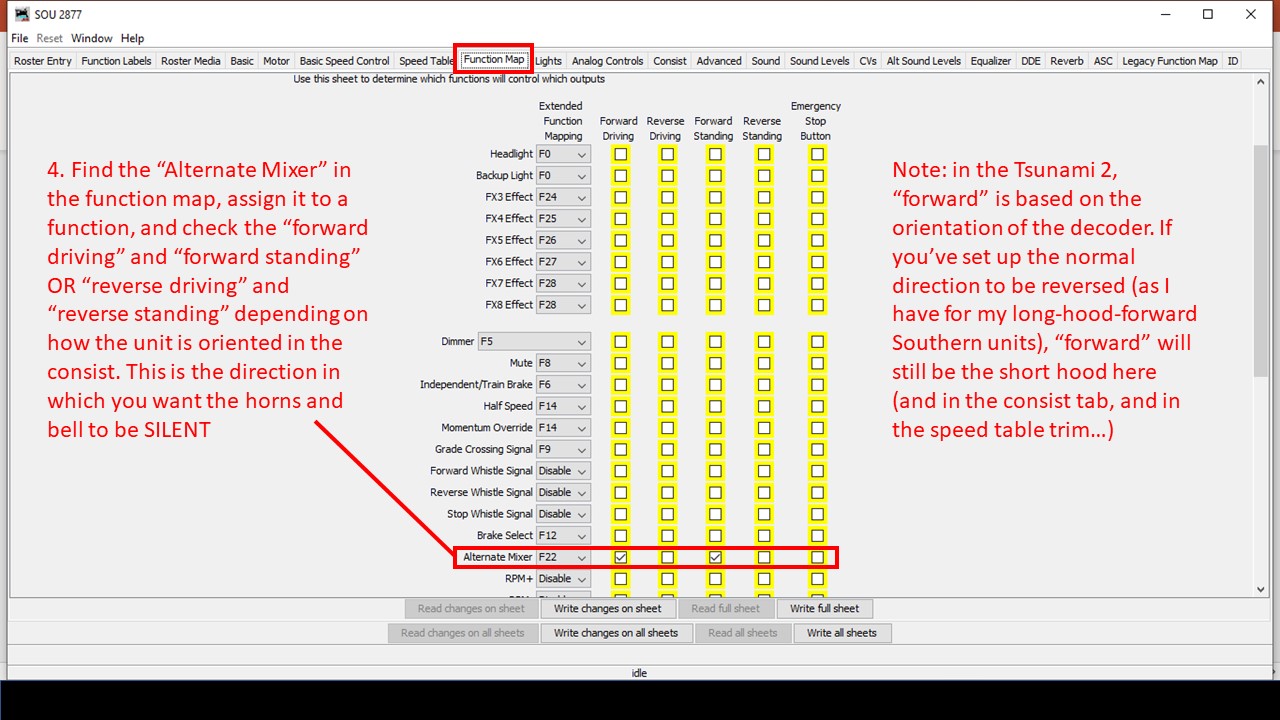
Soundtraxx Tsunami 2 decoders have an “alternate sound mixer” designed to make it easy to select a new set of alternate sound levels with the press of a function button. Additionally, the “function mapping” in Tsunami 2 decoders allows you to set any function to operate automatically when the command station commands the decoder in “forward driving,” “reverse driving,” “forward driving,” or “forward standing” conditions. The trick is to set all the alternate sound levels to match the primary sound levels EXCEPT the horn and bell which are set to volume “0,” then use the function map to configure the alternate mixer to operate any time the decoder is moving in the trailing direction (forward or reverse based on how it’s sitting in the consist), and finally to set up the decoder to “respond to consist address” for horn and bell functions. When you set up the locomotives on the ends of the consist in this manner, it has the effect of silencing the horns and bell when the locomotive is trailing and not leading. Here are the steps in JMRI.
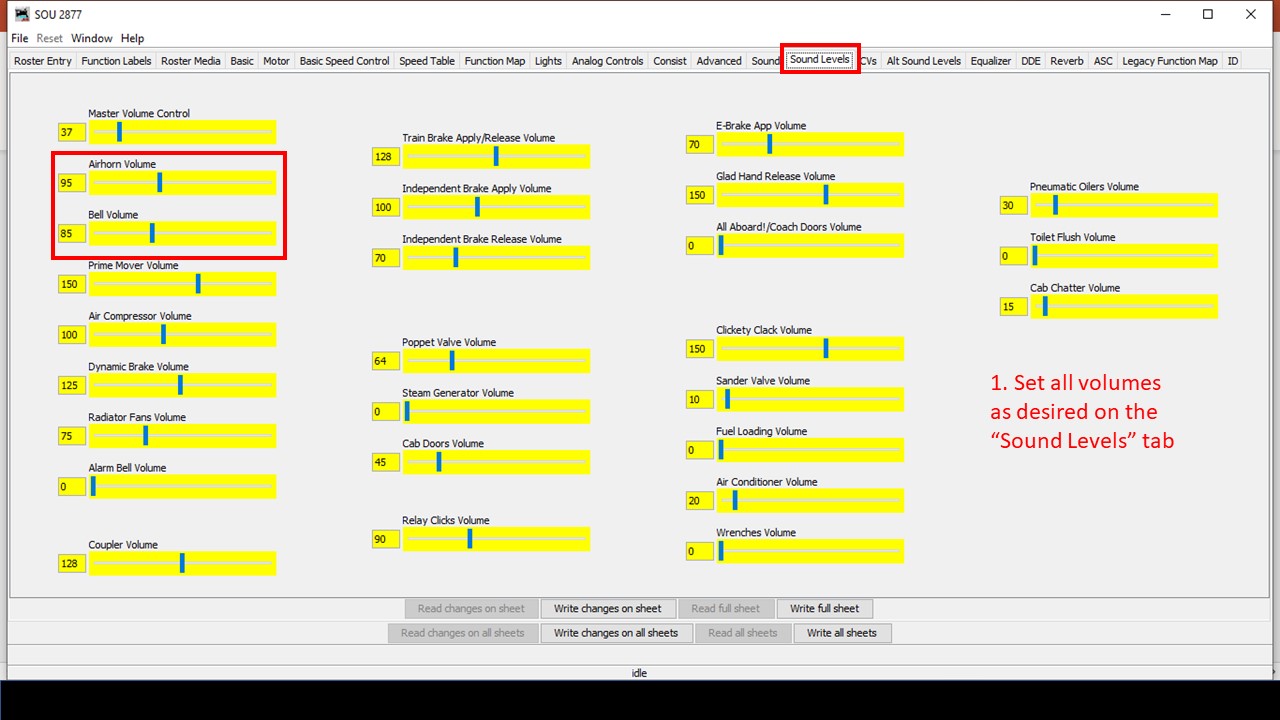
Consisting for horns and bells 1
Step 1. Set the sound levels in the primary sound mixer


Consisting for horns and bells 2
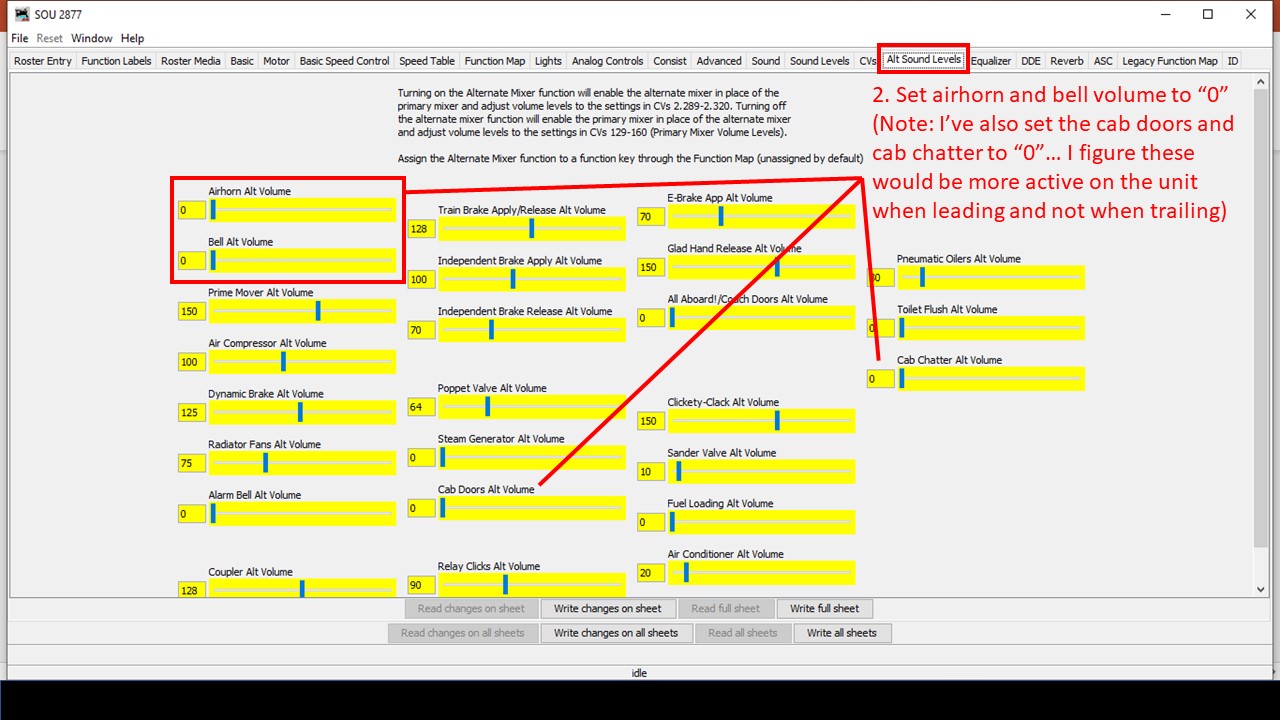
Step 2. Set the horn and bell to “0” in the alternate sound mixer


Consisting for horns and bells 3
Step 3. Copy all other sound volume values from the primary to the alternate sound mixer


Consisting for horns and bells 4
Step 4. Set up the “alternate mixer” to operate with forward or reverse direction (the direction in which it’s trailing in the consist)


Consisting for horns and bells 5
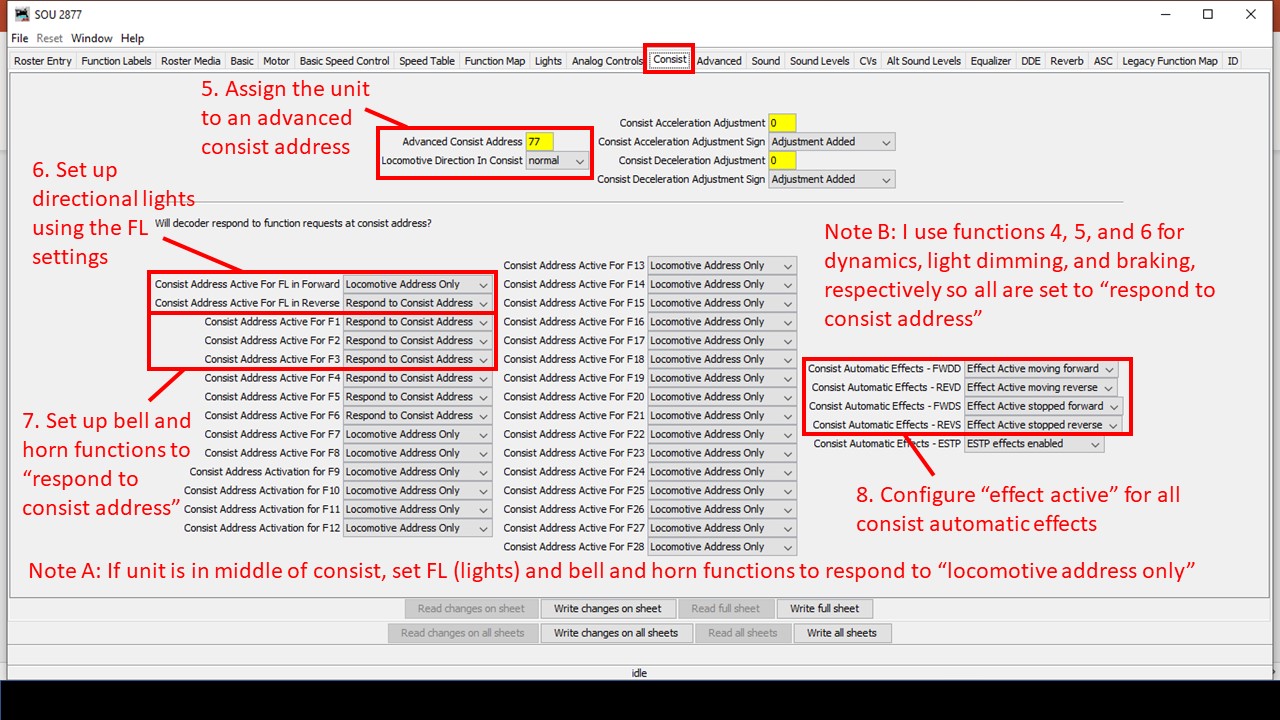
Steps 5-8. Set up the advanced consisting so directional lights and functions for horn and bells “respond to consist address” and enable the automatic functions


Some of the settings will depend on where the locomotive is in the consist and whether or not its on the end. For a locomotive in the middle of the consist, you can either set the decoder’s light, horn and bell functions to “locomotive address only” in the consist tab, or you could place check marks in all four columns in the function map (forward driving, reverse driving, forward standing, reverse standing) so only the alternate mixer with zero volume for bells and horn are used. If you change the orientation of the locomotive, you may need to change the FL settings in the “consist” tab and swap from “forward” to “reverse” check marks in the function map. Also, if you’re using a locomotive on the end that doesn’t support an alternate mixer (like the Soundtraxx Econamis I have in some locomotives), then you’ll need to pick just one of the locomotives to “respond to consist address” to provide the horn and bell for the whole consist and disable the directional checks in the function map.

That’s it! Now when you run a throttle using the advanced consisting address, the lights on the ends will be directional, AND only the horn and bell of the leading unit will respond to the throttle’s horn and bell functions no matter which direction you’re running. Click on the video at the top of the page to see this in action, and if you’ve got some even better tips and tricks for this, please leave them in a comment below!
Farewell to the Mighty Z

DCS50 Zephyr
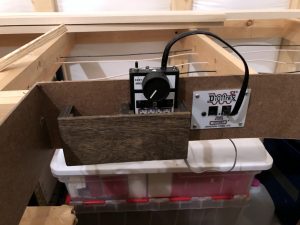
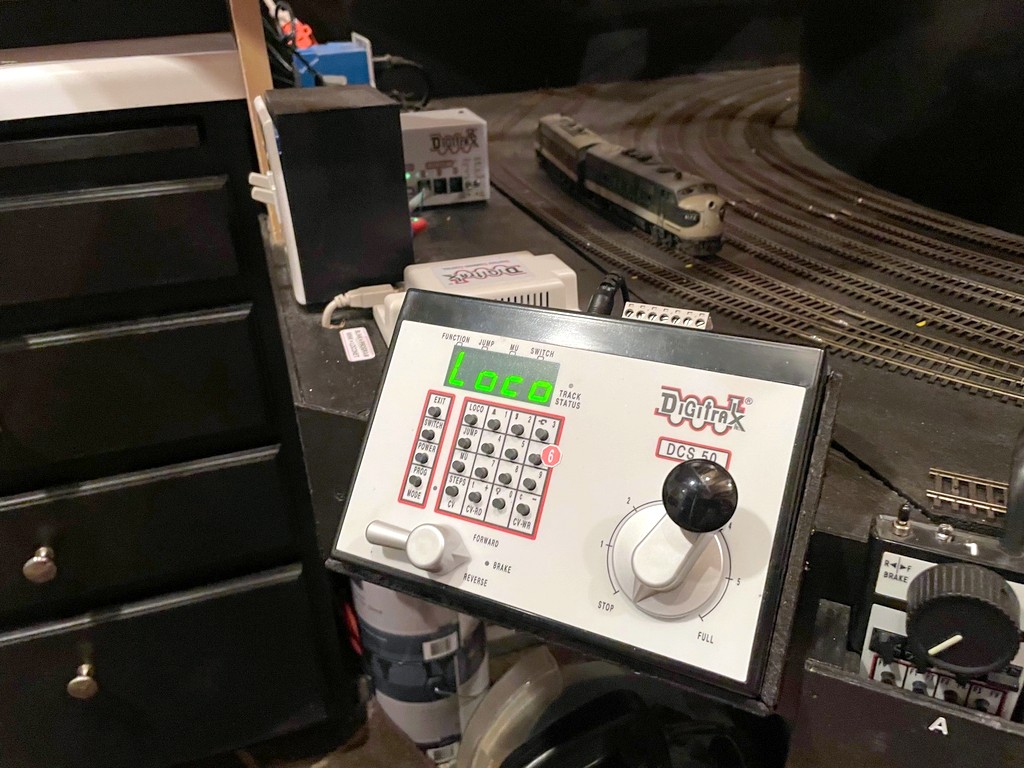
This Digitrax DCS50 Zephyr has served me faithfully for more than a decade on two layouts

***Update Oct 22, 2022. The Zephyr is not yet gone, and I may just keep it. I’ve figured out that I can still use it to turn track power on and off, even in booster mode, and the odd scrolling LEDs that come with placing the unit in booster mode aren’t quite as annoying as I remember. It also seems kinda handy to be able to quickly punch in a loco address and run a locomotive with the Z when doing things like speed matching… so, even though it’s no longer my command station, it may just stay right there on the fascia.***

This past Wednesday marked a milestone on the layout–it was the last time my layout was controlled by my venerable and dependable Digitrax DCS50 Zephyr! The “Z” is known as an entry level system, but it’s historically been my favorite to use as a command station because it’s very easy to operate and made a great stationary controller for creating consists and programming decoders. On both my previous layout and this one, I used a specially made box created just to mount the Z on the fascia in a convenient spot. The Zephyr’s 2.5A were never enough to power my entire layout, so there’s been an old DCS100 command station/booster serving as the booster behind the scenes, but the Z has always been the command station, and I’ve always had fewer than 10 locomotives on the layout at once, so the “slot” limitation has never been an issue.

Two things have happened recently that precipitated a change away from the Zephyr. First, thanks to my adoption of sound decoders and their braking features in all locomotives, I switched from “universal consisting” (command-station consisting) to “advanced consisting” (decoder consisting) to be able to control functions in all decoders simultaneously, so I can do all my consisting in JMRI instead of in the command station. While this method takes up even fewer slots in a command station, it also eliminated the need to create consists using the Z, one of its greatest strengths. Secondly, my old DCS100 has been getting more and more finicky over the years, often being disagreeable and “forgetting” its a booster. This never created any operational problems, but it was a constant source of angry beeps from the DCS100. I had a few options. First, I could just revert to using the DCS100 and upgrading to a newer advanced throttle (it came with an ancient DT100), but the DCS100 was starting to show its age. I also played around with a new generation Zephyr Express (DCS52), but I found the screen and buttons too bright (I want to run night operations), and the DCS100 REALLY didn’t appreciate working with the new Z, and it was more difficult than I’d hoped to get them to play nice together. Ultimately, I decided that the best answer would be to just upgrade the whole command station/booster combo.

DCS210 on the layout
The new DCS210+ in its spot on the staging level

I ended up going with the Digitrax Evolution Express (EVOX) which includes a 5A DCS210+ booster, 100-slot command station, a USB interface, and an a DT602 advanced throttle to control everything. It’s plenty of power for the layout, and I’ll never need the additional capacity of the top end command station. I splurged on the duplex radio version because I figured it would be worth it to upgrade my 2-way radio system to the newest receiver (UR93), and I wanted to preserve the ability to use the DT602 wirelessly, even if right now it’s serving as a glorified power button. Installation of the new system was easy, and everything works like a champ! I’ve also now got a spare command station, spare 5A power supply, and spare duplex radio receiver if I need them. I’ve also got a backup method for connecting my Digitrax to JMRI, even though for now I’m sticking with my old PR3 rather than using the DCS210+ USB port… it’s working well, don’t mess with it!

Anyway, I didn’t want to let this moment pass without giving a big shout-out and thanks to my Zephyr for the many years of faithful service on the layout. I don’t know many who use a Z as the command station for a good-sized, serious layout, so I was happy to be a long-time advocate! I already miss one simple thing: the ability to just push a button on the Z to turn the track power on and off. I’ll say farewell, though I have no plans to actually get rid of my Z any time soon… maybe I need a stand-alone programming station… hmm…

One final thing. If you’re trying to turn the track power on or off using a DT602 super throttle, and you can’t get the soft keys for track power to stay there long enough for you to actually push them, you need to press on the LEFT side of the power button and not in the middle. Might just save you a help-desk ticket with Digitrax… not that this happened to me.

Loconet Functional Diagram - St Charles Branch Aug 2022
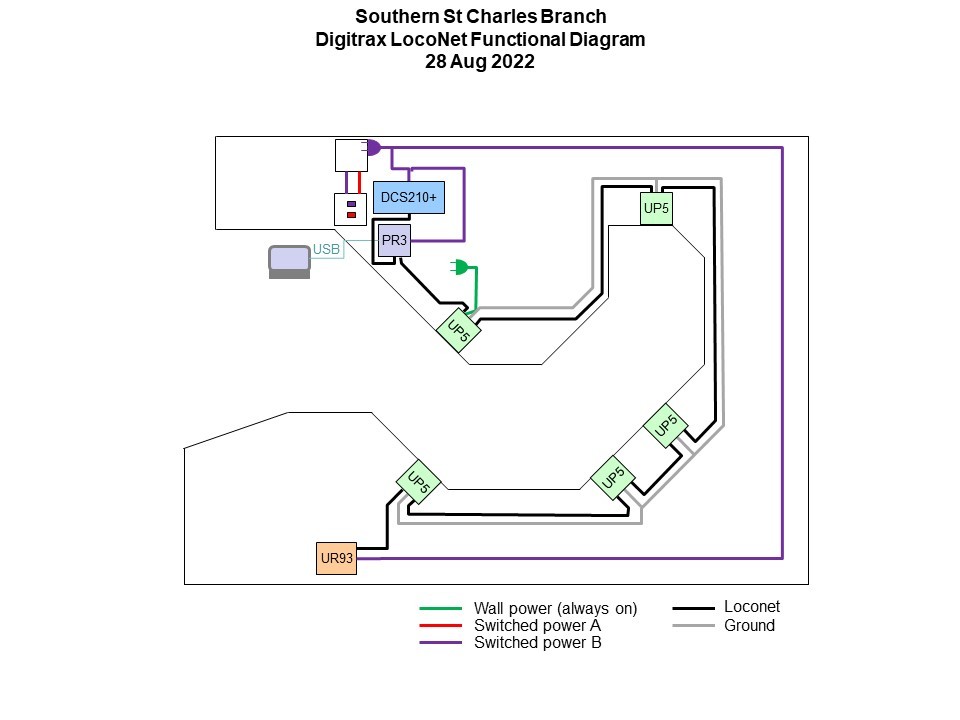
Here’s the updated functional diagram of the Digitrax system on the layout


DCC Installed

Digitrax Setup
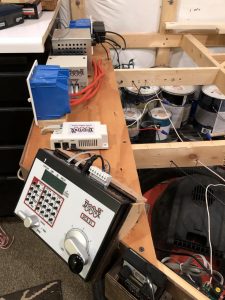
Key Digitrax components on the layout including a DCS51 command station, PR3 computer interface, DCS100 (acting as a booster), and power supply

The last couple of weeks I’ve been working on the fascia and wiring for the staging level, and I’ve also installed the DCC system. It’s a lot easier to install when there isn’t a lot of layout in the way, and most of it resides on the bottom deck anyway.

I’m using the Digitrax DCC components from my last layout. While I have an upper-end DCS100 “Chief” system, I’m actually using a smaller, entry level DCS51 Zephyr Xtra as my command station. While the Zephyr doesn’t have the same functionality as the Chief, it’s got everything I need, and it’s much simpler to operate. Like my previous layout, I’ve mounted it on the fascia where it’s easy to access and can be used as a throttle for the staging tracks or for smaller visitors.

Throttle Pocket
One of the simple throttle pockets for the Digitrax UT4D wireless throttles. It’s designed to hold two throttles while preserving batteries and protecting buttons.

The rest of the throttles are UT4D 2-way wireless throttles connected through a UR92 wireless receiver/transmitter. Even though everything’s wireless, I still use several UP5 throttle plug-ins around the layout. This allows someone else to bring and use their favorite Digitrax throttle, and it allows an ops session to go on if the wireless is acting up. Each of the panels has an adjacent throttle pocket that perfectly fits the UT4D throttles (those who visited my last layout will recognize these). This not only gives the operators a convenient place to set the throttles, but it protects the buttons and also promotes the plugging in of throttles when not in use to preserve batteries.

I’m using three sources to power components. The first is straight wall power, and this powers the UP5 panels to supply keep-alive power to the throttles (preserves batteries while the layout is off). The second is switched power for the DCS100 and UR92, and the third is switched power for the Zephyr command station and a PR3 computer interface. I kept these separate so I could turn on just the “Z” and PR3 when I’m programming locomotives.

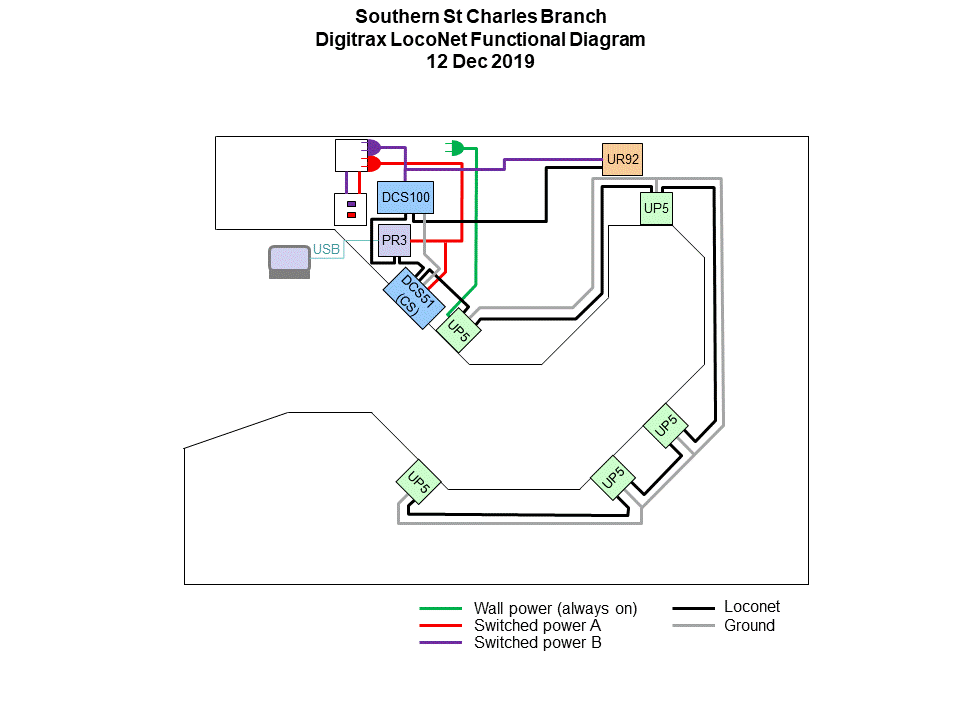
Loconet Functional Diagram
Functional diagram of the Digitrax setup on the layout

One lesson I learned from my last layout was to keep a functional diagram of the Digitrax setup so I could easily determine how the components are wired together even when they’re covered by the layout–it’s a great aid in troubleshooting!