I haven’t added an update for a while because the layout doesn’t really look any different. That’s not to say I haven’t been working, it’s just been all the boring stuff – wiring. It may be boring, but if you want your layout to run well, it’s doggone important, so it shouldn’t be left as an afterthought.
 First, I corrected an issue I first noticed when running trains around the staging level – sound! I never ran sound locomotives on my previous layout, and now that I’ve got a few, I noticed how annoying it is to have diesels sitting in staging making idling noises that are easily heard throughout the room. These trains are supposed to be dozens of miles away, and I don’t want to hear them while they’re in staging. Of course, there’s the option to “mute” a sound locomotive temporarily, but I don’t want to force operators to go through an entire consist muting and unmuting every time they pick up or drop off a train in staging (and every time a short occurred, all the sound would come right back on anyway). For a solution, I went “back to the future.”
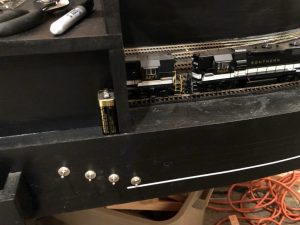
I installed a small SPST toggle switch (picked up 20 for cheap on eBay) for each staging or locomotive track (9 total) on the fascia where the track diagram will be. Unfortunately, this meant pulling dozens of feeders from the staging tracks and running a secondary bus for one rail under each track that’s connected to the switch. Thankfully this didn’t involve any de-soldering because all my feeders are connected via wire nuts. Now I can turn off the power to any staging track with sound locomotives until they’re needed, and all the operator has to do is flip a single switch. Old school “electrical block” solution to a DCC problem.
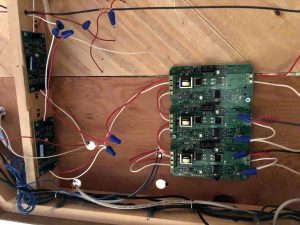
 While I was at it, I broke down and ordered a DCC Specialties PSX-4 solid-state circuit breaker to go with my On-Guard-AR auto-reversing circuit breakers. I’ve been planning to do this all along and wiring for multiple zones, but after reading through the PSX documentation, I discovered my understanding of the PSX-4 and how it interacts with AR breakers was a little lacking. I didn’t know that the AR breakers should not be wired off a PSX zone but directly wired to the booster themselves. Turns out with the two reversing zones already protected by an AR circuit breaker, I really only needed a PSX-3 because I only have one non-reversing zone per level (1=staging, 2=lower level, 3=upper level, 1R=staging reverse tracks, 2R=St Charles wye to Mayflower). “Snap” – “hey look, now I have a PSX-3 and a spare PSX-1”. . . smart DCC Specialties! Not gonna lie, it was a little confusing to program the PSX to work well with the AR breakers using the Digitrax Zephyr, but I finally figured it out:
- Set the Digitrax booster to .5 sec short circuit trip using booster instructions (CV 18 to “c” on my DCS100)
- Solder the Digitrax jumper on each PSX zone per PSX instructions
- Set the PSX to programming mode via the jumper per the PSX instructions
- Ignore the part about setting the PSX address unless you need the PSX to respond to “on/off” or other special commands from the DCC (If you just need it to be a circuit breaker, you don’t)
- Connect a single PSX zone directly to the Track A / Track B from the Zephyr
- Turn the track power on on the Zephyr
- Put the Zephyr into “OPS Programming” mode
- Select CV55 (“CV”, “55”, “CV”)
- Press “1” and “CV-W” (add delay to the PSX so the AR zones will trip/reverse first)
- Select CV65 (“CV”, “65”, “CV”)
- Press “80” and “CV-W” (set delay to 10ms which works for my setup)
- If Zephyr shows “Busy,” exit programming mode and try CV65 steps again
- Set PSX to ops mode via the jumper per the PSX instructions
- Repeat steps for additional PSX zones
 I encourage you to read all the instructions first and choose your own adventure–just sharing what worked for me.
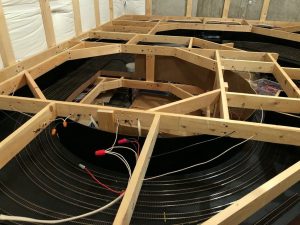
Finally, before I lay subroadbed and track for the lower level, I had to add the wiring bus, or in this case, two wiring buses. Two are needed because the St. Charles wye needs a reversing circuit, and the reversing district carries over all the way to Mayflower. Lots of drilling holes, cutting open Romex, and pulling heavy gauge wire through. I still have to make the little pigtails for feeders, but it’s mostly done. Shouldn’t be long before I’m laying track on the main level!
Dan
Good information. Thanks for the progress report.
[…] a PSX-3 (essentially 3 PSX-1s) from DCC Specialties (I covered how to program these with a DCS51 here). Like the auto-reversing breakers, the PSX breakers are solid-state and are well worth the money […]