


- Size: 27′ x 38′
- Scale: HO
- Minimum Radius: 30″
- Minimum Aisle Width: 30″
- Designed by Dan Bourque
This track plan is decidedly “non-Appalachian,” but I’ve decided to include it because it offers an interesting glimpse into coal-hauling operations of western US railroads, in this case the Denver & Rio Grande Western and later the Southern Pacific and Union Pacific. The D&RGW mainline between Denver, Colorado and Salt Lake City, Utah ran through Grand Junction, Colorado on the western slope of the Rocky Mountains. The D&RGW built a line south from Grand Junction into the fertile lands of the Gunnison River Valley and extended that line up the North Fork of the Gunnison River to serve the rich bituminous coal deposits east of Paonia, Colorado.
The Layout
This layout, designed for a friend’s basement, captures the D&RGW’s North Fork Sub as it appeared around 2000 after the line had transferred to the SP and then the UP. It’s designed to capture the key features, locations and operations of the nearly 100-mile long branch including the five major coal loaders near the end of the line. Despite the large space, fitting everything still required a good bit of compression between scenes. This need for extensive compression between scenes is probably the biggest difference between an Appalachian track plan and a western track plan–towns in the eastern US tend to be closer together while western towns are more spread out with the landscape being a more prominent feature between towns.
I decided on a down-up-down double-deck design to maximize the mainline run. One challenge with modeling this area on a double-deck layout is that the scenery generally demands a north-facing orientation to put the rivers in the foreground and the hills in the back. That’s easy to do on a single-deck layout, but a double-deck layout without duckunders (a “deal breaker” for this friend) generally switches orientations between decks–this drove most of the design. One bonus to this challenge is I ended up with space to model a portion of Grand Junction, something that wasn’t a “must have” but adds a lot to the layout.
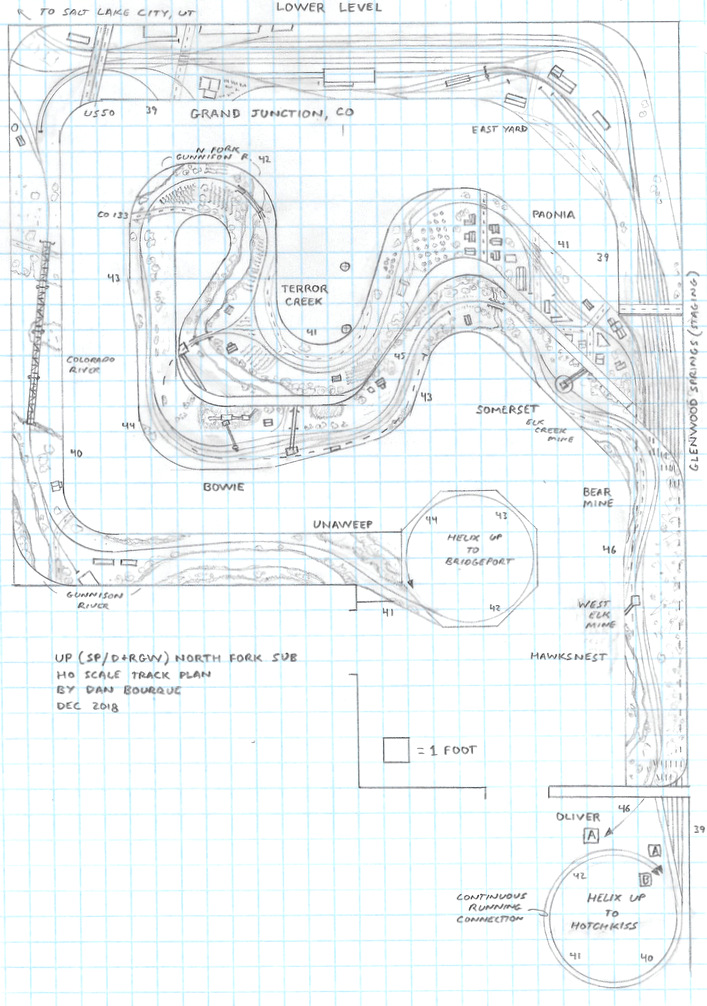
The first part of the lower deck represents Grand Junction and the start of the North Fork Sub. Grand Junction was a huge place on the D&RGW with two large yards to the east of the North Fork wye and one large yard to the west. This track plan includes a portion of the east yards including the engine facilities. The east-east yard (if that makes sense) is actually the end of the staging yard representing Glenwood Springs, CO and lines east (where most of the coal trains went). The remainder of the yard provides a place to showcase motive power and non-coal cars, and it adds a bit of switching for a yard crew to work the industries and do some light classification for the locals. The key scenic feature of this area was the five-span bridge across the Colorado River–I’ve truncated it to four spans, but it would still be an imposing scene.
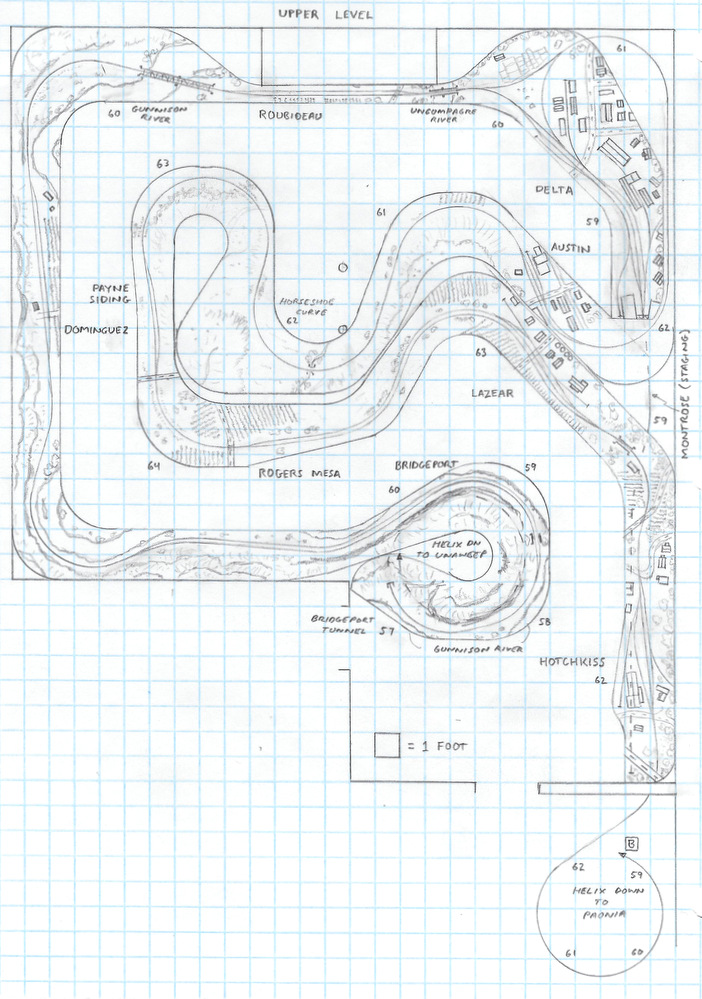
The upper deck picks up at Bridgeport, about halfway through the canyon that the railroad followed between Grand Junction and Delta and the site of the only tunnel on the line. The remainder of the canyon is severely compressed but enough to give the right (imposing) scenic impression of the area. Near Delta, the terrain transitions to rich farm country with looming mountains in the backdrop. Delta was where the line to coal country and the industrial/agricultural line to Montrose, CO split. I’ve modeled a compressed version of Delta with many of the industries and a staging track to represent Montrose–just enough to justify a Montrose Local job on the layout. Taking the coal line off the wye and behind Delta also allows more compression of a long straight and flat piece of railroad between Delta and Austin. The key scenic feature of the upper deck is the horseshoe curve geographically east of Austin that climbs up a grade to reach the top of a rocky and brown plateau before the line descends again into the farmland of Rogers Mesa, Lazear and Hotchkiss. I’ve used topos to add a few of the older industry tracks at each of the towns back onto the line for more operations–it’s easy not to use them if you want to have a more prototypical mix for the ‘1990s-2000s, but they’re there just in case.
A helix in a side room brings the line back down to the first level and the town of Paonia. Operators will have to walk around the peninsula to follow their train, but this compromise was needed to keep the river in the foreground and mountains in the back at the end of the line. From Paonia, the line begins to transition from farm country into mountainous coal country with the first flood loader located off the wye at Terror Creek. This is great scene because the land all around the loader and even in the middle of the wye is tilled fields like the prototype. After crossing the Gunnison River, the scenery becomes decidedly mountainous with steeper grades, tall hillsides in the background and narrower scenes. All four of the later loaders are modeled including the single-car loader at Bowie and the flood loaders at Bowie, Somerset and Hawksnest. The tail track at Hawksnest transitions through the wall and into the side room where it follows the helix for two turns and joins with the east end of staging to form a continuous running connection.
Construction would be pretty straightforward with most of the benchwork along the walls. The peninsula would be the most challenging, but there is room for some partial stud walls to support either open grid or L-girder construction. Being a large layout with lots of trains, I would highly recommend an advanced DCC system with multiple boosters and wireless walk-around throttles.
Operations
This layout could easily keep 4-6 operators busy for a few hours. The stars of the show are definitely the unit coal trains. Because of the flood loaders, it would make sense to stage at least a portion of the trains at the loadouts, freshly loaded. The majority of the operations would be running loads down the branch to Grand Junction and on to staging and running empties from staging up to a specific loader where most trains would be cut in two for loading. Actual trains on the branch could be pretty short (44 cars in at least one case), so the loadouts and passing sidings are designed to support trains of about half this length–3 locomotives and about 25 cars (the staging tracks will support much longer trains). In its heyday, the branch loaded about 4-5 trains per day (the West Elk loader at Hawksnest could load two a day), so it wasn’t unusual to see multiple trains in the same area, especially Somerset to Hawksnest. This traffic and the amount of hidden trackage in two helixes is enough to justify a full-time dispatcher.
There is also enough work for two locals and a Grand Junction yard crew. The first local would be the North Fork Local which would run out of Grand Junction and work the industries between Delta and Hawksnest including the primarily agricultural tracks at Austin, Lazear, Hotchkiss and Paonia and the single-car loader at Bowie. This job could be a simple one or a busy one depending on how many industries you wanted to “activate.” The second local would be the Montrose Local. In the UP era, this local was down to once a week, but it could be run every session. This local would start out in Grand Junction and work the industries along the line between Grand Junction and Delta including the many industries in Delta. The remainder of the train would be cars bound for Montrose that would be run into staging. On the next session, this local could be run in reverse working its way from Montrose to Grand Junction. The Grand Junction yard crew would do some light classification work to put together and disassemble the locals, and it would serve as a local crew working the spurs and railroad facilities (car shop and engine facilities) along the yard. This crew could also serve as a hostler/shuttle crew to perform motive power moves and to bring coal trains into and out of staging for crews to pick up in the yard (where crew exchanges were made on the prototype).
This layout lends itself to a wide variety of operations not only with the numerous industry tracks that could expand or contract the operations but also in the railroads that could be run. Because the D&RGW to SP to UP shift all happened within a decade, the layout could easily represent any of those railroads by swapping out power and some cars. Motive power in the late D&RGW days and early SP days was SD40T-2s and SD45s on the coal trains and GP40s/40-2s on the locals. Motive power in the late SP era was normally AC4400s while in the UP era it was a mix of modern 6-axle power. Ex-Rio Grande GP40s/40-2s continued to provide the local power well into the UP era.
Things I Like About this Plan:
- Captures all the key features of an interesting line
- Lots of coal trains
- Good mix of operations
- Looong mainline run
- Option for continuous running
Things I Don’t Like About this Plan:
- Lots of hidden track
- Need to walk around peninsula to follow trains
- Significant compression between scenes
- Some narrow scenes
Related Products: