


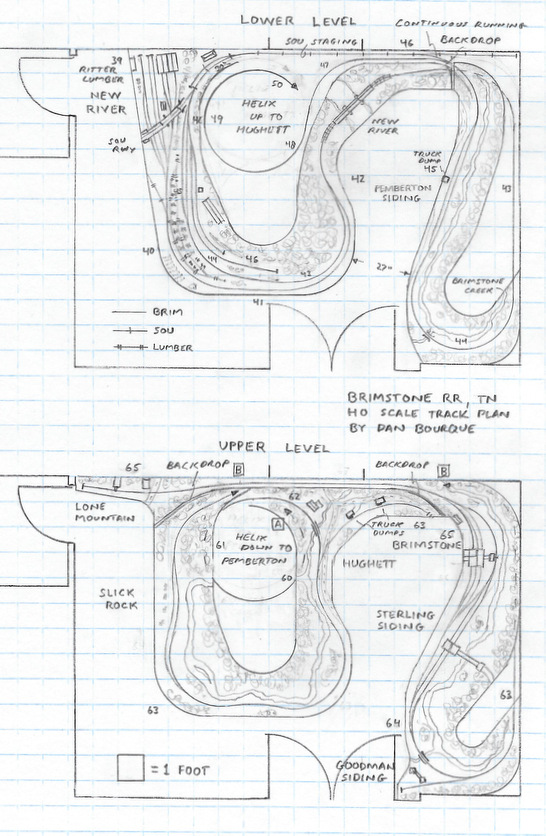
- Size: 13′ x 18′
- Scale: HO
- Minimum Radius: 24″
- Minimum Aisle Width: 27″
- Designed by Dan Bourque
The Brimstone Railroad was a quaint little coal hauler in northeastern Tennessee that connected with the Southern Railway’s CNO&TP line at New River, TN. What made the Brimstone unique was its motive power, a pair of three-truck shays that ran the 12-mile line into the 1960s, long after the Southern had dieselized. The Brimstone majored in coal and minored in lumber up until the early ’60s when Ritter Lumber shut down its operation in New River. In 1966, the Southern purchased the Brimstone and ran sporadic mine runs for the next few decades. The tracks were finally pulled up in 2015.
The Layout
This double-deck track plan captures all the key locations of the Brimstone in its heyday (1950s). The lower deck represents the northern end of the line from New River to Pemberton Siding. The key feature is the unique track arrangement at New River where the Brimstone’s engine house and W.M. Ritter Lumber occupied the low land, and the Southern crossed high above on a trestle that spanned the New River. The Southern was reached via a steep grade on the Brimstone that climbed the hillside behind New River. At the top of the grade was a small interchange yard and scale track, and between the interchange and the lower tracks was a large terraced hillside with racks for drying lumber serviced by narrow gauge tracks. The lower level also contains the main scenic feature of the line, the long bridge across the New River. The final scene on the lower deck is Pemberton Siding, home to a truck dump loader and an operational necessity for lightening trains before climbing up the hill to the Southern.
The upper deck represents the southern half of the railroad from Hughett to Brimstone and Lone Mountain with most of the loaders and a couple of short spurs. It’s organized into three “scenes.” The first is the line from Hughett to Slick Rock including the spur which served three small loaders (two are represented here). The tiny bridge at Hughett is an important operational feature because this is where the Brimstone locomotives took on water. The second scene is from Goodman Siding to Brimstone, home of the two largest loaders on the line. The Brimstone tipple also has a small chute over the mainline where the locomotives take on coal. The final scene is just a few square feet representing a pair of small loaders at the very end of the line near Lone Mountain.
The challenge with designing a layout for this room (an actual room in my house), is that the closet is a workshop and two walls must be left clear. This necessitates a small minimum radius (24″) and one tight pinch point. The other challenge with the Brimstone is the shays. Shays just look much cooler from their right side than their left, and the Brimstone always kept theirs pointing north toward New River. The locations of Brimstone creek to the west and the hillside to the east for most of the railroad would normally drive a trackplan where “left” looking from the aisle is north. Unfortunately, this would mean hiding the shay’s pistons for the entire layout. Instead, I chose to orient the track where right is north for all of the scenes except New River. While it means the creek is generally between the tracks and the backdrop, it does have the benefit of orienting viewers as if they were on road that paralleled the tracks similar to the perspective of most photos of the Brimstone.
One final feature of this track plan is the crossover switch between the Southern staging track and Pemberton Siding. During an operating session this would be left parallel, but when crossed over it provides for continuous running on the lower deck.
While the Brimstone only ran one train at a time, DCC is still recommended for flexibility, especially for wireless throttles which would be handy on this layout. An entry system would be adequate to control the few locomotives, but a booster would be needed for good power distribution.
Operations
This layout would allow 1-2 operators the full experience of operating the Brimstone as all of the major scenes, industries and tracks are represented. Brimstone mine runs were about 12 cars long, and the railroad interchanged anywhere from 12-36 cars a day with the Southern, so in any given session, 1-3 trains would be needed. Each train would start by picking up a shay (#35 and #36 are pretty darn close to the Bachmann Spectrum three-truck shay model) at the New River engine house. The Brimstone didn’t use cabooses, so perhaps the first order of business would be to collect a boxcar of lumber or a hopper of woodchips at Ritter Lumber before heading up to the Southern interchange. At the interchange, the shay would grab about a dozen empty hoppers (all Southern cars) and head downhill toward the mines with the locomotive facing backward and the empties trailing. Depending on the type of operating session desired, any number of loaders could be active or idle, and each loader could have anywhere from one to a dozen loads. The Brimstone didn’t have many run-arounds at its loaders, so having a shay traveling miles sandwiched between any number of loads and empties was pretty common.
During the session, the shay would need to fuel up and take on water. They took coal from a chute over the main that ran from the Brimstone tipple, and they took on water by pumping from a hose they lowered into the Huntsville Branch of Brimstone Creek while sitting atop the small bridge at Hughett. The Brimstone was known for its clean locomotives, so their chores also included cleaning coal dust off the locomotive at Brimstone before returning home (not sure how to model that other than a stop). Once the crew had 12 loads, they could return north to the Southern interchange, but not before setting off loads at Pemberton Siding–six loads was the max up the hill. Once up to the interchange, the crew would weigh the loads (track closest to the backdrop) before returning for the remaining loads at Pemberton and repeating the scale work. From here, the crew would either call it a day and head back to the engine house or grab a fresh set of empties and repeat the process all over again serving a new set of loaders. Because of all the switching moves and the slow-moving shays, all of this work for a single mine run would probably take 90-120 real-time minutes.
There’s enough room on the Southern track to store a pair of F-units or GP7s, about 18 cars and a cab, so for a busy session, a Southern crew would pop out of staging to work the interchange, pulling loads and replacing them with fresh empties before heading back into staging.
For variety, the layout could also be run as a Southern-era layout with F-units, GP7s and GP38s replacing the shays. In this case, the interchange tracks, engine house and Ritter lumber would remain dormant and the tipples could be worked much as in the Brimstone era.
Things I Like About this Plan:
- Models an entire railroad
- Little need for staging
- Shays in the ’60s!
- Lots of interesting switching and operations
Things I Don’t Like About this Plan:
- Tight curves
- Lots of hidden track
- Limited variety in operations
Related Products: