


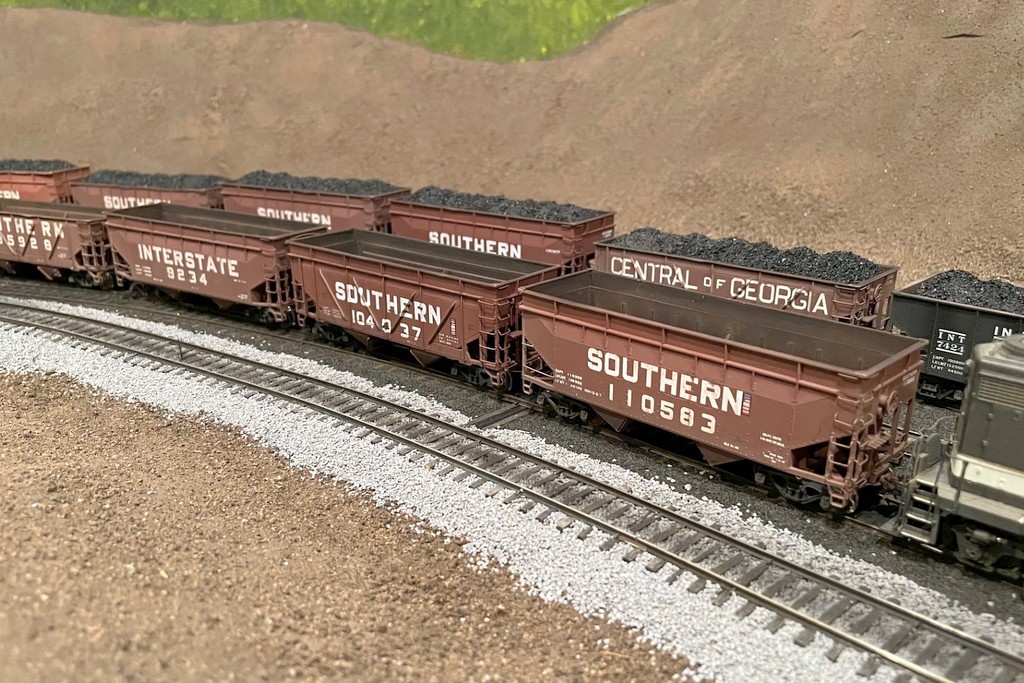
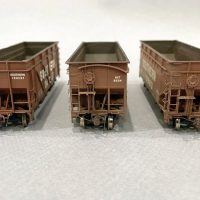
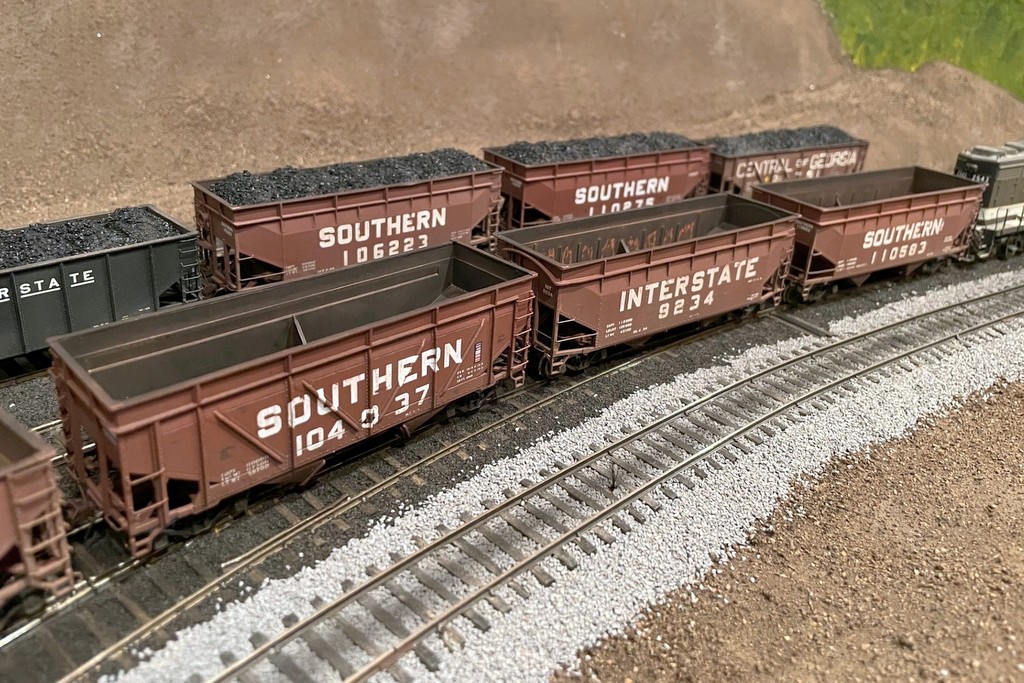
Kitbashed Southern extended height hoppers in three styles awaiting loading on the layout
One of the things I love most about modeling coal-hauling railroads is the variety of hoppers employed by all the railroads. Each line seemed to have their own unique preference for sizes and mixes of cars, and the manufacturers made them in so many varieties. The 1960s and ’70s were especially eclectic as railroads engaged in hopper rebuilding programs to extend the lives of otherwise obsolete cars, especially 50-ton twin hoppers that were the mainstay of coal hauling for most of the 20th century. This is an easy kitbashing project to bring one of the more distinctive modifications in Appalachian coal hopper history to your layout.
History of the Southern’s Extended-Height Fleet
Two freshly modified hoppers from Southern’s second run of extended height offsets (date and location unknown, Dan Bourque Collection)
Rebuilding programs often involved increasing the capacity of these cars by extending the sides upward to the height of the newer 100-ton cars coming off assembly lines. Railroads like the C&O, L&N, and SCL gave their rebuilt cars all new sides and often increased their rating to 60 tons. The Southern Railway, on the other hand, took a simpler and more economical approach by merely building 18″ steel extensions on top of several hundred twin hoppers in the mid 1960s. The Southern was an early adopter of 100-ton cars and unit trains, so it seemed less interested in rebuilding old cars. Still, smaller hoppers were still useful for single-car shipments, and these distinctive modified cars made their way across the U.S. As the ’60s turned into the ’70s, much of the coal in the busiest of the Southern’s coal fields in southwestern Virginia was being shipped from dozens of smaller loaders to the giant transloader at Appalachia, VA using old hoppers in captive shuttle service. Known locally as “yellow ball” hoppers, these old cars were a motley assortment, and most of the Southern’s extended-height cars ended up in this service, especially since they could handle more cubic feet of coal, and they could be overloaded and abused without a requirement for interchange. Despite the abuse, many of these modified hoppers lasted into the 1980s, a testament to the general toughness of a twin hopper.
The Southern seems to have experimented first with some second-hand hoppers given to the newly acquired Interstate Railroad in 1964. Hoppers 9200-9234 seems to have been a motley crew of different hoppers, so it’s unclear how many got the side extension.

A well-worn example of an extended height hopper from Southern’s first build (date and location unknown, Dan Bourque collection)
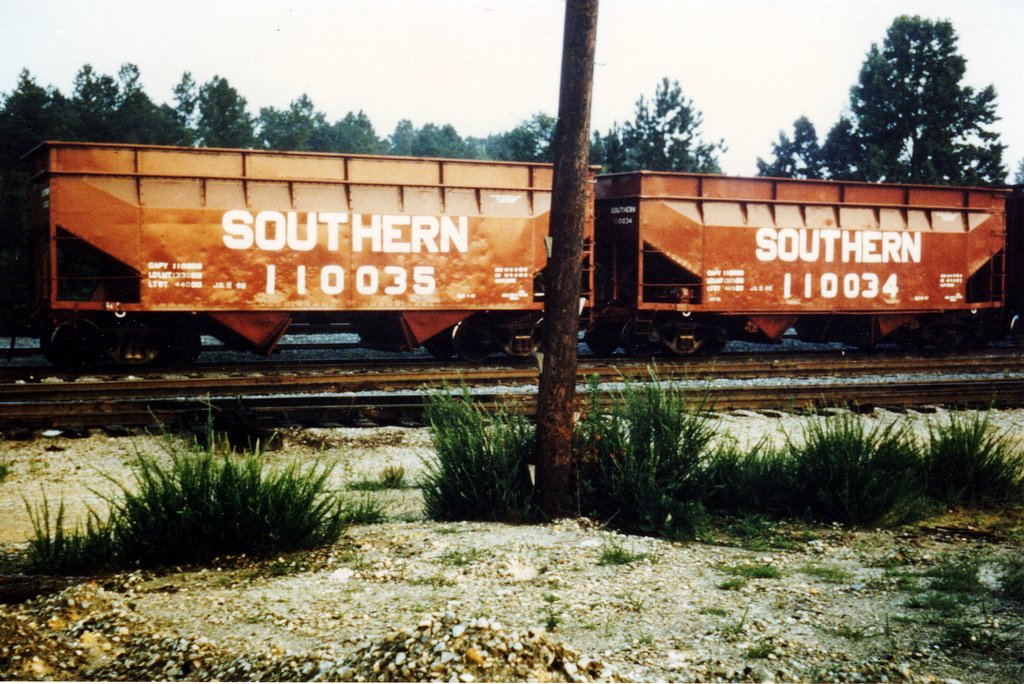
The Southern began their modification program in earnest in 1965 starting with 500 33′ offset hoppers that were renumbered into the class 106000-106499 between 1965-1967. The Southern began a second class using around 640 offset hoppers renumbered 110000-110643 between 1966-1968. These were made from various classes of offsets originally built between the 1930s and 1948. Their original height was 10’8″, and their modified height was 12’2″, and their cubic capacity went from 2145 cu ft to 2592.
The modification program was successful enough that the Southern extended the modifications to other types of hoppers. Between 1966-1968, they converted just over 300 rebuilt war-emergency hoppers (previously rebuilt with steel sides) by adding these 18″ height extensions, bringing the cars to 12’2″ and raising their cubic capacity from 2045 to 2516 cu ft.
Picking the Right Model Starting Point
I’ll start with the offset hoppers. There are several 33′ offset hoppers to choose from in HO scale. The Kadee car is beautiful but a bit pricey for a kitbash. Atlas makes a nice car in their “Trainman” line, and the old Athearn blue-box kit is still easy to find and easy to work with. The Atlas car has the slightly upturned ends on the bottom sill like the Southern cars, so it’s actually a more accurate starting point–because you can get this car with arched ends, I chose an Atlas car as the starting point for my model of Interstate 9234. On the downside, I find the Atlas plastic tougher to work with than the Athearn, the taper on the sides is more difficult to work with and requires bends on the extended sides, and the grab irons are an odd width if you want to replace them. For the rest of my offsets (I’ve completed five now), I’ve used the old Athearn kits that I’ve acquired cheaply over the years. Their dimensions are overall correct, the plastic is easy to work with, and the top chord allows the side extensions to be built completely straight. For the war emergency rebuild version, I used the excellent Proto 2000 kit with steel sides–I’ll address the differences at the end.
Modifying the Car Body
Starting an undecorated or stripped car, my first step was to clean up any plastic flash from the molding process and to remove all grab irons and wire bracing from the ends. I first started to use my “thin ’em down” technique (shown here) but later decided to just replace them all with wire. I used a combination of X-Acto No.11 blade, X-Acto chisel blade, and wire nippers. I tried to leave the rivet/bolt detail intact–it takes some extra time, but it adds a little more detail, and it makes it much easier to drill the holes in the right spots. Don’t forget the grabs adjacent to the coupler. Next, I removed the upper portion of the middle vertical braces on the ends using a chisel blade and cleaning up with sandpaper for the Southern offset models only–photos reveal these extend just above the end sheet but don’t go all the way to the top. Finally, I removed the overhanging edges of the top chord on the corners with the ladders as seen in photos. It’s just a perpendicular chisel cut into the top chord just beyond the ladder followed by repeated shallow chisel cuts to remove the unwanted pieces. In the end, the top should all be the same height, but the ladder corner tops should be flush with the sides of the car.
Making the Side Extensions
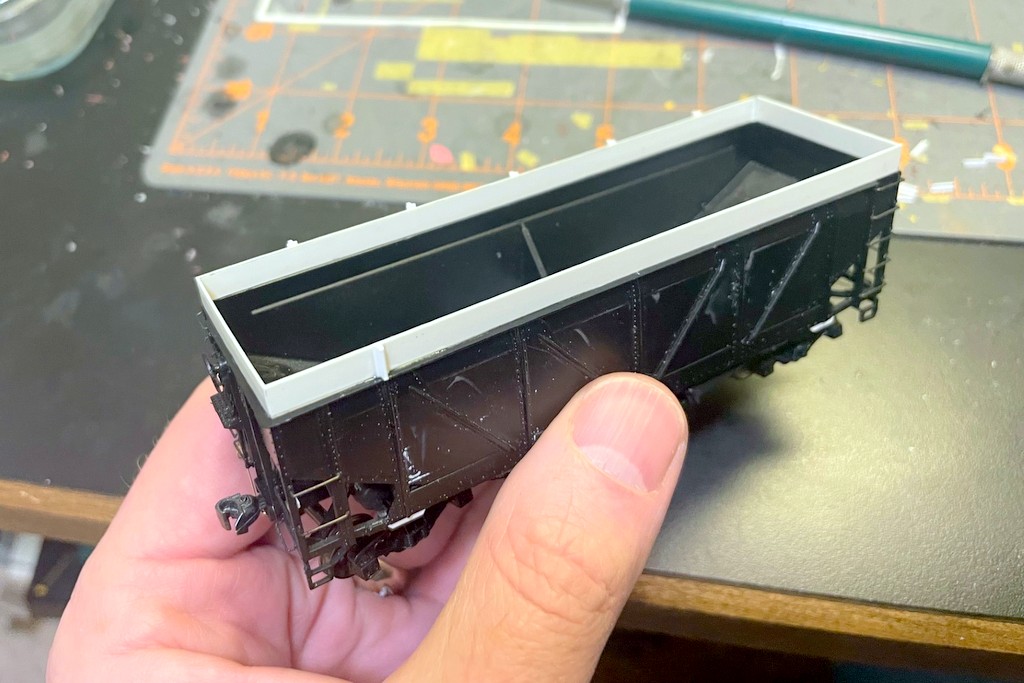
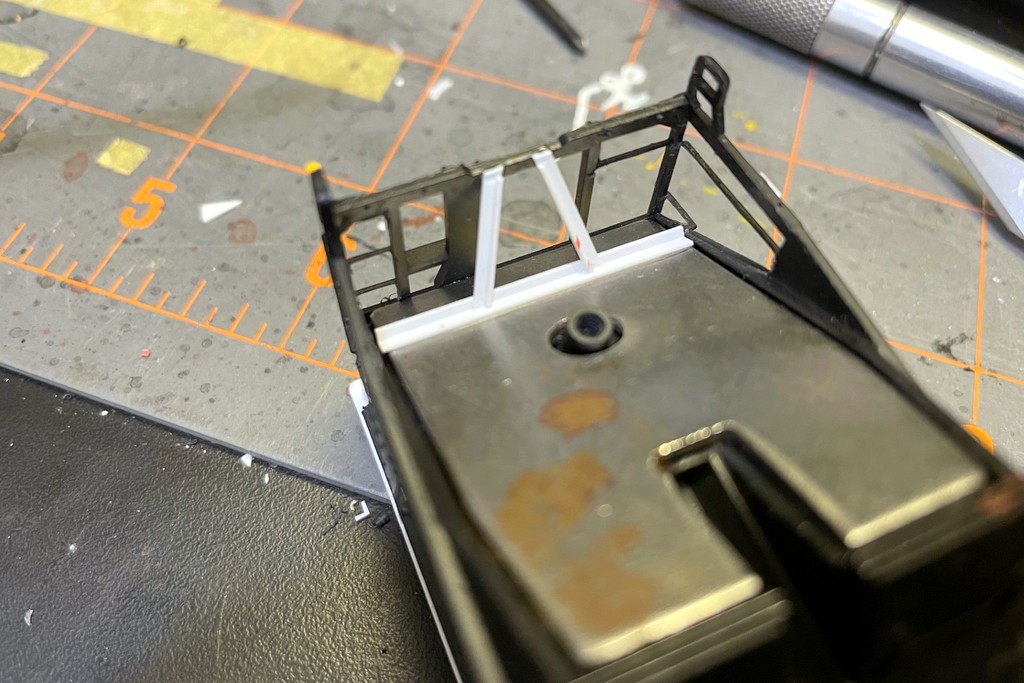
Next I built the side extensions from sheet, strip, and shaped styrene. The sides are cut from .015″ styrene sheet, marking the width and scoring along a metal straight-edge with a No 11 X-Acto blade. If you have a scale rule, you can cut them about 16 scale inches (the rest of the 18″ will come from the top chord). If you don’t have a scale rule, they’re about 3/16″ tall. For length, I just cut them slightly bigger than the insides of the car, about the same length as the model’s sides. The extension ends were cut to fit between the extension sides. With the pieces cut and the model’s top sanded smooth, I secured them to the hopper using plastic cement in the joint and on the inside and outside edges of the joint. The arched ends on the Interstate car were a little more tricky, but I just traced the outline of the arch onto styrene and made a careful curved cut to fit.
Proto 2000 war-emergency rebuild hopper getting the ends of its height extensions
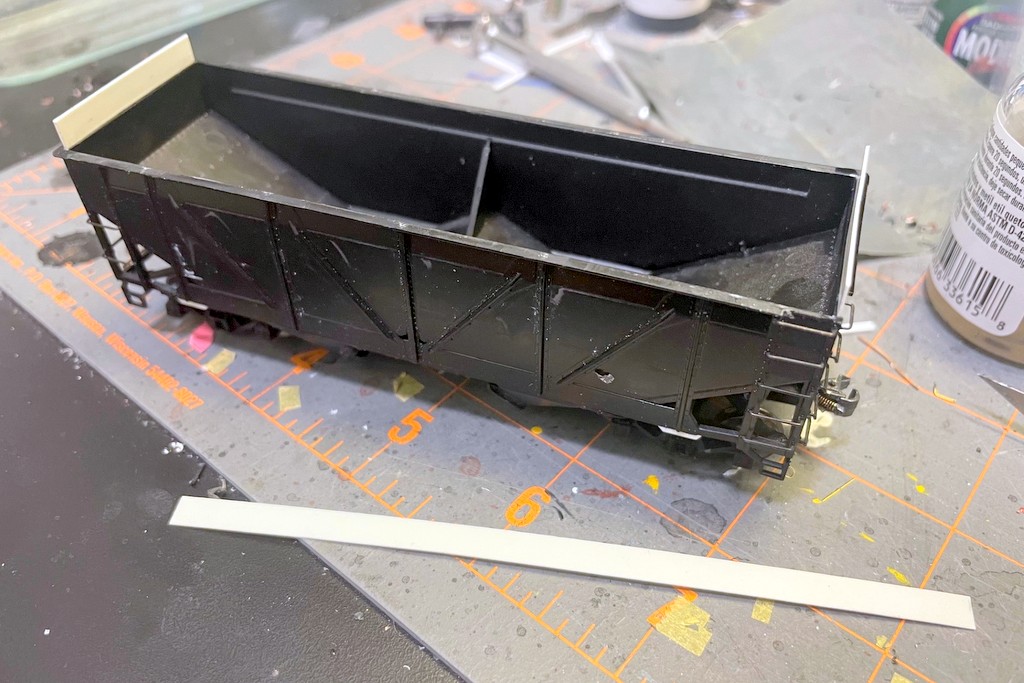
All four sides are on, now the ribs are being added
Once the glue was dry, I added the ribs cut from Plastruct 90562 1/16″ Tee, 14 total per car (5 on each side, 2 on each end). I cut them slightly oversized and glued them to the extended sides just above the corresponding ribs on the original model, sighting down the rib line and using a square to get them perfectly vertical. Once the glue dried, I used a chisel blade and small flat file to make the rib height the same as the sides. Then I used styrene strip for the new top chord and glued it on flush with the insides of the new extensions. I used Evergreen strip–I’m actually not sure which exact product, but it’s about .015″ x .080″ for the long edges and .015″ x .060″ for the ends. I topped off the corners with new corner caps cut from .010″ styrene and slightly dog-eared on the inside corner–I don’t have dimensions, but about a scale square foot is close. Once the glue on the caps dried, I used a flat file to slightly round the outside corner and top outside edges of each cap.
Underbody Details
Scratchbuilt slope-sheet brace from styrene strip and L-angle
Next I added the weights using CA. The Athearn and Atlas models don’t come with slope sheet braces, so I made my own out of styrene L-angle (Evergreen 291 .060″ angle). I used the “that looks about right” approach here and cut the first angle the same width as the weight and glued it across the weight using CA just to the inside of where the inside vertical ladder piece sits on the sides. Then I added two styrene strips to fit between the horizontal angle and bottom end sill just above the couplers. I had to bend these pieces at an angle on the ends to get them to sit against the bottom end sill. I added smaller strips to one edge to turn them into angled pieces. When the glue dried, I used a flat file to clean up any remaining angle bracing protruding below the end of the car.
Next I went to work on the undersides. The Atlas car is pretty much good-to-go here–it has acceptable brake detail in the exposed ends, and the trucks already have metal wheels. The only modification I made was to add metal Kadee No 5 couplers (I still use No 5s because they couple a lot better than the No 58 scale-head couplers on curves). While working on the couplers, I drilled a #78 hole in the center of the coupler pocked cover about 1/32″-1/16″ back from the face to hold the coupler cut bar later. For the Athearn cars, the brake gear needs a lot of help! First, I used an X-Acto blade to remove the holding tab for the air reservoir and to shave off the bulges from the angle pieces going to the corners (where it tells you to put the triple valve). I filled in this hole with putty and sanded it to match the angle piece once dry. I drilled a hole the size of the plastic tabs for the air reservoir into the bolster behind the tank–this allows the tank to be mounted horizontally instead of facing upward per Athearn’s directions. For the triple valve, I drilled a new hole into the top of the coupler pocket just behind the coupler. I drilled two holes into the front of the air reservoir and into the long side of the triple valve which will face the air reservoir (maybe #74? just big enough to hold a piece of copper wire). I glued these two pieces into place and let them dry. Then I stripped some insulation off of a piece of old Cat 5 ethernet cable to reveal the copper. It’s very malleable and a great size for making air lines. I bent two air lines to go between the air cylinder and triple valve and secured it with CA. I cleaned up the brake cylinder and glued it into the existing hole per instructions. I also added a little triangle support between the outside end of the brake reservoir and the bolster wall it’s mounted on.
While I despise them, I used the Athearn metal clips to hold Kadee No 5 couplers with the trip pins cut off (my preference). To get them to hold better, I bend the metal sides inward slightly for a tighter fit. For the trucks, I remove the plastic wheels and replace them with Reboxx 1.040″ axle semi-scale metal wheels (which are out of production) after reaming the trucks out with a “truck tuner.” Finally, I use an X-Acto blade to remove the little plastic ovals that stick up between the truck bolster and the weight, filing things down until the bolster wall fits snugly against the weight. At this point, I usually glue the underbody into the rest of the shell, making sure I’ve got the brake gear under the brake wheel end of the model.
Body Details
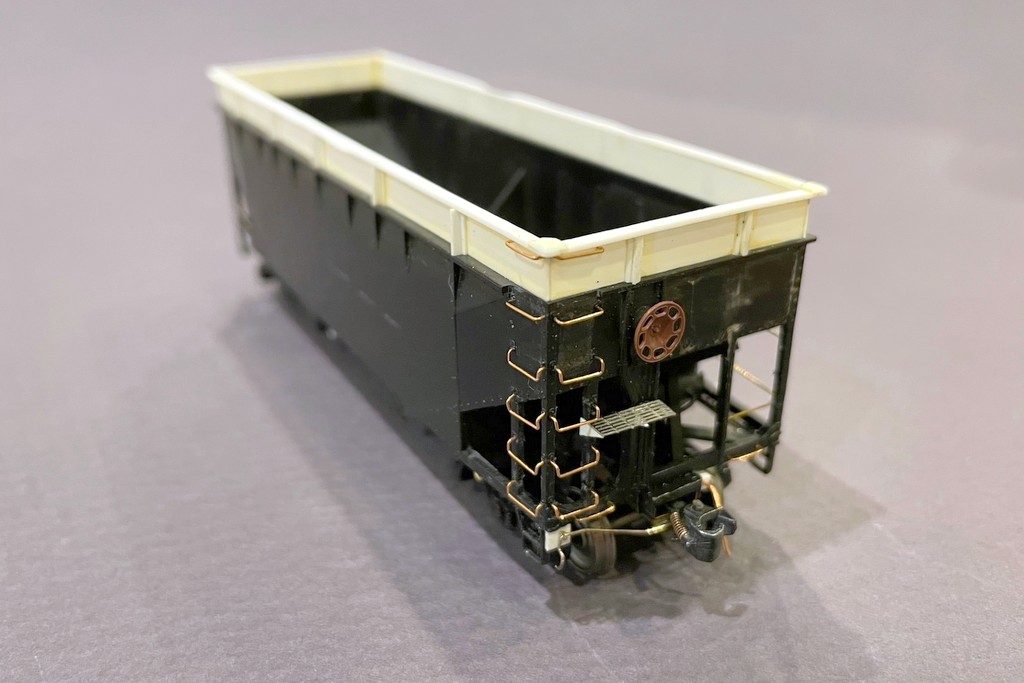
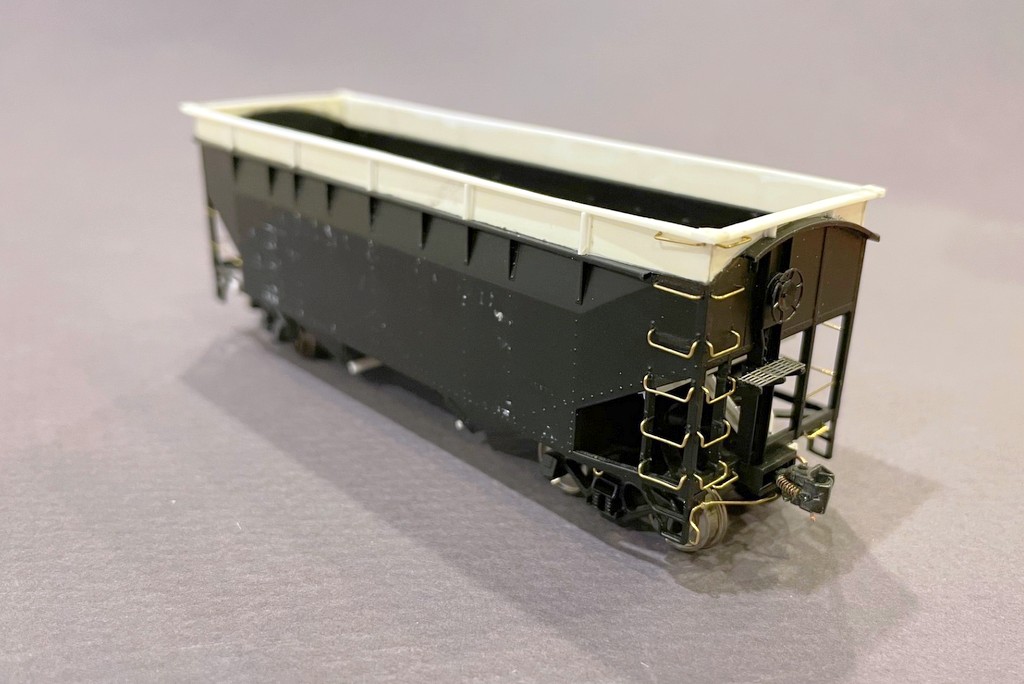
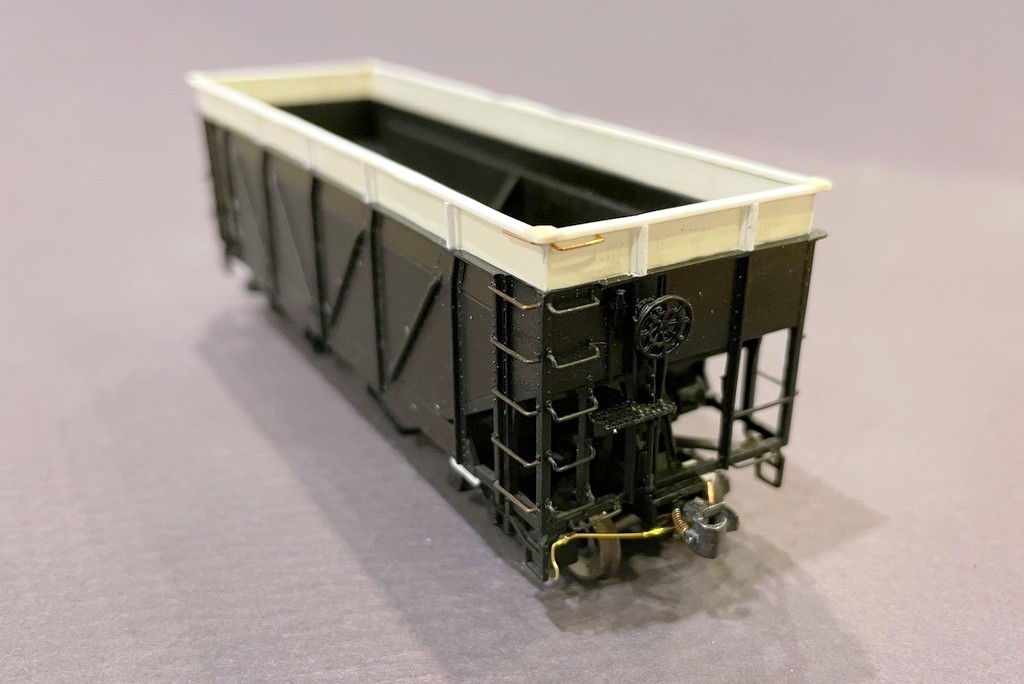
This is one of the “standard” cars built from an Athearn offset hopper ready for paint
Back on the body, I drilled all the holes for the grabs and wire bracing and installed a combination of Tichy 18″ straight and 18″ drop grabs. There’s one grab that goes above each of the ladders on the extension (four total), just below the top chord. I used drop grabs on all the ladders except for the top two rungs, the highest on the body and the ones on the extension. I also used a pair of straight grabs to flank the coupler on the ends. The Atlas car ladders were tougher because the end ladders are a little narrower than 18″ and the side ladders are a little wider. I ended up bending my own grabs on a homemade jig for these grabs, and they worked out well. For the longer wires opposite the ladders, I bent them from .012″ brass wire. While I had the brass wire out, I made some tow loops. I bent the wire into a 180-degree “U” around the point of a thumbtack, then cut either side of the loop to make a “J” shape. The short side of the J should be the distance you want the loop to extend from the body. Then I drilled a #78 hole into the bottom of the side sills using photos as a reference, put on a dab of CA, and inserted the long end into the hole–this is a LOT easier than trying to drill two closely spaced holes.
Interstate 9234 in progress–note the arched ends and homemade wire grabs to match the odd widths on the model
Next I added a small tack board using a thin piece of scrap styrene strip and mounted it on the lower left bottom sill per photos. For the Athearn cars, I also added a small rectangle of styrene under the bottom end sill on the left side against the steps where the coupler cut bar will attach. Then I added a short piece of styrene channel (Plastruct 90531 1/16″ channel). inverted under the end sill just to the right of the coupler where I’ll install the air hose later. I don’t bother to measure the length, but it’s around 3/16″ long. While I had the channel out, I cut two bars the width of the hopper bays and glued them across the doors with the channel facing down. I made the trainline (air pipe) that runs under one side using a piece of .015″ steel wire and mounted it using 3-4 eye bolts (depending on the car–Interstate needed 4 based on pics) inserted into holes drilled under the sides.
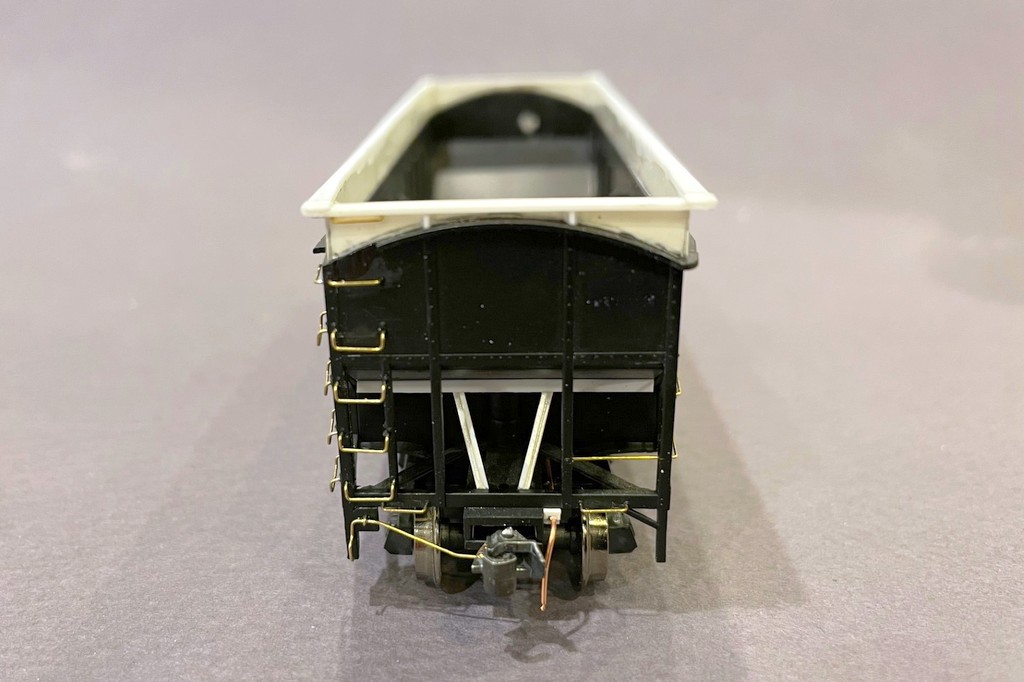
The “A” end of the Atlas model showing the slope sheet brace, coupler cut bar, and air hose
I made my own coupler cut bars using .012″ wire and a jig and attached them via CA and an eye bolt inserted in a hole drilled through the rectangle adjacent to the steps. You can easily use a DA coupler cut bar instead. One trick I do is to bend the tip upward for the end that goes under the coupler and insert it into the hole drilled into the Atlas coupler pockets previously (can’t use this technique with the Athearn metal pockets, unfortunately). I also made my own air hoses out of the inner copper wire from old Cat 5 ethernet cable. I just bent it to shape, used needle-nosed pliers to crimp the end into something resembling a glad-hand, and cut the other end at the spot it touches the bolster. Then I glued it in place with CA and covered the bottom with a second piece of styrene channel to make a box around the hose–this makes them pretty bulletproof on the layout.
The final prep step was replacing the brake platform and brake wheel. I like to use Kadee brake wheels, Universal on most of these particular cars. For the Athearn cars, you’ll want to fill in the back side of the brake wheel hole inside the hopper with some putty. For the platform, I actually left the existing stubby platform in place and cut a new rectangular platform from Plano sheet walkway material. I glued it on with CA, and once it was secure, I added pieces of styrene strip cut into elongated triangles between the vertical posts and platform to represent the supports.
I also added a few dings and dents with a 100W lightbulb and X-Acto blades using the techniques from the “Weathering Old Coal Hoppers” article here.
Painting and Decaling
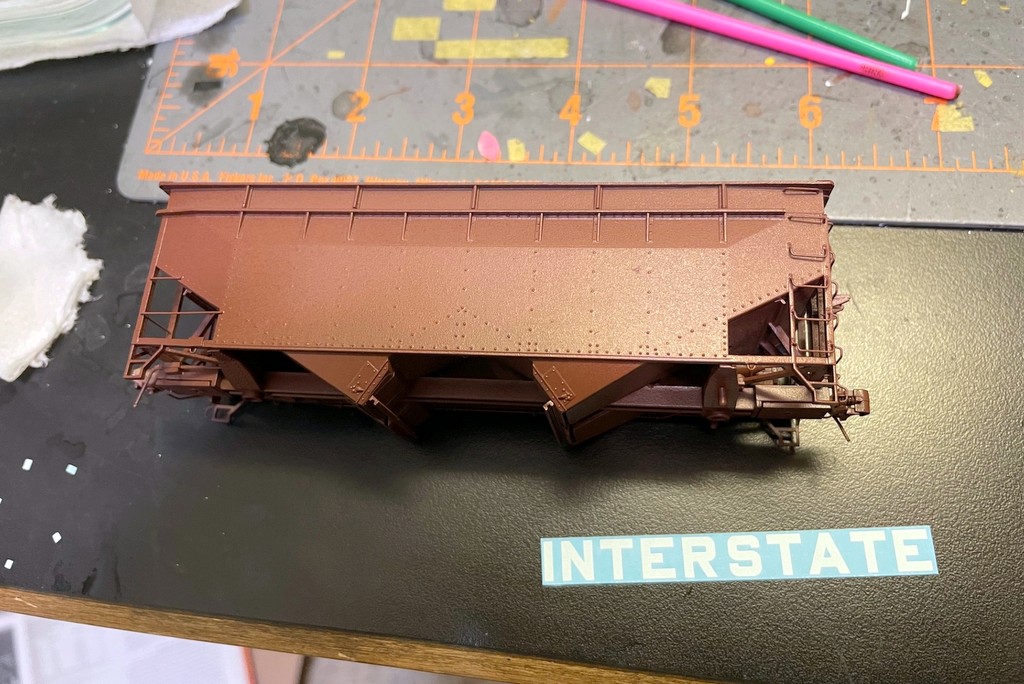
The Atlas offset has been painted and lacquered and is ready for it’s first decal to become Interstate 9234
Because I now had a black-and-white car, I first airbrushed a coat of Tamiya flat black on as a primer. I followed this with a couple coats of Tamiya NATO brown. This color is a bit less red than Southern paint, so for some of the cars, I mixed a little Tamiya flat red with the NATO brown to lighten it up. I thinned all paints with 91% isopropyl alcohol. Once the paint dried, I hit the cars with a light coat of Rustoleum clear semi-gloss lacquer to preserve the paint and give a smoother surface for the decals.
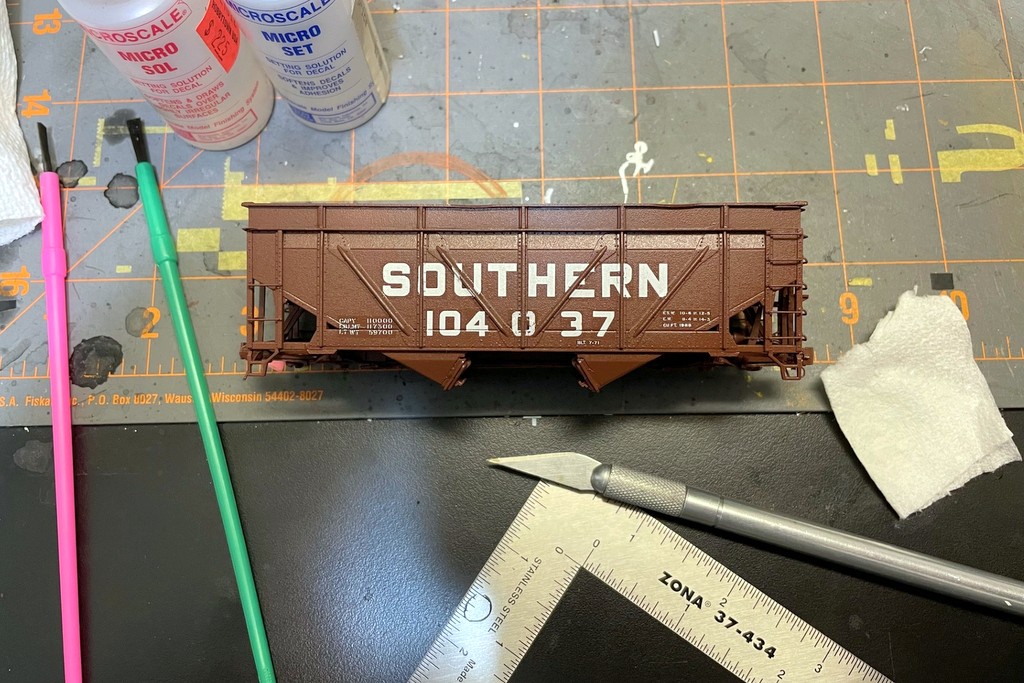
Speaking of decals, I used a mix of K4, Mask Island, and Microscale decals for these cars. I used Mask Island decal set 87-0161 on hopper 106223–the decals are great, but the font is for a more modern car with narrower numbers. Consequently, I used K4 decals for the rest of the hoppers, set K4-SOU3H-87 for the Southern cars and set K4-INTH2-87 for the Interstate car. The “INTERSTATE” decal could be applied in one piece, but the “SOUTHERN” decals had to be cut and applied individually to get the right spacing. Most of the data comes from either the Interstate decal set, a K4 hopper data set, or Microscale 87-2 freight car data set. It was painstaking to create the “INM X-YY” shop stencil, but the Microscale set has what you need if you make an “I” from an “L.” For my decals, I apply alternating coats of Micro-Sol and Micro-Set and use a damp paper towel to occasionally sop up the excess and press the decal into the paint. Depending on the size and thickness of the decal, this can take 4-5 coats, or it could take 30 coats… I’m patient, but I’m sure you can find other techniques to speed this up.
When the decals were all set, I used a detail brush and painted the tow loops white and air hoses black. I used a silver Sharpie to hit the ends and elbows of the air hoses. I then touched up any missing brown paint on the body or grabs to get things ready for weathering. I’m modeling these cars a few years into their “yellow ball” captive service, so I weathered them moderately heavily using pretty much every technique except for the letter streaking in the “Weathering Old Coal Hoppers” article.

Three of the finished hoppers representing different classes now finished and weathered
-
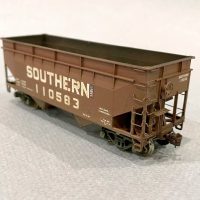
- Finished extended-height offset built from an Athearn blue box offset hopper
-
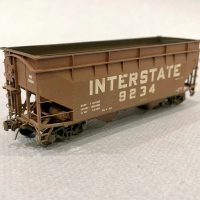
- Finished Interstate hopper 9234 built from an Atlas arched-end offset hopper
War-Emergency Rebuild Differences
Fully built war-emergency rebuild ready for paint
My model of hopper 104037 was built using most of the techniques outlined above, but overall the model is more detailed and a better starting point. The Proto 2000 model already has wire grab irons, so I installed them per the instructions. I thinned down the one molded plastic wire on the ends using an X-Acto blade to make it a rod instead of a flat plate. I also added small blocks of styrene on the sides adjacent to the truck bolsters that show up in photos. Additionally, I trimmed off the molded-on tow loops and replaced the wheels with Intermountain 33″ semi-scale wheels.
Decaling this car was tougher because of the angled ribs on the sides. I had to cut a piece out of some of the letters to make it fit… tedious, but not difficult. This also required some painting with flat white paint to fill in the lettering gaps across the ribs. Also, check photos if you can find them as the vertical placement of the “SOUTHERN” and the numbers varies. On an offset car, the top of the “SOUTHERN” is basically aligned with the horizontal crease in the side. On a war-emergency rebuild, this crease is higher. Some cars seem to have the top of the lettering ON the crease, some non-extended cars have the lettering ABOVE the crease, and like in this case, some have the lettering well BELOW the crease in about the same spot as it would be on an offset car. Variety is the spice of life… and coal hoppers!
Decaling the Proto 2000 war-emergency rebuild required cutting the decals to fit around the ribs-now awaiting paint touch-up across the ribs
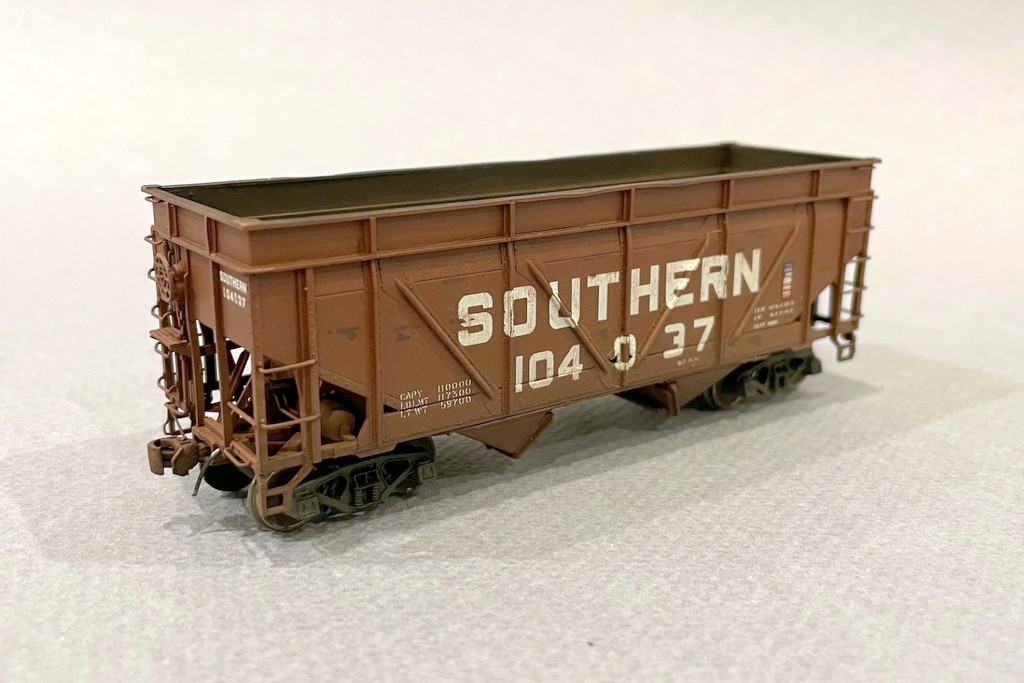
Finished rebuilt war-emergency rebuilt from Proto 2000 kit–the odd spacing of the numbers is prototypical
Conclusion
That’s it! A pretty easy project as coal-hopper kitbashes go, and it yields a very distinct car, especially in a line of more “normal” 50-ton cars. If you model the late ’60s or early ’70s, I hope you give one of these cars a shot as they did get around.
A Southern GP30 on the St Charles Switcher shoves a cut of modified “yellow ball” captive hoppers toward the loader at Mayflower, VA on the author’s layout