


- Size: 14′ x 24′
- Scale: N
- Minimum Radius: 15″
- Minimum Aisle Width: 27″
- Designed by Dan Bourque
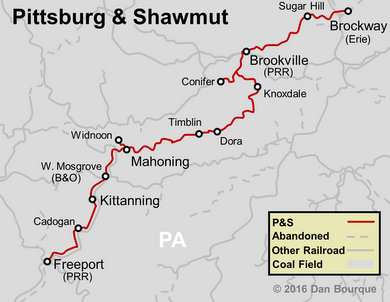
 The Pittsburg & Shawmut was a picturesque coal hauler that featured tunnels, high trestles and lots of small loaders nestled in the rolling hills of Pennsylvania. The heart of the P&S in later years was Brookville, PA, a small town that housed maintenance facilities, a small yard and an interchange with the Pennsylvania RR (and later the Penn Central and Conrail). A handful of trains, powered mostly by colorful SW9s, worked out of Brookville making this a great area to model.
The Layout
 Most track plans try to cram a lot into a little space, but I’ve taken a very different approach with this layout. This plan is in N-scale to get a good scenery-to-train ratio, and it’s deliberately spread out to provide a long run and lots of work for the few trains that plied these rails. You could say this is a plan for a modeler with lots of space but few friends to run trains. Despite its large size, the layout is essentially a really big switching layout with lots of scenery because there were no through trains here–everything was a local. While N-scale isn’t ideal for switching, it helps that all the loaders in this area were single track requiring fewer moves and switches.
This layout represents the central section of the northern portion of the railroad, from the railroad’s midpoint at Timblin to the yard at Brookville, in the ’60s-’70s, about 1/4 of the entire railroad. I kept the layout single-deck to keep it uncomplicated and to allow an uncompromised focus on scenery, most notably the imposing Sprankle Viaduct that greets visitors as soon as they enter the room. The actual viaduct, the second longest on the P&S, was 1,431 feet long and the tallest at 150 feet. This scales out to almost 9′ long and about 11″ high. The version on the layout is 11″ high and 5 feet long–not a bad compromise. Other scenic features include the numerous cuts and fills along the line, dozens of other bridges, and three tunnels. Also included are most of the active loaders that dotted the line between 1967-1977 (8 plus the lead for a 9th at Ringgold–all marked with a circled “T” on the plan).
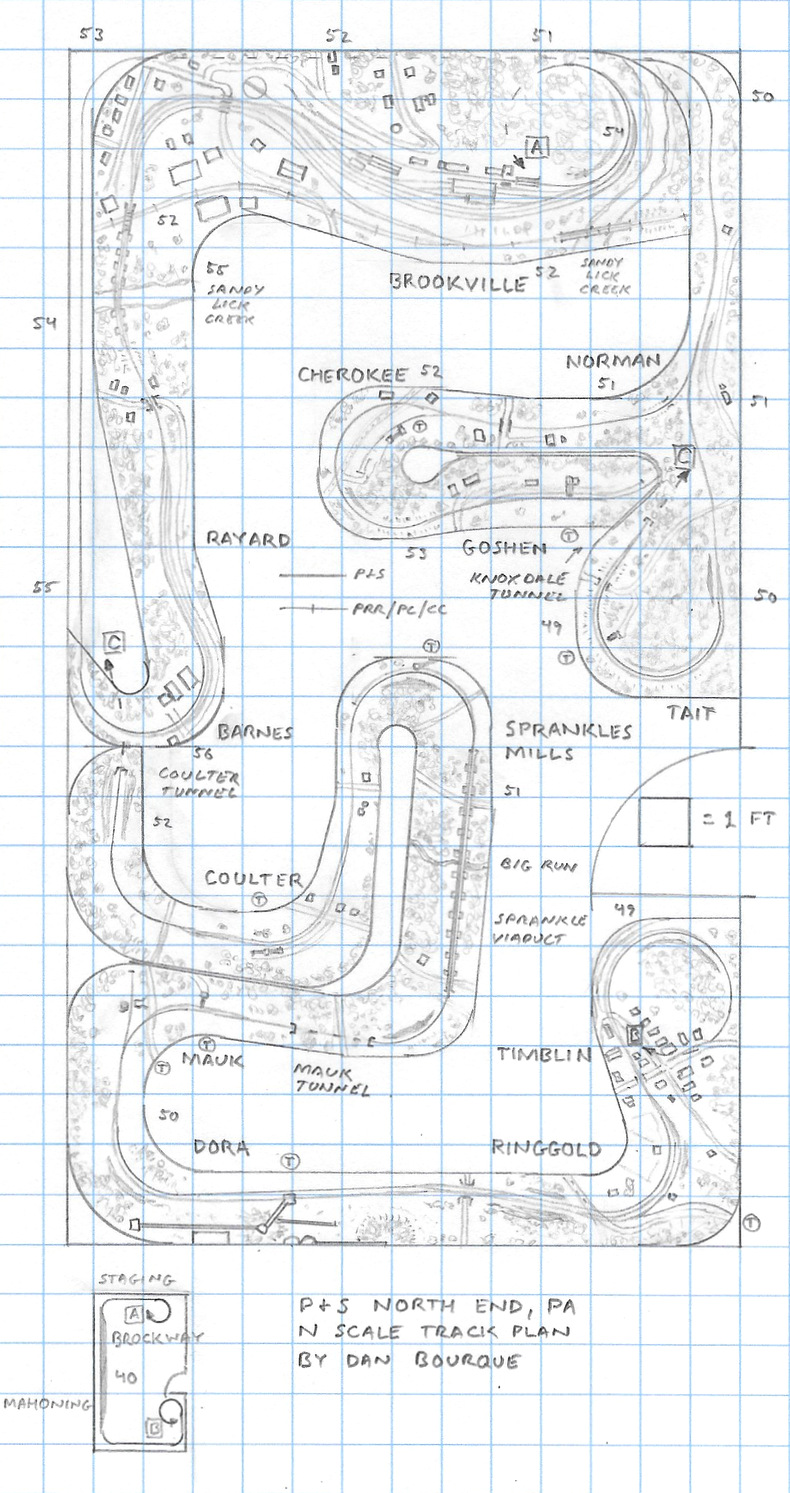
The layout starts at Brookville and works its way south to Rayard. From there, it loops back behind the backdrop and pops out again at Norman, the junction to the Conifer Branch which served two small loaders. From Tait, the track runs hidden along the backdrop again to Coulter–this skips another large trestle and two small loaders, but I thought it was worth it to include the busier area further south at Roda. Roda was sleepy in the ’60s but became home to the largest loader on the P&S in the mid ’70s. The layout ends at Timblin with its short siding and little station. Helixes on both ends link to a long, narrow staging yard that represents both the railroad’s north end at Brockway and the small yard at Mahoning to the south–this also allows for continuous running.
Construction would be simple with either L-girder or open grid benchwork. The trickest part would be the elevation of the scenery, particularly Sprankle Viaduct. While this layout lends itself to operating one train at a time, a wireless DCC system would still be helpful to simplify both wiring and walk-around operation
Operations
During the ’60s and ’70s, the P&S ran up to five different trains in the area covered by this layout: the North Rounder, South Rounder, Brookville Local, Brookville Turn, and Brookville Local. Not every train ran every day, and the work was fluid. Even running all 5 trains would only require 1-2 operators, but it would take several hours to run a full day’s worth of trains.
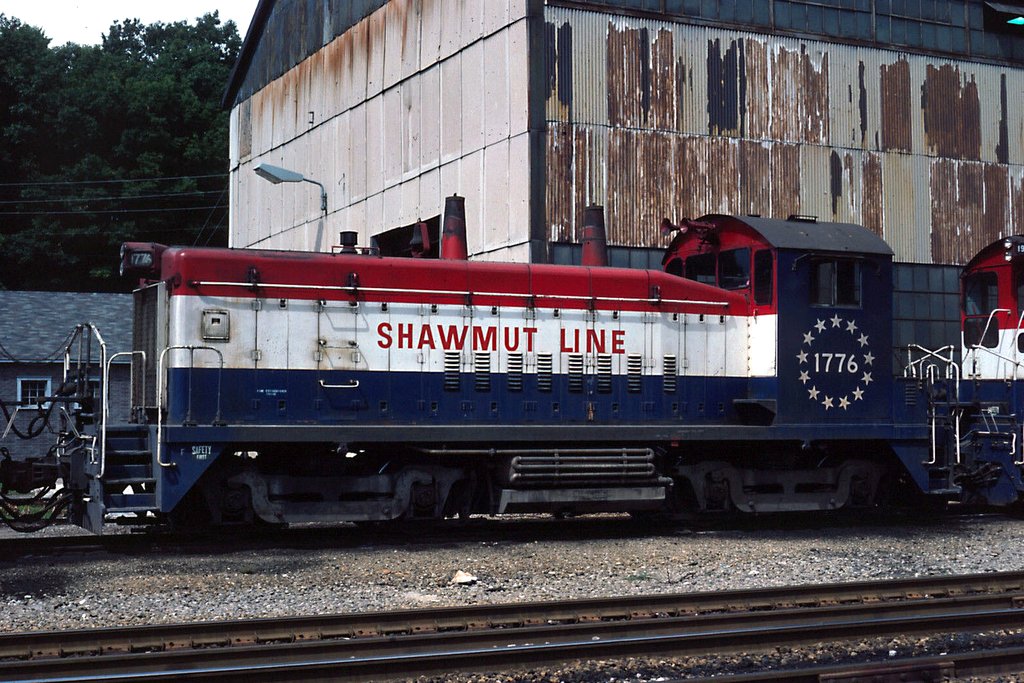
Pittsburg & Shawmut SW9 1776 in red-white-and-blue at Brookville, PA -J. R. Quinn (Dan Bourque collection)
A session might start before sunrise with a North Rounder (KBX-3) returning to Brookville from the interchange with the Erie Lackwanna at Brockway (staging) behind 1-2 SW9s. Traffic would include a car or two destined for an online customer or the repair shop at Brookville, empty hoppers for loading at points south, and some loads from the handful of tipples from the north bound for the PRR/PC interchange (the Rounders no longer ran after the Conrail merger). Next would be the star of the show: the Brookville Local (BVL-1). In reality, the local ran both north and south, but for this layout, there’s plenty of work on the modeled section to the south. Anywhere from 1-5 SW9s were assigned to the local based on the day’s work. It would grab empty hoppers from the PRR/PC interchange and the yard and head south, stopping at Rayard to fill out with empties (Rayard was used for “overflow” from Brookville and for its scale). From there, it would work most of the loaders on the mainline between Tait and Ringgold. The most important loader was Roda which loaded both 55T cars for the powerplant south at Reesedale and 70-100T cars for interchange. The local would drop empties all the way down and pull northbound loads on the way back up. The territory for the Brookville Local and Kittaning Local changed based on the workload and open and idled tipples with the Brookville Local going as far south as Mahoning; however, there’s enough work to do on the layout with Ringgold being the turn-around.
The next train would be the Kittaning Local (KGL-1) coming up from Mahoning staging through Timblin to Roda. The Kittaning Local would be responsible for pulling the Reesedale-bound coal loads from Roda, but it would also bring northbound interchange traffic in the form of coal loads and a few non-coal cars to trade with the Brookville Local (and vice-versa) using the sidings at Ringgold. On some days, the Brookville Turn (BVX-2) would be called at Brookville in the early afternoon to work the yard, the shops, Rayard and the Conifer Branch. In addition to the pair of small loaders on the branch, a nearby lumber yard used the tipple siding at Cherokee to load an occasional boxcar of pressure-treated lumber. The final train of the evening would be the South Rounder (BKX-4) which would take any remaining southbound traffic from Brookville and head toward the railroad’s southern terminus at Freeport, PA, working any remaining loaders along the way before heading to staging. Between these trains, a crew might also take a couple of SW9s and work the shop tracks and interchange at Brookville to keep things moving.
Lots of operational variety is possible on this layout. First, coal changed dramatically from the ’60s to the mid ’70s. In the ’60s, more loaders were active, but they loaded fewer cars and were more sporadic. The mid-’70s saw a major uptick in coal production but from fewer loaders. You could also model a late ’70s layout where the P&S’ red and gold SW9s gave way to red, white and blue SW9s and later a couple of GP7s. The open-air shop at Brookville also serviced non-P&S cars, so just about any car imaginable might end up on the layout. The Conrail merger also led to operational changes including abandonment of the E-L interchange at Brockway and consolidation of most of the interchange at Brookville. If you’re really adventurous, you could even model the 1990s when sister railroad Mountain Laurel had acquired the Conrail’s low grade through Brookville, and its silver, red and black GP10s would mix with the P&S SW9s on the locals, though Dora was about the only remaining loader in operation by this point. The P&S also ran occasional passenger specials in the fall (even some with steam power) which would be a cool addition if you chose to model this area’s spectacular fall scenery.
Things I Like About this Plan:
- Great scenery potential
- Relatively uncompressed
- Looooong runs for trains
- Continuous running option
Things I Don’t Like About this Plan:
- Tight-ish aisles
- Lots of hidden track (long transit times through hidden track)
- Limited operations for this expansive of a layout
- You’ve got to love switcher engines
Related Products:
Pingback: P&S South End, PA track plan HO – Appalachian Railroad Modeling