


Lots of track plans need a helix, especially if you’re trying to build a double-deck layout to capture your favorite mountain railroad. Ever wonder why I draw most of my helices on Appalachian Railroad Modeling track plans as octagons? Here’s why…
I’ve never heard any model railroader talk about how much fun it was to build a helix, but I know plenty who dread this step in their construction. Building a helix is daunting because it’s a whole lot of track and subroadbed crammed into a vertical circle, and it’s usually hidden, so its construction needs to be bulletproof. My layout requires not one helix but two, so I wanted to find a way to make them in the most straightforward way possible (see my Southern St. Charles Branch track plan here). Here was my criteria:
- Strong
- Reliable
- Efficient use of space
- Efficient use of material
- Easy to build
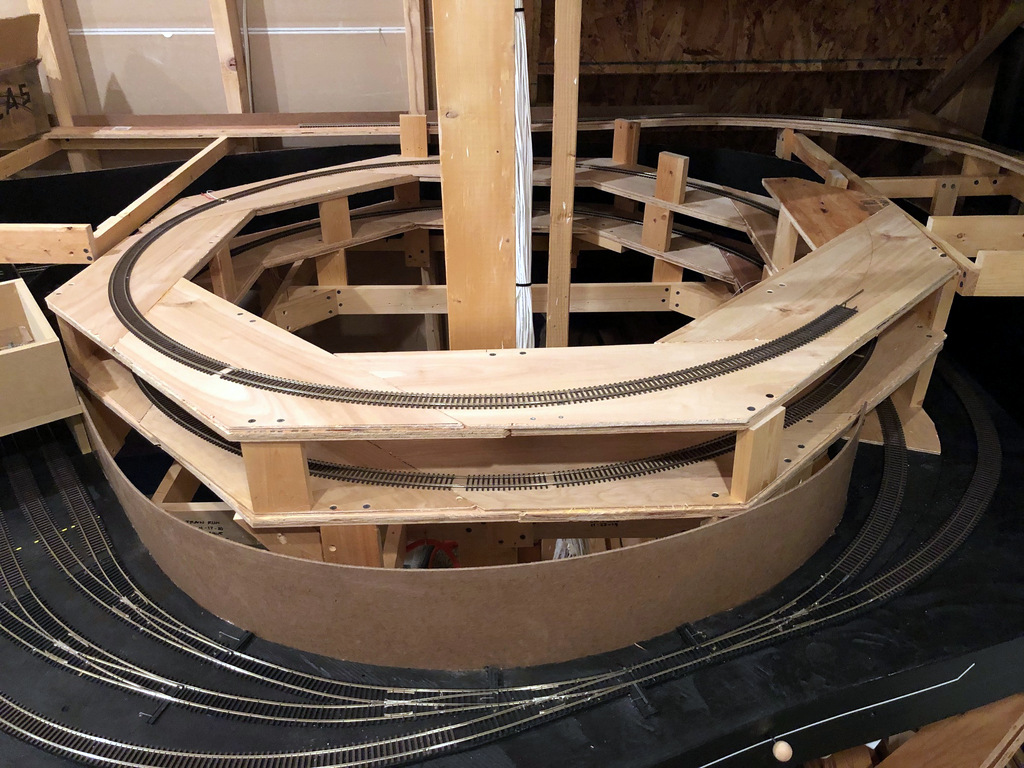
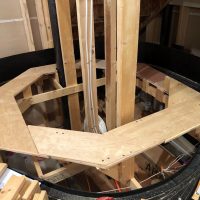
The Double Pinwheel Helix is nearly finished with 2 of its 2.5 turns complete
Plenty of articles on building a helix have been written throughout the years, but while most of them fit the “strong” and “reliable” categories, and most were an “efficient use of space,” I didn’t find one that checked both the “easy to build” and “efficient use of material” boxes. Many helix designs are circles using arcs of plywood or other material–arcs are somewhat wasteful uses of plywood sheets, and while it’s straightforward, there’s nothing easy about using a jigsaw to make dozens of circular cuts. Additionally, to make room for vertical supports, the arc often has to be much wider than the track, making it less efficient in its use of space. One of the designs that intrigued me was an octagon using 8 identical pieces of plywood. The risers were placed at the corner joints to hold the pieces together, so the design had natural wide spots for risers that allowed it to fit into a smaller square footage of layout space. However, each piece had to be cut with great precision for it to fit well, and the gaps between pieces might subject the track to elevation changes due to warping. In the end, I came up with my own design which I call the “Double Pinwheel Helix,” and I believe it’s strong, reliable, easy to build, and a very efficient use of material and space. It’s design is also very flexible and tolerant of imprecise cuts and placement. Intrigued yet?
What’s a Double Pinwheel Helix? The Double Pinwheel is similar to the octagon in may respects. It’s overall shape is octagonal, so it shares the same space-saving features by fitting into a smaller square footage by placing risers at the corners. However, rather than making each shape a single side of the octagon, the pinwheel uses identical pieces that are offset resembling a pinwheel or camera lens aperture. The “double” comes in by adding a second layer of pieces on top of the first but oriented in the opposite direction–in this way, the pieces overlap so no vertical-space-eating joiner pieces are needed. As a bonus, the pieces (all identical) can be marked with simple 45 degree angles (think combination square) and cut using a simple circular saw with little precision needed and minimal waste of plywood. Once complete, the helix is strong as a rock leading to exceptional reliability.
The hardest part of the Double Pinwheel Helix is coming up with the dimensions of the basic piece–it’s a lot of trigonometry. I’ll give you the dimensions of my helix, but unless you’re also building a 24″ helix in HO, you’ll need to determine the dimensions for the radius and width you choose. Don’t worry, I’ll walk you through it!
 Step 1. Determine your radius and rise. When I’m designing HO-scale track plans, I often shoot for at least a 30″ radius. Using the formula “circumference = 2pi x radius”, a 30″ radius helix travels about 188″ in a single turn. For clearance, a helix generally has to rise about 4″ every turn in HO, so by dividing 4″ by 188″, a 30″ helix rising 4″ per turn uses a 2.12 percent grade–very manageable. However, on my layout, I simply couldn’t fit such a large helix, and 24″ radius was my max–only 150″ per turn. With my locomotives and train consists, I was willing to accept a maximum 3 percent grade, so I could climb 4.5″ per turn (150″ x .03 = 4.52″). My most problematic train for grades is a single Athearn RS3 that needs to haul 6-12 empty hoppers and a caboose up the grade–on testing, the RS3 can handle 14 empty hoppers and a caboose on a 24″ helix at 3 percent grade without slipping (it slips with 15)–good enough!
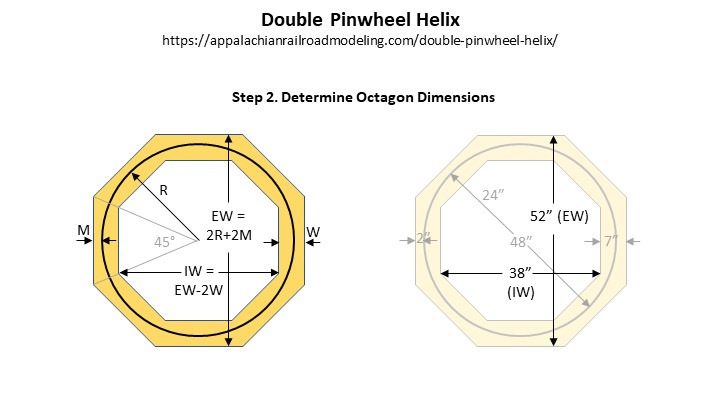
Step 2. Determine your octagon dimensions. I always advocate for a little margin with hidden track in case of derailments, so I opted for a minimum of 2″ between the track center and any edge as my margin (M). This set the external width (EW) of my 24″ radius octagon at 52″ ((24″x2) + (2″x2) = 52″). Easy enough, but what about the inside width (IW)? A 5″ width (W) of each section is sufficient to provide a 2″ clearance on the inside corners with a 24″ radius, but I had room on the inside of the helix to spare and wanted it extra-wide for strength, so I chose a width (W) of 7″ (it’s really enough room for a second track). Hence, the inside width of my helix was 38″ across (52″ – (7″x2) = 38″). Armed with these basic dimensions, it’s time for the math!
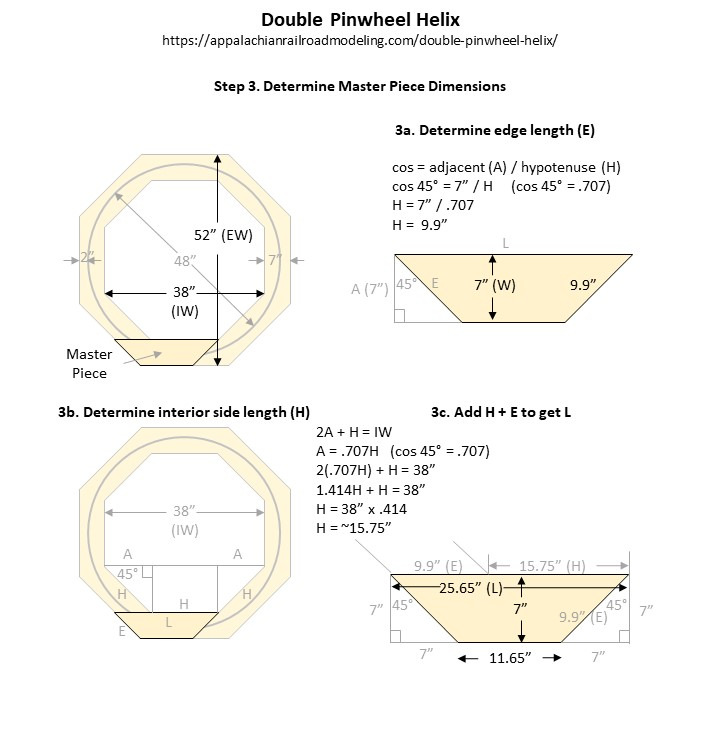 Step 3. Determine the master piece dimensions. We’re trying to find all the dimensions of the trapezoidal piece that will form each “petal” of our pinwheel. The dimension we know after step 2 is the width of the piece, in my case 7″. The next dimension we can calculate is the length of the ends (E). Because of the shape of the octagon, we know the ends will be cut at a 45-degree angle. Remember SOH CAH TOA from trig? End E will be our hypotenuse. Since we know the adjacent side (W) is 7″ wide, we can use cosign function (Cosign = A/H) to figure out our hypotenuse. With A=7″ and an angle of 45, the length of each angled end is 9.9″
The next step is a little more convoluted. We need to figure out the long dimension of our trapezoid. We’ll start with determining the length of each of the 8 sides on the inside of our octagon. What we know is our overall dimension (in my case 38″), and we know all sides are the same. If we consider each side the hypotenuse (H) of a 45-degree triangle, we can break up the 38″ to equal 1 hypotenuse (H) plus 2 adjacents (A). Because we know the relationship of A and H through cosign 45 (.707), we can substitute .707H for each A which gives us the formula 2(.707H) + H = IW. If you hated algebra like me and want to skip the formula reduction, you can just multiply the inside width (IW) of your octagon by .414 to get the length of an interior side (H). In my case with a 38” inside width, H = approx 15.75″.
In reality, though, the long side of our trapezoid is LONGER than H because it goes all the way to the outside edge of the octagon. No worries, we already know this extra dimension is the same as the angled end (E) we already calculated, so now we just have to add the side (H) we just calculated with the length of the angled end (E) of the trapezoid to get the total length (L). For me, that was 15.75″ + 9.9″ to get a total length of 25.65″. If you need it, you can get the dimension of the shorter side by subtracting 2x width from it. For my width of 7″, my short side ended up being 11.65″ (25.65″ – (7″x2) = 11.65″).
Step 4. Cut the pieces. Now that you’ve got the dimensions of your master piece, make a template from which to mark all the follow-on pieces. I made mine out of simple 1/4″ plywood taking extra time to cut it precisely. On my last layout, I opted to use two identical thicknesses (7/16″ ply, I believe) for the helix layers–it was uber-strong! For this layout, I chose to use the same materials I use for all my subroadbed: 7/16″ plywood for the first layer and 1/4″ door skin ply on top. Despite one of the layers being only 1/4″ thick, it still turned out plenty strong. I started by cutting 7″ x 96″ strips out of plywood, then I used the master piece to trace out pieces along the strip–you should be able to get about 4 pieces per strip (I was able to get 5 for a 24″ helix), and don’t worry if you lose the last 2″ or so of the point at the ends–it will still be plenty strong. You’ll need 8 pieces for the bottom layer and 8 pieces for the top for each loop of the helix.
Gluing the first two pieces of the Double Pinwheel Helix together
Step 5. Lay the foundation. The first layer of the helix is critical because it takes the weight and sets the grade. It’s best to build an octagonal benchwork structure underneath that’s just narrower or just wider than your helix so you can attach risers straight to it. I use 16 risers per level, 8 at the outside corners and 8 around the middle of the inner sides–in this way they’re staggered for extra support, and they attach to each piece at the spots furthest from the track. Determining height for each riser is as simple as dividing the climb for one turn by 16. For 4.5″, that means each riser should be 4.5/16″ (just over 1/4″) higher than the last, and each corner should be 9/16″ higher than the last corner. You could use threaded rods and nuts, but in my opinion this is overkill since once you adjust the risers the first time, they shouldn’t need to be adjusted again. Wood blocks (I’ve found 1×3″ lumber to work great) are cheaper and easier. My preferred method is to have the risers for the first level ready but to build the first layer BEFORE installing them underneath. You could just as easily install them first and build the first level on top.
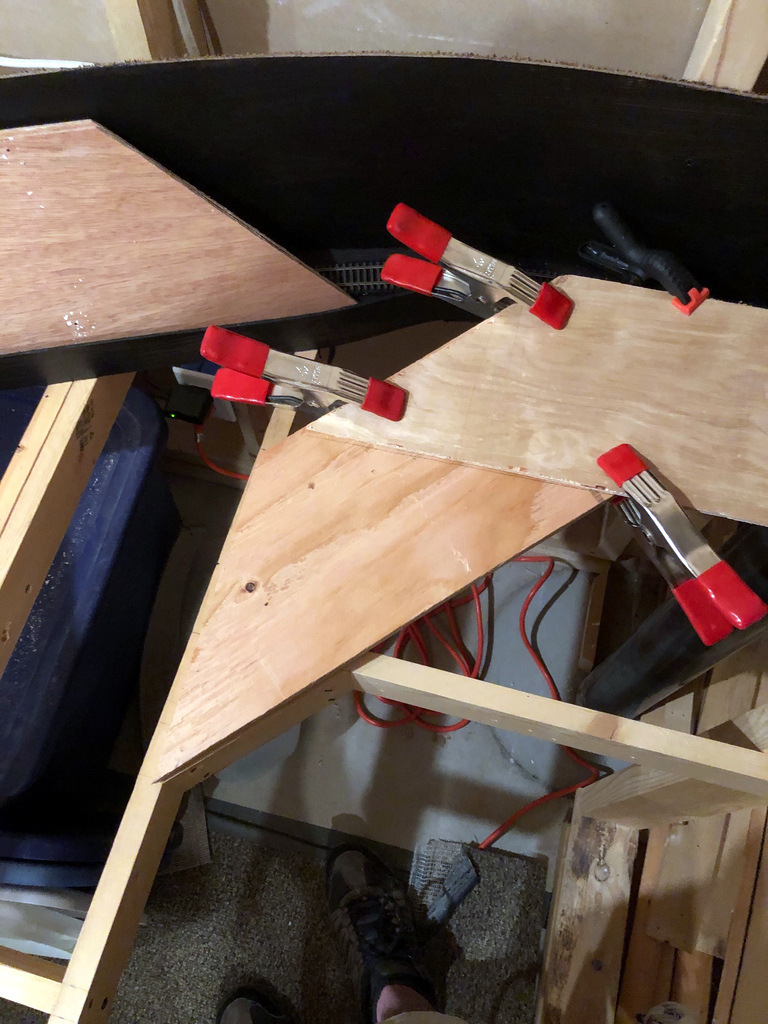
Step 6. Build a layer. Now that you’ve got the pieces cut and the base in place, it’s time to start building! It’s as simple as laying a bottom piece, putting glue on top, laying a top piece half overlapping, gluing a bottom piece and placing it under the previous top piece, adding the next top piece, etc. Every time you add a piece, you’ll want to secure it to the previous piece with wood glue and use a good number of clamps to hold them tightly together until the glue dries. The number of pieces you can put together at once is really a function of the number of clamps you have.
For the first layer, if you’ve left your risers out, you’ll need to go back and add them. I started with the bottom and worked up, bringing each corner and side up to the levels calculated in step 5, leveling across the piece inside to out (i.e., flat for the track from side-to-side), and securing the risers to the benchwork. Once everything’s in place and you’re happy with the fit, place two screws down through the plywood into each riser.
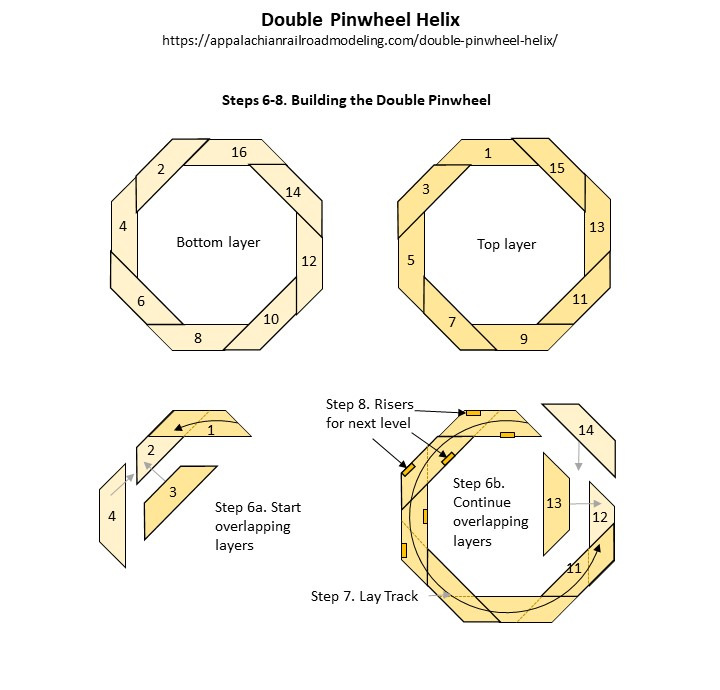 Step 7. Lay track. Once you’ve got the first layer close to complete, you’ll need to mark the track location and lay track. I marked the spot ~2″ from the edges on all 8 sides and used a plywood 24″ radius template to draw in the curve. Then it’s a simple matter of laying flex track. Because it’s all on a curve, I solder all the joints with the track straight, then curve it and nail it in place. Don’t forget to run electrical feeders–I use two sets of feeders per level about 180 degrees apart, and because I solder them at the joints, just about every section is directly connected to a feeder.
Step 8. Place more risers. The next level of risers is cake compared to the first. All you need to do is cut 16 identical pieces. For height, you’ll want the climb of each turn (4.5″ for me) minus the thickness of both layers of plywood (just over 3.75″ for mine). Place them at each outside corner and inside center. If you laid a good foundation, your risers should be mostly on top of your foundational risers so all the weight goes through the riser and not the plywood. I simply glue them in place and let them dry.
Step 9. Keep going. Once the risers are dry, you can repeat steps 6, 7 and 8 until the helix is complete. Of note, I stagger my risers slightly between levels so at least one screw going into the lower riser is visible, that way if I have to disassemble it, I can remove at least one of the screws and twist the riser off the second (better than breaking it off two screws). If you find your subsequent layers aren’t going exactly on top of the previous layers or your space isn’t exactly what you thought, you can fudge the placement of the pieces to adjust without cutting them by changing where the boards come together, either slightly closer to center to make the helix narrower or slightly outward to make the helix larger–it’s extremely flexible and forgiving!
That’s really it. After everything sets up, you’ve essentially created a solid spiral of plywood to elevate your trains. Because the weight’s on the risers, the weaker areas where there are joints in the plywood are still plenty strong. Remember in railroad engineering a short bridge can use much smaller girders to support a train than a longer bridge–here we’re talking about a 1/4″ plywood bridge covering a 1/16″ gap. . . no problem!
Conclusions. I first used this method on my previous layout, and I’ve stuck with it for my current layout. Its design hasn’t exactly made helix building fun, but it sure has made it a lot easier, and the end result is a rock-solid train elevator that’s reliable and efficient in its use of space and materials. If you’re looking for a design for your next helix, I highly recommend you give the Double Pinwheel a try!
-
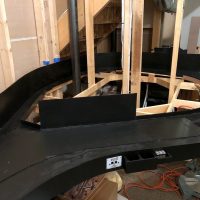
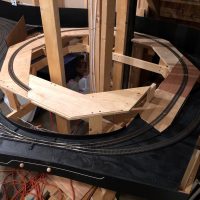
- This is the base for the helix area on my layout. This one is challenging because I have to build it around a floating wall and metal support column.
-
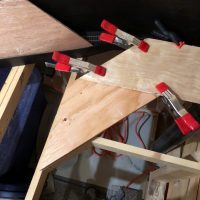
- Gluing the first two pieces of the Double Pinwheel Helix together
-
- Bottom layer of the Double Pinwheel Helix with risers installed
-
- Track must be laid on each level before moving on to the next
-
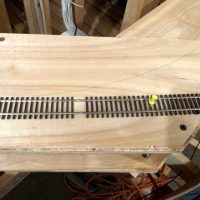
- When connecting flextrack joints on a curve, I like to solder the joints while the track is straight and then bend
-
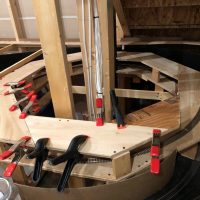
- Lots of clamps is the key to making the lamination and gluing process effective and strong
-
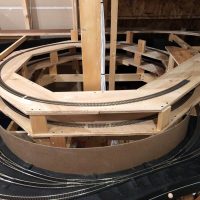
- The helix is nearly finished with 2 of its 2.5 turns complete
Pingback: Double Pinwheel Helix – St Charles Branch
Extremely helpful and excellent presentation!
Thanks, Dan. I’ve posted the link to this article on the model railroading forums. I think many modelers will find it helpful and practical.
Thanks, Paul!
How do you smooth the grade of you are lapping the plywood trapezoids 1/2 over each other? Don’t you have a7/16 bump where each new piece is placed?
Peter, there are two layers—-the bottom layer pieces are one uniform thickness and the top layer pieces are another uniform thickness. Pieces within each layer overlap pieces from the other layer but only butt up against other pieces within their layer making the surface a uniform thickness. Let me know if this is still unclear.
Magnificent! Thank you for sharing tour calculations. Erik, BE, Ghent.
I previously built a “standard” helix, which was not a fun activity. I am in the process of using your double-pinwheel design and it is so fast and easy I can’t believe it. I am actually considering tearing down my recently completed Helix and replacing it with this version!
Thanks for this!
I’m very glad you’re finding this method useful! Helixes are never fun to build, but I find straight cuts are a lot more fun than curved ones.
Wow, this technique is really clever. Well done. I just sketched out my helix yesterday, and I’ll be revising it.
Hi Dan, thanks for an informative and simple approach to taming the Helix Beast. I’m in the process of building a similar version in N Scale. Max radius 24″ min is 18″ three tracks climbing 10 rings of 48″ radius with exits on ring 2 and 3. Using your method, I’ve jumped in fearlessly with pleasing results so far. Thanks again.
I forgot to mention that I’m using 6mm threaded rods x16 with nuts and washers instead of the cut risers, and my grades average is 1.9 percent. I will let you know how it turns out. Cheers