


- Size: 15′ x 20′
- Scale: N
- Minimum Mainline Radius: 20″
- Minimum Aisle Width: 30″
- Designed by Dan Bourque
 The Shenango/Greenville area of the B&LE was unique in that it was a major hub of a railroad and yet not on the mainline. In 1902, the K-O cutoff from Kremis (south of Shenango) to Osgood (north of Greenville) was completed which greatly improved the grades and curvature by keeping the main out of the Shenango River Valley. However, the old line remained important because it hosted three interchanges and was home to the B&LE’s major engine and car shops. Shenango Yard was the site of the interchanges with the PRR/PC and the Erie/EL and later Conrail and NS. The P&LE also interchanged at Shenango via trackage rights during the Conrail era. North of Greenville was an interchange with the NYC/PC at Osgood. Greenville was a major crew base for B&LE crews and home of the dispatching office.
The Layout
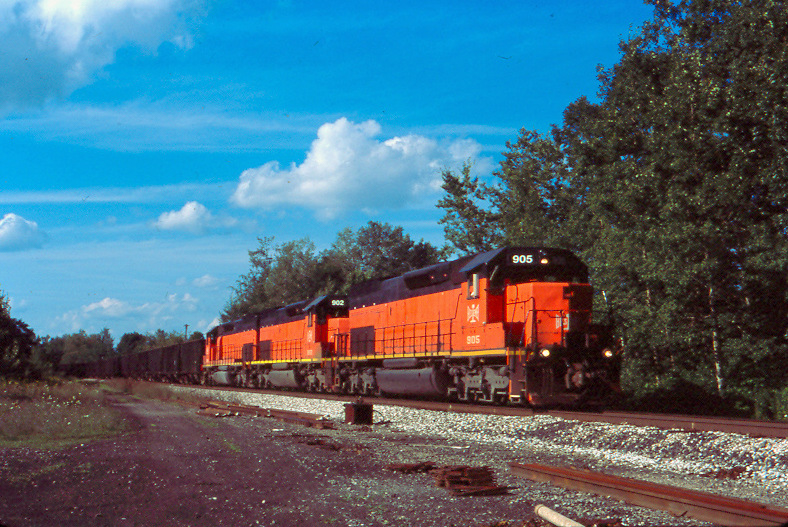
B&LE SD40T-3 at Osgood, PA, 2010 -Randy Faris
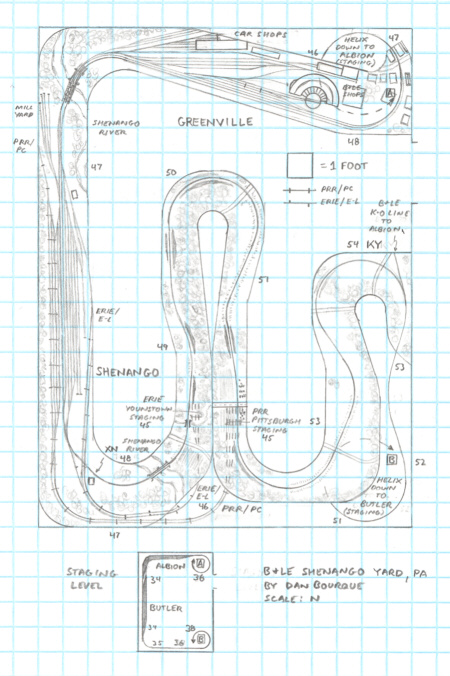
This layout is designed to capture the three major elements of the old line through Shenango: Greenville shops and engine facilities, Shenango Yard and its interchanges, and the 1.3% helper grade south of Shenango. It was designed in N scale to minimize the compression required and to allow effective modeling of the large shop complex at Greenville (though the transfer table and car shops are still mostly “behind the backdrop”). The plan was built using track charts (unknown date), topos and photos, so most track arrangements are fairly accurate, though not all yard tracks are represented.
From the north, the layout begins in the town of Greenville. The B&LE ran between two buildings with narrow clearances and across Main Street–these buildings are used to disguise the transition out of the backdrop. The large engine terminal in Greenville, including the 180-degree roundhouse, is well represented as it is a major source of train movement on this line–crews often take light engine movements either north or south to pick up trains left on the K-O main. The B&LE’s Greenville Car Shops (not to be confused with the nearby Greenville Steel Car Company on the Erie-Lackwanna) are represented in a compressed fasion, but there are enough tracks to make for interesting switching and display of cars. The B&LE crosses the Shenango River via a pair of through truss bridges which are represented near scale. Shenango Yard is modeled about 2/3 size in terms of tracks and length, but both interchange partners (PRR and Erie) are linked to multi-track staging yards. A key track feature of Shenango is the diamonds at XN Tower where the B&LE crossed two tracks of the Erie. South of the diamonds, the B&LE again crosses the Shenango River and begins to climb out of the river valley on the 4-mile long, 1.3% grade of Shenango Hill. I used topos and Google Earth to place cuts, fills and road crossings, and even the orientations of the curves are fairly close. The last scene on the visible portion of the layout is the junction with the new K-O main at KY. From there, trees and an S-curve hide the transition into the backdrop.
Staging is used to represent the B&LE’s mainline–I chose the next major yards to the north and south, Albion and Butler, respectively, for names. Short helixes are used to transition down to the staging level, and a connection between the staging yards makes the entire layout a continuous running loop. Smaller staging yards for the PRR and Erie are just under the B&LE on the main peninsula–bringing them to the front of the benchwork and cutting holes in the fascia would keep them accessible. Aisles are generous, especially near Greenville and Shenango where multiple crews might be working simultaneously. Walk-around control is a must, and DCC with radio throttles is recommended to keep B&LE head-end and helper, PRR/PC and Erie/E-L crews from getting tangled.
Operations
For not being a mainline, operations in this area were fairly busy and complex. I won’t pretend to be an expert on all the movements, but many are straightforward. Traffic on the old line through Shenango still followed the coal north, ore south pattern of the B&LE mainline, but the sources of the traffic are primarily interchange. Because Shenango sat at the bottom of the river valley, grades in both directions required helpers for loaded trains. These movements would keep a handful of operators busy for a few hours. The following operators would be needed: PRR/Erie interchange crew, Shenango Yardmaster, Greenville Hostler, 2-3 road crews and a dispatcher.
The interchange traffic from the PRR and Erie lines could keep one operator busy for an entire session moving trains full of loaded coal hoppers and a few other cars up from staging to be left in Shenango and departing back to staging with strings of empty hoppers and an assortment of other cars. The PRR/PC crews would use the PRR’s interchange tracks along the backdrop of Shenango yard. The Erie/E-L crews would normally use the Erie’s small yards flanking its mainline both east and west of the diamonds for interchange, but on this layout, the Erie would use the connection track to bring cars into the B&LE’s Shenango Yard. The Shenango Yardmaster, also acting as the Yard Crew, would control movements into and out of the yard and use an SD7 as its switcher to block less-than-train cuts of interchange traffic and local cars from Greenville into north and south bound trains. The switcher would also work the car shops at Greenville, bringing in cars to be shopped and extracting and blocking cars ready to be returned to service on the B&LE or any of the connecting railroads.
The Greenville Hostler would be responsible for setting up and breaking down consists in the B&LE’s busiest engine terminal. Three types of consists would be needed for this layout: head-end power for interchange trains, pushers for both north and south bound trains, and light consists for mainline trains. Head-end and light consists would be 3-units while pushers would be 2. The hostler would hand these consists off to the road crews based on the dispatcher’s needs.
To handle each train of interchange traffic, two road crews would be needed: the head-end crew and a pusher crew. These crews would pick up their engines in Greenville and proceed south across the bridge to Shenango. Coal trains would move primarily north, ore trains south. Because of the short trip, pushers (at least southbound pushers) would couple up behind the caboose for the push. Coal trains and northbound traffic would move back through Greenville before taking the helix down to staging. Ore trains and southbound traffic would have to negotiate Shenango Hill. Once the train clears KY, the head-end operator takes the train down to staging while the pusher crew returns light to Greenville. This set of movements is only limited by the number of PRR and Erie staging tracks, though extra traffic could be visibly staged in Shenango Yard.
The last type of road crew movements would be the many light movements (engines and a cab) between Greenville and the K-O mainline. Because many of the mainline crews were based in Greenville, train crews nearing the end of their day would leave their trains on one of the two main tracks near either KO (north) or KY (south), grab their cab and return light to Greenville where the next crew would run the process in reverse to get to their trains. This is where the continuous running loop connection between staging yards could provide an infinite number of trains. One crew would run light from Greenville to staging to simulate a train crew starting its day. The next crew could pick up the same light consist in staging and run it in to Greenville from the opposite direction (to avoid having to run around the cab) to simulate a crew ending its day.
There are many potential variations. For one, the car shops at Greenville can be used to add or subtract switching moves and to vary the types of cars seen in an ops session. New cars from the unmodeled Greenville Steel Car Company could be spotted in Shenango Yard for movement on the B&LE or PRR/PC. Of course, the occasional visit by a B&LE F unit for servicing would break up the steady stream of 6-axles. While I haven’t confirmed it, it appears that the dispatcher would sometimes use the old line for B&LE through trains when the K-O was either too busy or undergoing work–this could make for a very busy session, especially if most trains would require pushers.
Things I Like About this Plan:
- Very reasonable compression
- Smaller scope but well modeled
- Helper district in both directions
- Ability to run PRR, PC, Erie, E-L, Conrail and P&LE trains
- Generous curves and aisles
- Excuse to model almost the entire B&LE locomotive fleet
- Car shops and Greenville Steel Car Co add variety
- Continuous running option
Things I Don’t Like About this Plan:
- Coal moves north where helper district is not modeled
- PRR/Erie staging difficult to access
- Not on mainline – limits number of trains (can be good and bad)
Related Products: